Saturday, December 29, 2012

Preparing For Bigger Things: More Interior Sheet Metal Prep

As the 2012 thankfully comes to its controversial end, I find it’s been a month since my last update.  And while it seems I have made little progress, I have managed to move forward, albeit with little outward proof of the fact.  The reality is that I am in a phase that is boring, tedious and generally lacking in most of the “fun” associated with the hobby.  Since I last checked it, I have been consumed with preparing the rear interior and trunk area for an upcoming coating of SEM Rust Shield (gunna try something new!) and then the trusty PPG DP40 primer.  Following that, the entire interior will get a finish coat of PPG matte black urethane.  But as simple as that all sounds, I have a lot of work to do before any coatings can be applied and that is the phase I’m in.

The latest concentration has been treating the light surface rust in all the critical areas in any way I could approach.  At first, I ventured to use my trusty chelation process, but quickly found that I had reached a practical limit in its application in consideration of the limits of my space and the difficulties in the recovery of the chelant in such complex structures as those in the rear of a Mustang.  As such, I resorted to the old tried and true wire brush and elbow grease method for the majority of the job.  Of particular interest was cleaning up and prepping the areas surrounding the door openings and the roof drip rails.
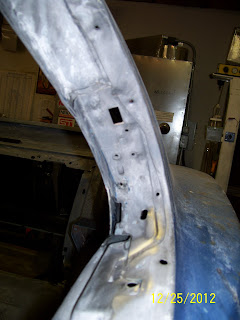
As I have mentioned in several posts in the past, I have learned that it is critical to remove every bit of factory seam sealer that can be removed in the process of a proper restoration.  This is especially true of the roof drip rails and window surrounds on any classic Mustang.  In keeping with that, I again turned to acetone to soften the compound and using scrapers and wire brushes of various configurations to remove it from all of the door opening surfaces.  Next, I dove into the task of cleaning up the inner door openings, rocker sills and B-pillar posts.  For the most part, the bulk of this work involved removing the original paint and primer and then treating the slightly rusted spots with phosphoric acid-based “prep & etch” solution to remove it and protect the bare metal until it was time to apply primer.  B-O-R-I-N-G and time-intensive work, but the results were very good and I managed to fit all of it in in spite of the requisite Christmas preparations and associated activities that demand as much time as any resto work ever did!

So, with the door openings in good shape, I decided to tackle a few repairs/modifications on the rear bodywork.  One was by necessity and the other by choice.  Of priority was the need to repair to cracks about 1¼” long that radiated from the top corners of the trunk lid opening out into the quarter panels.  This is a common crack area in Mustangs, especially in car that have been extensively drag raced without added structural reinforcement like a roll cage or subframe connectors.
These repairs are pretty simple in concept, but a bit tricky in that they often traverse many body character lines and welding them up takes a pretty fine tune on the welder to ensure minimal distortion and weld bead size.

The first order of business is to stop the crack’s propagation by drilling a small hole just beyond its end.  In my case, I used a sharp 1/8” bit for the job and this did the job perfectly.
Next, I tack the inboard origin of the crack to lock down that end and to keep the panels as stable as possible.  At this point, the crack is isolated on both ends and can now be repaired.  Using my trust Dremel tool, I used a thin cutoff blade and carefully cut directly along the crack to provide a gap that would allow full weld penetration without buckling.  This gap only needs to be about .030-.050” wide max when using .023” MIG wire and can be as tight as .015-.020” with TIG.

With the prep work complete, the crack was welded up using a step-stitch method with the MIG set at a slightly hotter range than recommended to allow a quick burst of weld that would lay flat and fill well.  After each stitch, I would cool the area with a blast of air and repeat the process until the gap was fully welded.  This technique is a little different than welding in patch panels as it is of much shorter duration and is essentially stacking a series of small spot welds in a row until a complete bead is formed.  The truth is, I often resort to this method when installing patches as it helps keep weld distortion to a minimum, at the expense of considerable increase in repair time.  But HEY, this is a hobby right?  What’s a little extra time?????
With the cracks fully welded up, a few minutes with the sanding disc in the angle grinder was all that was required to get the surface back to smooth with no evidence the cracks were ever there.  Now, not being one to leave well enough alone, I took the opportunity to do one more small tweak to the body that I have been planning since day one.  The fact that it fires yet another shot across the bow of the purist elite makes it all the more enjoyable.

Since I was working in the “neighborhood”, I took the opportunity to fully weld up the seams between the upper trunk panel and the quarters.  As long as I can remember, my eye has been drawn to this area of 69 and 70 Mustangs as one that always seemed unfinished at worst and inconsistent at best.  In fact, I am not sure I have ever seen these seams look the same way twice and it peeves me to no end.  Well not on MY car it won’t!  So, after a quick wave of the magic smoke-wand, they are no more!
And that is pretty much a wrap for now.  I apologize it wasn’t a bit more of an adventure, but those days are coming soon.  But for now, the tedium will continue for a while longer.  Until next time!
I was very luck that the B-posts in my car were in great shape.  After stripping the seam sealer away and scrubbing the old paint and primer off, the bare metal was treated with phosphoric prep & etch.

The driver side rocker sill was pretty nasty, especially along the "wire groove" just underneath where the aluminum sill plates attach.  But once the munge was removed, the metal was found to be extremely solid and in fine shape. 

As fortune would have it, the passenger side rocker sill was also in excellent shape after clean-up and etching.

Although a crap picture, the quarter glass surrounds cleaned up well and are completely solid.

The underside of the roof drip rails required quite a bit of work to remove the seam sealer and surface rust.  However, the end result was good clean metal around both the driver and passenger side openings.  Bonus!

While I failed to document the "before" shots of the trunk-to-quarter cracking, here you can see the 1/8" "stop hole" I drilled at the outboard end of the crack and the inboard anchor tacks welds at the root of the crack.  Also, I have already cut a thing groove along the crack to allow full weld penetration.  You will also note that I have hinted at my next modification as evidenced by the short string of weld along the gap between the upper trunk closeout and the quarter panel.

As a middle-finger salute to obnoxious "purists" everywhere, I welded the trunk/quarter gaps completely just to watch them point out the "flaw" when the car is complete.  Actually that's bullsh*t.  I absolutely HATE how this area looks on "restored" cars and didn't want mine to look that way (but I still like my original story better).

Though a slight bit of finish work is still left, this shot shows the gaps filled and the crack repaired.

Tuesday, November 27, 2012

A Milestone Reached & Another Chapter on the Horizon

Sometimes, it seems major milestones are marked with small accomplishments.  Such is the case with the most recent few bits of work I have completed.  Specifically, I was able to confidently declare the major damage and rust repairs complete on the car and man does it feel good!

All that remained in the way of welded repairs was a small rust perforation at the right lower corner of the rear window opening and the eight rear louver hinge bracket holes that will no longer be used.  Following that, a small bit of clean-up on the roof drip rails marked the work complete as well as a significant change in the work plan moving forward.
The repair in the window opening was as textbook as it gets.  A combination of a cutoff wheel and pneumatic body saw, coupled with a little file work, was all that was required to prepare the aperture for the welded patch.  From there, simple paper patterns were made to replicate the inner and outer structural patch “coupons” and a few minutes of fab work had the patches duplicated in metal and ready for installation.

Starting with the inner repair, I tacked the patch in place in several locations to allow the outer patch to be fitted before final welding.  Next, the outer patch was punched for plug welds.  Then the patch was clamped, tacked and then fully welded into place.  Final finishing of the welds was accomplished with deft use of the angle grinder and the job was complete……..no drama, no blood, no cussing……just done.
Rounding out this phase of work was a revisit on the roof drip rails.  I had been struggling with effective seam sealer removal procedures in confined areas like roof rails.  Sand blasting is not an effective method of removing old seam sealer, and the roof rails are quite restrictive in terms of tool space to simply scrape the sealer out effectively.  Secondly, old seam sealer is often as hard as rock and doesn’t lend itself to removal with even forceful application of tools.  Obviously, this is quite different from easily accessible sealed areas where many different tools (some even dedicated to the job) can be employed.

I have been experimenting with a few ideas intended to make seam sealer removal easier from restricted areas (like drip rails) and have managed to devise a combination of tools and methods that make this a much more approachable.  The first ally in this battle is acetone.  Acetone works very well in softening old seam sealer and loosening the bond to the metal substrate.  The second tool I use is a version of “mini-scraper” I made using a very long, thin flat-blade screw driver with the end sharpened to a slightly angled cutting face.  This tool has a bit of flexibility to allow it to reach sealer in what are otherwise inaccessible areas.
The process is rather simple.  First, I apply acetone to the sealer with a rechargeable sprayer and allow it to soak a bit.  It helps to scar or prick the surface of the sealer to allow deeper penetration of the acetone into the sealer.  This softens the sealer much more quickly and the removal process is much more efficient.  After a minute or two of “soak time”, it’s simply a matter of scraping layer after layer of sealer away until you get down to the parent material.  This simple process can be used over and over, until the majority of sealer is removed.  As a final step, I use a combination of wire wheels in my drill motor and small picks to remove the last remaining bits of sealer residue with the acetone softening treatment in between each cycle.  While somewhat labor-intensive, the end result was a pair of drip rails that were exceptionally clean and (fortunately) almost rust free.  As I have experienced in the past, old seam sealer is notorious for hiding rust and the removal of it is absolutely critical to a long-lasting repair.  With this method, hidden rust can be exposed and removed/treated such that it is no longer a concern.

The final project in this batch was simply welding up the eight drilled holes that were left over from the long dispatched louver hinges.  I welded these up is short bursts from the MIG gun and then quenched the hot spots to reduce warpage.  The real key trick in getting this to work well is the use of a copper backing plate on the back side of each hole.  The copper acts as a casting surface to let the weld flow and form in the hole while molten.  The copper dissipates heat so quickly that it doesn’t melt into the puddle.  Secondly, the copper acts as a gas dam, preventing the shielding gas from simply flowing through the hole and out the back rather than remaining around the weld puddle where it belongs.  In fact, this method is so effective, I had all eight holes welded up and dressed down in under an hour.
Well, there it is.  The major repairs on the “tub” are complete and I now have a solid car that I can confidently move forward into more “cosmetic” work without concern for the foundation.  Two years of constant work has led to this point and it is interesting and exciting to begin thinking and planning the next phases of the build.  The immediate plan is one more round of chelation to remove the rather minor surface rust on the interior panels that were primarily bare metal from the factory.  Then priming, sealing and painting the interior in preparation for the move to the finish work on the underside of the chassis.

In this shot, I have already removed the inner and outer rust damaged areas of the right lower corner of the rear window opening.  This is the last rust damaged area that requires welded repair!

Here is another view showing the outer window flange repair area already cut out.  With these edges dressed, I was able to make simple paper templates for each repair "coupon" and fit them perfectly before welding.

Looking down on the repair, you can see the curvature that will be required in the inner repair and the simple flat repair required on the outer flange (on the left).

With little ceremony, the repair is tacked into place on both sides and then welded into place.  This is the outer flange after finish grinding.

Here is the inner window flange repair complete.
 
Fore removing seam sealer from drip rails, I needed to devise a flexible, thing scraper.  This slender old screwdriver was just the ticket!

I carefully ground the tip into a sharp, beveled chisel point to allow easy scraping without bending or dulling the tip.  Works great!

Here is another priceless tool in the restoration shop!  Sure Shot rechargeable sprayers are worth their weight in gold!  I fill this sprayer with acetone and pray old seam sealer with a generous mist to soften the sealer for easier removal.

After about 30-45 minutes of softening with acetone and scraping (repeated as necessary), the drip rails were surprisingly clean.  You can just see slight evidence of hidden rust that can now be effectively removed before priming.

Here is a look down the A-pillar drip rail after the sealer has been scraped away.  The lead joint filler is clearly visible in the middle of the frame.

After a few minutes work with a wire wheel in my drill motor, the drip rails are ready for chelation to remove the slight traces of rust found underneath the old seam sealer.
 
To weld up the louver hinge bolt holes, I back each hole up with this copper plate.  This acts as a dam, keeping the weld puddle in contact with the repair surface and prevents the shielding gas from blowing through the hole and past the weld area.
 
With the copper backer, you can rather easily weld up holes in thin sheet metal like this.  A very thin skim of filler will be all that is required to complete this repair.


Thursday, November 8, 2012

Left Rear Wheel Opening Repair

As luck (and mercy) would have it, I had election day 2012 off at the expense of a vacation day (whether I liked it or not).  I had been noodling the steps required to repair the left rear rocker panel and wheel opening most of the previous week and I felt pretty confident I had it worked out.  So naturally, with a little time on my hands, no adult supervision, and a full day to invest, I was all too happy to spend it in the shop tackling the last “large” repair I had left on the car (whoopee!).  But first, a little background:
As many followers on this blog will recognize, the damage on this car when I bought it was rather extensive.  In the case of the left rocker panel, the rear edge had been mashed severely by what looked to be a parking block or something that became wedged between the front of the left rear tire and back of the rocker.  Apparently, this damage was left unaddressed for quite a while as the mud that was trapped under the folded rocker end was responsible for ensuring the complete rust-through of the inner wheel tub behind it.  Nice.
I left this particular repair until later in the process as it is fairly involved, structurally speaking, and any goof on the rocker could mean a much more extensive repair if I wasn’t very careful.  The first thing I decided to do was invest in a full rocker panel assembly as opposed to the skins that are commonly available.  This got me the best available material and stamping quality available (more on this later), albeit at considerable cost.  Fortunately, I already had the remains of the outer wheel tub and fender opening repair panel skins I used to repair the rear corner of the wheel opening, so those investments were going to pay off twice for a change.
I began the repair by carefully assessing the damaged area and marking the repair area with my trust pain marker as an initial guideline.  In this repair, the order of repairs was going to be critical, so I needed to be especially careful to only remove material on each surface where it needed to be repaired and no more.  Then it would be equally critical to rebuild the corner in a specific order to ensure everything could be fully welded and that each section would fit with the others as perfectly as possible.
Once I was confident I had identified the full extent of each repair area, I truncated my trim lines and started making patches for each section, starting with the rear rocker cap, then the upper fender apron, and finally the inner wheel tub.
As in similar repairs before, I created the individual patches and after careful trimming, used them as patterns to allow the parent metal to be precisely trimmed to match the repair patches.  Then, with careful application of the screaming-wheel-of-death (a.k.a., cutoff wheel), the damaged material was removed from the rear rocker cap, fender apron and wheel tub and the edges fitted to the new patch material.
The patch installation began by welding in and metal finishing the inner wheel tub patch.  This effectively established a framework on which to align and anchor the apron and rocker cap patches as the repairs moved forward.  Next, the small apron patch was carefully positioned and tacked into place to establish position and solidify the joint line between the upper fender apron and rocker.  Then, attention was shifted to the rocker end cap and this is where the real challenges began.
When I first started fitting the repair patch, I measured the contour of the original rocker on both sides and confirmed they were identical in profile.  However, when I transferred this shape to the new rocker using my contour gage, it became obvious I would have a lot of metal forming work ahead of me to get the patch panel to match the contour of the original rocker.  In fact, I would need to completely re-contour the profile of the panel to get this fit I wanted (seems to be the trend throughout this whole project!).
The first order of business was to “un-bend” the character lines on the lower part of the patch to allow the curvature of the part to be hand formed to match the original profile.  I decided to use the panel seam as the guide surface and secured the rocker end cap patch at this edge first.  This would allow me to carefully form the patch and anchor it with small tack welds along the seam as I got each small section fitting perfectly.  Using this same technique and measuring and validating the contour at every step, I walked up the weld seam with tack welds until the entire patch was correctly fitted and the contours matched the original panel exactly.  At this point, both the apron patch and the rocker end cap were tacked into place and I could begin welding them completely.
Final welding of the rocker and apron patches began at the lower edge of the rocker cap and finishing at the apron patch seams.  In usual fashion, I skipped around with small stitches and cooling each with a strong jet of air to minimize warpage until the entire repair was fully welded.  As a final step, each weld was carefully ground and metal finished until the repair was finally complete.  A very thin skim of filler will be all that is required to make this repair equally invisible relative to the repair on the right side of the car I documented last week.
At this point, I have only one small rust repair that remains before the car will FINALLY be solid and no further rust repairs will be required.  Not sure what I’m gonna do with myself!

Even after prying the damaged rocker end cap out as far as I could, you can see the extent of the damage was considerable.  The rust behind this mess was even worse!

The first patch I roughed out was the apron patch.  I cut this from the remains of the fender arch repair panel I used to fix the rear wheel opening earlier in the project.

To make the rocker patch more manageable, I cut the entire end of the replacement rocker assembly off well beyond the area I would eventually use.  The white paint mark is my rough cut line.

The white and yellow paint lines identify the maximum repair area.  I worked well within these lines to begin removing the damaged areas to better prepare for the repairs.  Here you can see that rust has completely destroyed the inner wheel tub lip.

With the rust-damaged inner wheel tub lip cut away, I was able to better assess the extent of the required repair areas.
 
Based on the final damage assessment, I was able to reduce the size of the apron patch quite a bit as shown by the white paint lines.
 
Using my trusty contour gage, I established the correct rocker contour for reference against the new part.  My "calibrated eye" kept telling me the shape was not correct on the new panel and.........

......BOY WAS I RIGHT!  As can be clearly seen in this shot, there was no way the new rocker would work with this huge disparity in contour.  Needless to say, it was obvious a significant amount of metal forming would be required to get this corrected.

 
Using the apron patch panel as a pattern, I was able to trim the repair area to fit the new patch exactly.  The white paint lines show where I had originally estimated the repair area to be.  Less is definitely more in this game.

The black lines also show how much I was able to reduce the repair area on the inner wheel tub.  Also note the three spot welds that had to be drilled out to allow the old material to be removed.

Once again, by using the wheel tub repair patch as a pattern, I cut the offending damaged metal away.

New wheel tub patch is fitted and clamped into place with panel clamps and small locking pliers.  Looks good!  At this point, I tacked the patch into place to ensure position and fit and followed up by welding the patch in completely.

Next, the apron patch was tacked into place.  No welding yet!

Here, you can see I have rolled out the contour features of the rocker end cap and will start carefully forming the panel to fit the original contour perfectly.  Tricky......but worth the effort.

Here is the rocker end cap patch tacked into place and ready for weld.  At this point, the contour is nearly perfect.

Starting with the apron patch and finishing with the rocker end cap, the entire repair patch areas were fully welded.

And there it is.  The entire repair is complete.  All welds were ground smooth and all metal finishing is complete.

This shot give a good idea on how nicely the lower character line matches the original rocker.  I can work with this!


Thursday, November 1, 2012

Right Rear Wheel Opening Repair

As the weather continues to deteriorate here in Michigan, and I am desperate to avoid listening to political bull$h*t through every conceivable communication medium on the planet, I have had plenty of motivation to keep myself occupied in the shop as much as I can.

The latest bit of progress was to fix the front corner of the passenger side rear wheel opening where I discovered a small patch of rust that I had not seen before.  This spot was a bit of a heartbreaker as the outside skin only showed a very tiny pinhole of rust, whereas the back side was rusted through and hidden by a generous dollop of seam sealer that worked to trap moisture in this one area over the decades.  Once I got the sealer removed, this discovery let a bit of the air out of my sails knowing I’d have to cut deeper into the old girl than I had hoped.  But…….she deserves the rehab, so off I went!
The first order of business was to mark the general area that I would need to remove so I could fabricate the necessary patch and then use the finished patch itself as the pattern to make my final cuts.  I first cut out the damaged area well inside my marks to leave plenty of material to work with when the final fitting of the patch was at hand.  After the outer skin was removed, the full extent of the damage could be easily seen and assessed.  Then I made a pattern and fabricated the rather simple patch and then traced it on the parent metal to allow me to very precisely fit the rough opening to the new patch.

Once the patch was ready to go, I then carefully removed the damaged inner structure and then cut out the necessary patch from a leftover outer wheel house patch panel I had on hand.  This was a rather simple proposition that allowed the inner patch to be welded into place quite cleanly and the welds dressed down before the outer patch was to go into place for the last time.  I should mention that I tried to keep the gaps quite tight between the patches and parent metal to ensure good penetration without blowing holes through the whole works.
I finished the job by carefully clamping the outer patch into place and tacking it into place at several points around the patch to ensure good retention and to allow many heat paths to soak up the weld heat and dissipate it more easily without warping the panel.  Then I slowly and carefully stitched the patch into place and ground all of the welds down smooth.  The end result is a nice clean patch that will require only a thin skim of filler to become completely invisible.

Next stop will be to repair similar damage on the driver side rear wheel opening.  Because this will involve repair of the rocker panel as well, the complexities of the repair will be considerable in comparison to this one.  But I think I might have it covered!
The white paint lines show the max extent I intended to remove and the patch I began fabricating.

I start cutting out the repair area well within the paint lines to allow me to use the patch as a precise trim pattern.  As you can see, the damage behind the skin was rather severe, but fortunately pretty localized.

Here is the new patch fit and the parent metal trimmed to keep the gaps tight for good weld penetration without blowing through.  Once the fit was exactly as I wanted, I marked the patch for position and set it aside.

With the outer patch fitted, I could concentrate on fixing the more damaged inner wheel house section.  With careful measuring and some work with the air saw and cutoff wheel, the offending area was cut away and a patch was fitted and welded in place.

Finally, the fitted outer patch panel was welded into place and metal finished.  A very light skim of filler will have this area completely undetectable in finished form.

Saturday, October 20, 2012

Axle Tunnel Filling & Prime

I enjoy momentum on projects.  Once I get into a groove and things start clicking off according to plan, I really like the feeling.  Perhaps it’s the confirmation that comes from planning the work and working the plan when the results are exactly as intended.  Either way, I love the feeling of accomplishment, and lately that’s been a frequent thing.

On the heels of completing the rear wheel tubs, I moved directly to smoothing up and finishing the axle tunnel in hopes I could get it in primer.  As luck would have it, things lines up pretty nicely and I was off too it last weekend with a vengeance.
Early this past spring I was able to repair the rust damaged front trunk floor as well as weld in a patch to fill the hole that was once occupied by the rear staggered shock mount.  Once the metal work was complete, I moved on to repair the rear trunk floors and tail light panel with the intent of coming back to the axle tunnel to finish the area and prime everything at one time.  Well, the time was right to do just that.

During my last sand blasting episode, I was able to get the axle tunnel and trunk floor repair areas well prepped for the coming finish work.  The rear subframes cleaned up very nicely following all of the welding for trunk floors and suspension brackets, and the new rear rotisserie mounts allowed excellent access to the areas around the original leaf spring bushing holes as well.  At the same time, I made sure to hit the weld seams on the axle tunnel repairs to make absolutely sure they would be cleaned of any nasties that might have been living there over the spring and summer.
After what seemed like days vacuuming sand from every conceivable nook and cranny of the car just to keep my shop floor from looking like a beach, I went over the entire axle tunnel with a 60-grit disc to clean it up and give the surface good “tooth” for the All-Metal filler and the Rage finish filler I would use to tidy the area up.

I started my filler work with All-Metal applied generously over and into each weld seam area and rather widely applied filler to each side of the repair.  I like All-Metal for its strength and similarity to lead body solder when working it.  It’s a much more “structural” filler than Rage  and I like it as a base along areas where patches have been welded in but the down side is it’s a bit of a b*tch to sand.
Once the All-Metal base fill was cured for a few days, I drew it down with some 80-grit on my D/A sander and finished the surface with the same paper on several hand blocks.  This gets the contour pretty well established and makes for a very good base for the following coats of Rage filler to get the final contour perfected and finished.

I tend to go kind of heavy on my first coat of Rage to make sure I have plenty to grate off with my cheese grater files.  It makes for a bit more dust on the ground, but I can get the low spots filled pretty quickly that way and not have to come back as many times to get the areas filled.
After an overnight cure, I sanded the first coat of Rage by hand (no DA required or desired) using some of my longer sanding blocks and some 180 grit paper to ensure the surface wouldn’t get lumpy and bumpy.  This would have been a very tedious job if not for the excellent sanding characteristics of the Rage filler.  Awesome stuff.

The third (and final) coat of filler was applied in a thinner and less extensive layer and I tried to keep it as smooth as possible to reduce the amount of sanding required and to keep from messing up the contours I had worked to achieve.  After a few minutes, I grated the surface down and left it to cure overnight.  Then, as before, I started at it by hand with long sanding blocks and 180 paper until I had the surface ready for primer.
With the filling complete, I added the grommet hole needed for the fuel sender wire to pass into the trunk and sanded the remaining surfaces on the bottom of the trunk floor to prep them for primer.  Then, after tacking off the surfaces and swabbing everything with wax and grease removed a few times, I masked the areas I wasn’t ready to prime and tacked everything once more time.

I was pretty excited to try a new spray gun upgrade I added to my gravity feed HVLP gun.  I upgraded to the 3M PPS cup system which makes spraying consistency, paint utilization and clean-up a TON easier.  The biggest plus I find with the 3M system is that I can now paint with the gun in any position (even upside down!) and never miss a beat.  When clean-up time comes around, you pop the liner and cap out of the cup and toss it in the trash.  Then a little wash of the gun head with reducer and you are pretty much ready to go again.  The cost savings in reducer alone will pay for this system very quickly even though the liners and caps are kind of pricey for what they are.  At this point, it doesn’t matter to me one bit as I LOVE this system and will be purchasing the small and medium sized cups for the future as well.
With my new painting weapon in hand and a fresh mix of PPG DP40LF primer in the cup, I laid down two medium wet coats of primer on the entire axle tunnel and bottom trunk floor with about a 20-minute flash time between coats.  Then, I cleaned up what little mess there was, removed the masking very carefully and then shut off the lights and left the primer to cure overnight undisturbed.  The next day I was thrilled with how everything looked and it was quite inspiring to see the entire bottom of the car in one color and looking mighty solid. 

Next on the agenda is to make the small repairs at the front of each rear wheel opening, and a tiny repair to the right rear lower window opening flange, which will mark the completion of all of the rust repairs required on the car!  Whooooohoooo!  Any rust left to address is simple surface rust on the interior surfaces of the body bracing where no factory primer was ever applied.  This will be an interesting application for my trusted chelation rust removal techniques and should work very well.  More to come!
Passenger side rear subframe cleaned up nicely after sand blasting.

Driver side subframe was also in good shape after sand blasting.

I am very happy with the decision to make the new rotisserie mounts that use the rear leaf spring shackle bushing locations as mounts.  This allowed me to blast the entire area surrounding these mounts without a problem.  Should make priming and painting far easier as well.

Here you can see the joint line that I blasted nice and clean before going forward with filling.  I am very happy with how this repair turned out, especially given the amount of rework that was required to get the trunk floor patch panel to even come close to fitting!

After a good going-over with my 2" angle grinder and some 60-grit discs, the axle tunnel was ready for the base coat of All Metal filler.

All Metal filler is awesome stuff indeed.  It is very tough (and therefore tough to sand) but is has excellent mechanical properties and behaves much like lead body solder when finishing.  I love this as a base filler where patch panel repairs are made.

I sanded the All Metal filler with my D/A sander with 80 grit paper to give the next layer(s) of filler good "tooth" to adhere to.

Here is a look at the first coat of Rage filler after it has been knocked down while soft with a cheese grater file.

After hand sanding with long sanding blocks, the first coat of filler is ready to be tacked off and a second coat applied.

The second coat of Rage filler is less extensive and far thinner than the first.  Here, it has been grated down and will be left to fully cure.

And there it is.  Though the different colors of filler make this area look rather lumpy, the actual surface is quite smooth.

One detail I had to add before primer is the grommet hole required for the fuel sending unit wire to pass through into the trunk.

With everything cleaned and tacked off, I masked off the trunk area I didn't want primed yet and started mixing up the DP40LF primer.

The first medium-wet coat of primer is on and after a 20 minute flash time, the second can be applied.

The second medium-wet coat of primer is on and looking great!

Here's a look down the driver side rear subframe rail.  Soooo much nicer than where we started!

A look at the passenger side rear subframe and trunk floor.  Nice!