Monday, December 16, 2013

Final Firewall Hole Filling

Over a month between updates is a rather shameful state, but like most of 2013 it seems, the month of November was less than kind or accommodating to the Night Mission project and yours truly.

Beginning with a significant setback on getting customer powder coating work out the door at the quality level I maintain, I spent a few week getting caught up before allowing myself the opportunity to dive back into the Boss.  In the middle of all this, I took ill for a rather extended period of time (which I NEVER do) and the end result was a rather extended recovery that I did not quite expect.  Before I knew it, it was December and I finally realized that the entire month of November had escaped me with absolutely nothing to show for it.
Fortunately, the first week of December allowed me to press through the powder work with a reasonable level of success and work that looked pretty nice and should please the customer(s) well.  Following this, I was finally able to get refocused on the Boss project and dove into the final hole-filling work that would see the firewall void of any extraneous holes and with a much cleaner, smoother final form than anything Ford has ever made in production.

Earlier work in this area allowed me to complete the lower half of the firewall while the car was still on the rotisserie, making this part of the project much easier.  Now that the car was on the body cart, it allowed relatively easy access to the upper portion of the firewall to finally complete this phase of the project without killing myself.
Before I dive into the latest work, I should apologize that I did not photo-document this particular update as well as I normally try to do, so please feel free to comment with any questions or clarifications you may have.

Perhaps the biggest challenge in this area of the firewall was the number of very large holes that required filling, some as large as 1.242”!  Secondly, since I would be welding these plugs in using the TIG (GTAW) welding method, the fit of the plugs would have to be extremely tight and precise.  Therefore, in order to get the final appearance I was after, I would first have to measure each hole and then machine a sheet metal plug to the exact spec that each hole required.  Sounds easy, right?
Well, for anyone who has ever tried machining thin sheet metal without totally destroying the project or severing an appendage, the idea itself is MUCH easier than the execution by orders of magnitude.  Complicating the matter even further was that I would not accept a hole drilled in the middle of the plug that I would just have to weld up later.  Yeah……I make this soooooooo easy on myself sometimes.

Anyway, though I didn’t document the solution properly here, I machined a “friction mandrel” that allowed very precise locating of the sheet metal blank in my lathe chuck, and with gentle cutting passes, allowed me to carefully machine precise plugs of sheet steel that fit each individual large firewall hole perfectly and allowed them to be welded into place with a minimum of filler material required.
A few nights of tedious and often out-of-position welding exercises and the entire upper portion of the firewall was filled and smoothed.  With only a thin token application of filler material during the “finish” phase, these modifications will be complete undetectable and very hard for even the trained Mustang enthusiasts’ eye to detect.  To my observation, the firewall appearance was far less cluttered up with holes and held the promise that this subtle modification would look very nice when in final color.

Since this would be an area that I would revisit at a later date, all that remained in this phase of work was to treat the bare metal with Prep-and-Etch to ensure there was no microscopic rust on the surfaces.  Then, a few coats of my ever trusty PPG DP40LF epoxy primer and this phase of the project was complete.
At this point, I can hardly wait to get deep into the next project!  Once I get the car flipped around in the shop, I will begin fit and finish work on the rear of the car, starting with stripping and priming the rear quarters.  Then comes the actual process of fitting the entirety of the components and panels to the rear of the car, along with all of the custom touches I have planned.  One of the biggest fabrication projects will be the construction of a tucked and smoothed rear bumper with hidden mounting bolts.  So……..’ol man Winter may be here for a while, but I have my work plan set and the throttle to the floor!


The upper firewall and cowl had some rather large punched holes that needed to be filled with metal.  However, the fit of the plug would need to be precise to allow each one to be TIG welded in place.  In this shot, you can see that the hole diameter has been marked to allow a plug machined to this exact dimension to be installed and welded using very little filler metal.  In the lower end of the frame, you can see some smaller holes that have been marked for size as well.

Here is a machined plug fit into place and ready to weld.  Note how tight the plug fits the hole.  This will allow much easier TIG welding with minimal filler metal and less chance of burning a hole through.

Using a weld-cool-weld-cool, etc. method, the plugs are welded into place.  In this shot, you can clearly see there were four individual weld paths used, essentially connecting the tack welds that held the plug in place.  A few swipes with the sanding disc and this plug will be virtually invisible.

With all of the plugs welded into place and finished with the sanding disc, the surrounding areas were feathered with 80 grit paper in preparation for primer.

After two coats of trusty PPG DP40LF epoxy primer, the firewall looks remarkably cleaner and simpler.  Not a single hole that doesn't have a purpose!

Brake booster, steering column and clutch master cylinder mounting holes are all that now populates the driver side corner of the firewall.

Heater box, heater hoses, export brace, gas pedal and a single wiring harness access hole make up the middle and passenger side hole population.  Nothing more required.

The firewall is not ready for action when we return to the engine bay for finish work later on.  When this is seam sealed and in body color, it will look fantastic!


Tuesday, October 29, 2013

Apron Seam Sealing & Undercoating with U-Pol Raptor

As Fall weather began imposing itself on Southeast Michigan, I began keeping an eye on the sky and the calendar to maintain momentum getting the front apron work completed and to find a window of opportunity in the forecast to complete this, my last “outdoor” project for the year.

With the car now solidly sitting on the body cart, the process of masking the exterior apron seams in preparation for seam sealing was a rather easy, albeit time consuming process.  Using the same techniques that were used on the floor pan, the seam sealer was applied on each masked seam and smoothed with a finger wet with xylene.  This smooths the sealer very nicely and makes the seams almost disappear when finally coated in bed liner material.  A few evenings dedicated to the job and the entire exterior apron area was fully seam sealed and scuffed for the final preparations before coating with spray bed liner material to match the floor.  However, before that could be undertaken, I had one small bit of repair work to complete.
Specifically, I needed to rebuild the left front lower valence mounting location that was torn away during one of the cars archival mishaps decades ago.  I reasoned this job would be a good one to tackle at the same time I cleaned up the areas of the front frame horns once concealed by the front rotisserie mounting arms now that they were perfectly accessible with the car on the body cart.

With a small swatch of clean sheet metal in hand, I simply traced the shape of the right side frame tab on the sheet and cut out the profile with material to spare on the back side to allow the parent material to be trimmed and perfectly fit to the new repair part.  Then it was a simple matter of fitting the repair to the prepared spot and tacking it up.  With a few small adjustments to the position and shape, I carefully TIG welded the mounting tab in place and dressed the welds smooth.  The final step was to drill and lightly chamfer the mounting hole and we were off to the next adventure.
Next up, was a thorough cleaning of the surfaces once masked by the rotisserie mounts and treatment with “prep & etch” to prepare the surfaces for a few coats of PPG DP40LF epoxy primer.  I like to let the DPLF cure for several days before topping it with any coating that is not designed for a “wet-on-wet” application over it.  This allowed plenty of time to begin masking the entire engine bay and aprons for application of the U-POL Raptor bed liner.

The final process before the bed liner application was several days’ worth of careful masking of the inside and outside engine bay, lower frame rails and front radiator support.  For this kind of work, the masking process is a “top down” operation.  In other words, I started by masking the upper surfaces of the inner and outer aprons, radiator support and firewall and methodically moving down until the entire complex was masked.  As always, I started by defining the sharp paint lines with tape and them coming back and masking the large, uncoated areas with more tape and masking paper.  As the process moved lower on the chassis, I made sure to overlap the masking paper such that all of the seams faced toward the ground to help prevent them from blowing open when the bed liner was sprayed as it is sprayed at a rather high pressure of 45psi and is very heavy-bodied so it’s impact force is rather high as well.
As the process continued to progress, the masking formed a very nice “road map” of sorts that allowed me to start focusing on the areas that required coating with little distraction.  This makes it much easier to visualize the end result in my minds’ eye and starts to tease out a hint of what it will look like when completed.

The final masking was a simple application of plastic drop cloth as an easy means of covering a lot of area in a simple and economical way that works well and quick to apply.  Then……we wait…….with a “weather eye”.
After several days waiting on Mother Nature to decide freezing temps and/or rain were deserving of a short break, we saw our opportunity and were ready to capitalize.  In short order, the car was in the drive and in position for the application of the U-POL Raptor bed liner material to begin.  The plan, as was predetermined days before, was to apply two solid coats of material with a third “texture coat” used to achieve the desired finish and touch up any “holidays” in the job we may have missed.

With my dad’s sharp eye and helping hands, the application of the Raptor went just about as textbook as it could have.  With weather cooperating perfectly, the first coat was concentrated on the areas we had predetermined to be problematic to coat and then we simply filled in the blanks between these areas.  This established a nice base coat that we allowed to flash for one hour before the second coat was applied.
The second coat was a purposefully even application over all of the surfaces with more attention paid to achieving the finer grained texture I prefer.  This coat was also intended to fill in any obviously thin areas as well and was again allowed to flash for an hour before the final “texture” coat was applied.  This was a light, “dusting-coat” applied from a greater distance to firmly establish the finer grained finish I prefer.

After about a 15 minute flash time on the final coat of bed liner, we immediately began remove the masking very carefully to ensure the sharpest masked edges and prevent the masking from becoming glued to the surfaces forever as the Raptor is some of the stickiest, most tenacious coatings you will ever run into.
And with that, I can comfortably declare the entire underside of the chassis finished and the work will now progress to more cosmetic challenges ahead.  Back to the firewall work first, then on to “real” bodywork!


Masking for neat seam sealer application is no less work than masking for paint.  The end result is well worth the effort.

Clean and smooth seam sealed joints are a favorite of mine and look great under spray bed liner materials.

I took a little extra time to seal up the areas around the lower control arm mounts to ensure a clean look under the car.


Outer firewall seams often require a fair amount of seam sealer to get them sealed properly.  By using the masking technique, even these seams are very tidy.

This is the final chassis repair I needed to make before primer and bed liner application.  This corner of the front left frame rail was torn away at some point in the past.  This is the repair just after smoothing up the weld.

The final step in this repair was to drill the new mounting hole for the lower front valence brace.

After brushing the front frame sections that were hidden by the rotisserie mounts, each side was treated with Prep & Etch and primed with PPG DP40LF epoxy.

Even after decades in a very harsh climate, these front subframe sections are very solid and straight and look quite nifty in fresh primer.  The mounting tab repair is virtually undetectable in this shot.

The really BIG job in this phase was masking the entire front of the car in preparation for the Raptor bed liner application to the outer aprons, radiator support and lower frame rails.  I start from the top and clearly define every tape line that will be seen to ensure clean and crisp tape edges.

As the process moves down the panels, the intricate masking details soak up lots of time.

The front radiator support is a bit tricky to mask.  I planned to have the forward surfaces coated in Raptor, but the interior surfaces in paint in such a way that the bed liner will not be seen when examining the engine bay.

Front the front, you can now get an idea what surfaces on the radiator support will be coated in Raptor.


Along the top edges of each apron, I leave a small 1/8" reveal to ensure the edges of the sheet metal are completely coated in Raptor.  This edge will be hidden completely by the fender when the car is assembled.

At the front of the radiator support, I mask down 5/16" from the top to ensure there is no Raptor visible above the gap cover that will hide this area from above.


Here, the front of the engine bay is completely masked.

Work now begins in the rear of the engine bay and firewall.

The driver side firewall and cowl are completely masked off.  You can also see how far back into the transmission tunnel the masking is carried.

With the passenger side firewall and cowl fully masked, it's time to finish up the prep work and head to spraying the bed liner material!

The windshield and front part of the roof and door openings is covered with plastic drop cloth material for an easy way to cover a large area.

Go time!  A quick review of the U-POL Raptor application instructions and we were ready to spray!

To make it easier to spray the underside surfaces, we jacked up the front of the body cart and placed it on stands.

First coat is concentrated on the hard-to-reach areas and then what's left in the gun is evenly applied to all of the other surfaces.  Full coverage is not the goal on this coat as it is more directed at the details.
After an hour of flash time on the first coat, the second coat is applied with a more even hand over all of the surfaces.  This establishes a nice even color and coverage.  Another hour of flash time and a much lighter third coat is applied to establish the final texture desired.

After the third coat has flashed for about 15 minutes, we begin to carefully remove all of the masking to ensure all of the taped edges are crisp and nothing sticks under a coating of bed liner.  This stuff is some of the most sticky poop you can find and will glue ANYTHING permanently in place if you let it.

Left side apron coated and looking very nice!

Right side apron completed as well.  I wonder if anyone will notice the relocated upper control arm holes????


Monday, October 14, 2013

1077 Days: A Small Update on a MAJOR Milestone

1077 days.  I look at this number and shake my head.  That’s a long time.  In fact, 18 days short of three full years.  It’s hard to imagine that the Boss has been hanging in the rotisserie for this amount of time, all the while getting its much needed and deserved reconstructive surgery.  In that time, I have dedicated over 2000 hours in all of the work that was required to return the chassis to a “buildable” state and I am only now reaching the point where “normal” restoration work will commence.  But more on that at another time.

At long last, a major milestone was finally reached in that we were finally able to take the car off the rotisserie and mount it on the body cart to begin the next phase of the build.  As exciting as this moment was, it came with a certain disbelief that so much time had been invested in the car to get it to this point and yet to the casual observer, it still looks like a gutted shell of a car that appears to flirt with the fringes of hopelessness. In fact, the before-and-after shots below are what finally gave me that “holy SH*T!” moment of realization that a lot of ground has been covered and every bit of it has been documented to an extent that I had never really imagined or put into perspective.

To say I am thrilled to have finally reached this point of the build is an understatement to be sure.  The enthusiasm to get on with making it look like a car again is building at a rapid rate and my ever-stirring brain is already working on the more intricate details of where I will start and how I will move through the preparation of the body.  I hope that the next phase of work will start showing larger leaps of obvious progress as panels start to take their rightful place, gaps are aligned, and contours perfected.  There is still a mountain of work to do, of course, but with every challenge, the therapeutic repayment the car delivers more than makes up for the strains of the work.

As it goes, I will let the pictures and captions tell the story of our latest success and thanks to all of the folks in “our” small circle of support who have kept the encouragement and positive energy coming.  It is more appreciated than you may ever know.

Thanks!


BEFORE
(ALMOST) AFTER


AFTER (1077 Days)!


The Big Move to the Body Cart!

After a bit of measuring, I determined all that was needed to provide a solid mounting surface for the chassis were these two simple wooded "pads".  The front pad (left) has the locator blocks already screwed into place.  Once the rear locator pads are in place, the car will be secure in both the fore-aft and side-to-side directions.

With the center spine brace removed from the rotisserie, the cart was positioned under the car and the entire works was placed on jack stands placed carefully on the body cart surface.  This allowed the front and rear rotisserie frames to be easily removed from the body mount brackets.


The body was lowered on the jack stands at their lowest settings in preparation for lowering the body down on the wooden support blocks.  Note the body brackets are still in place as they will be used as the final jacking points to lower the body to it's final place on the cart.

And there you have it.  For the first time in almost 3 years, the body is off the rotisserie!  Kinda looks like a car all of a sudden!

I kinda like this perspective.  This shot clearly shows how much working room this cart provides.

Monday, September 23, 2013

Fender Apron & Firewall Hole Filling, a Few New Tools, the Intricacies of Life and a Little Adventure Mixed In

Though I may wander, do not think me lost”………..One of my favorite, and rather self-descriptive sayings.  As the extended time between blog entries will indicate, in recent weeks I have indeed wandered.  In fact, my recent wanderings have been in MANY different directions and all in the most positive ways.

Vacation:  Start with Dessert, Cuz’ Life is Too Short
As fate and our Lord would have it, I come from a very small branch of a rather divided, even fragmented family tree.  Truth is, where this frail twig of a lineage is concerned, I am the end of the line.  The caboose on the train.  The last of the Mohicans.  The tail of the dragon.  Land’s end.  The short story is: my family name dies with me and only recently has the weight of it come to shove its way into my thoughts and has given me pause to consider those things that matter most, and perhaps more importantly, what doesn’t matter at all.

To begin, in the few weeks following my last update, I was ramping up for a once-in-a-lifetime experience I enjoyed beyond words.  Sparing the raw details of the how’s and why’s of time and the cruelty that so often accompanies it, my uncle and I, for the first time, had the extraordinary experience of sharing our common love of beautiful cars during the Street Rodder Magazine Road Tour from San Antonio, TX to Pigeon Forge, TN and the Shades of the Past Rod Run tucked into the heart of the Great Smoky Mountains.  Over the course of 8 days, we covered 2531 miles in his glorious 1932 Ford 5-window coupe hot rod.  It was hot, wet, humid, bumpy, smooth, fast, slow, up, and down and altogether a PERFECT trip that I will never forget.  In so many ways, I discovered we were more the same than I ever knew.  After 45 years, this was the first time he and I spent this much “quality time” together and to enjoy it from the same side of the windshield was absolutely priceless.  It is truly a treasured day when you realize you are blessed.  I very much am, and THAT realization is one of those things that really matters.

New Tools:  New to ME anyway!
Sometimes, you have to make moves when the opportunity is right, and just before leaving on vacation, opportunity knocked LOUDLY and I managed to answer the “door” for a change!  A very good friend and his bride have been frantically making their last preparations to make their move to Florida permanent.  In doing so, he needed to down size his blast cabinet and offload a band saw and a utility “cart” he had under foot.  As fate would have it, I was looking to up size my blast cabinet and the band saw was another tool I had on my “to get” list.  And then there was this “cart” he described, with large heavy duty wheels, tie-down rings and a large flat surface that would support a few tons.  Hmmmmmm, I thought to myself……that might be just the ticket.

Anyway, just a few days before I left on vacation, we struck a deal and I delivered my smaller blast cabinet, which was much more manageable for his new work space.  Then he dropped off my “new” blast cabinet, band saw and the cart.  As twists of fate often are, the cart was like a gift from the auto restoration gods!  Here I was, staring at a large 6’ x 8’ diamond plate clad, steel framed, iron-wheeled, industrial strength platform that would make a perfect body dolly to set the car on once it was off the rotisserie!  With a few simple stand-offs mounted to the cart frame, the body would sit quite nicely and securely on this cart and allow the bulk of my future work to be accomplished on a nice stable platform.  And coupled to that, I had a blast cabinet that would serve me for years to come and a band saw that I would eventually need as well.  I felt like I hit the jackpot!  And if there was any shade of a “down” side, it was only that I required a few weeks after I returned from vacation to rearrange the shop and get the new cabinet plumbed for use.  Not bad at all!
This blast cabinet was a great upgrade to the shop and just in time.  It's about a foot wider, a foot taller and about 6 inched deeper than my old cabinet and should work great for the foreseeable future!

Although it doesn't look like it now, this industrial strength cart will become an awesome body cart work platform for the work to come this winter.
 

Back to Work:  Filling the holes in the fender aprons and firewall
With the shop back in workable shape, I was finally able to re-engage the project where I left it.  Having earlier identified all of the holes in the fender aprons and firewall that I wanted to fill, I was ready to sit down and begin the tedious process of sanding away the surrounding primer from each hole, fitting each individual steel “plug” as tightly as possible, and TIG welding each one in place with little or no filler material required.  To ensure the fitting 
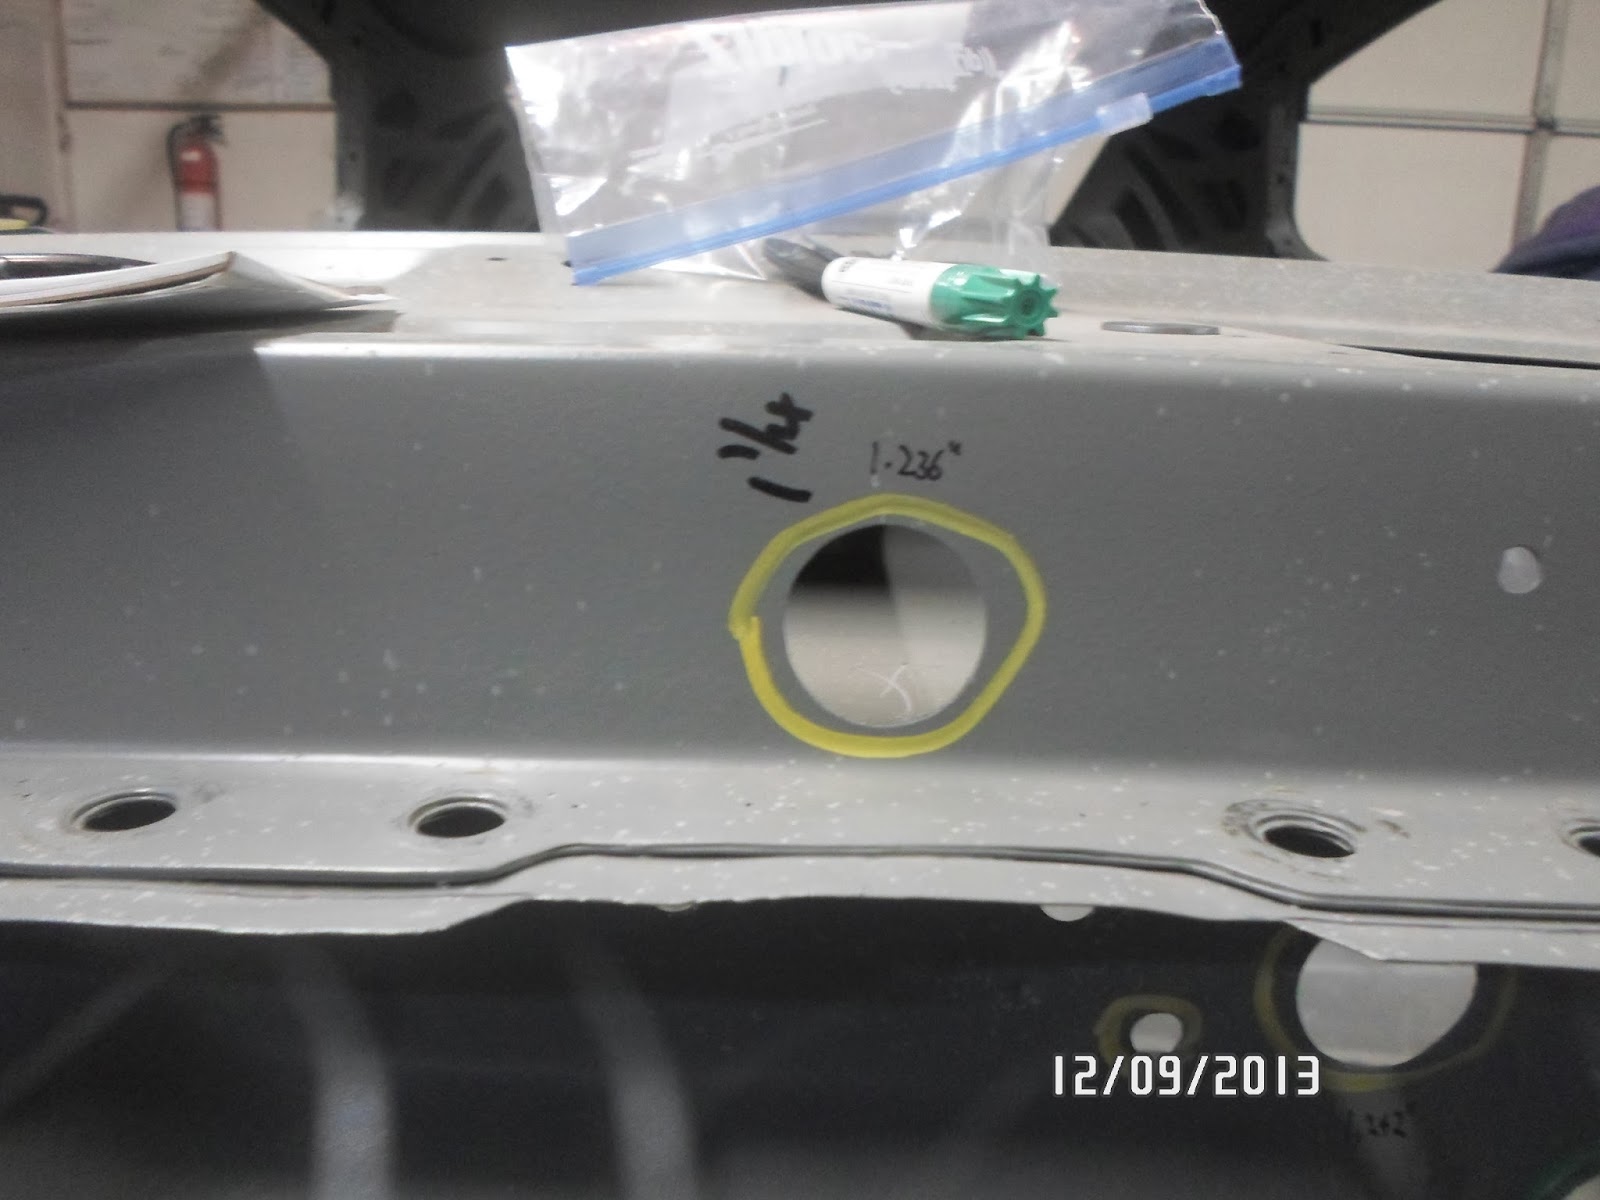
process was accurate and subtle, I used a tapered reamer to very gently enlarge each hole as required while keeping it round.  Often, this means only a turn or two of the reamer to get the desired fit.  Then, I fit each plug flush with the “beauty” surface and tacked it into place.  With a little hammer and dolly work to ensure everything was nice and flat, I welded each plug into place using only small amounts of filler metal as required. 

Pretty quickly, I was kicking myself for being a tightwad as the #17 air-cooled torch head I have is very large for this kind of work even with the stubby Pyrex gas lens kit and short quill installed.  On my Christmas list will be a new #9 flex head torch head and gas lens kit for sure!  Otherwise, after a few dedicated days of work, the aprons and lower half of the firewall were fully filled and waiting for a fresh coat of primer for protection.
After returning from my brief sojourn across the lower US, the time had come to prep and prime the bare metal spots to protect them and allow plenty of time for the primer to cure before moving to the next phase of work.  Since Fall is just around the corner here in Michigan, I have been prioritizing my further work on the upper half of the firewall to a later time as I need to get the car off of the rotisserie and on the body cart before the cold, nasty weather socks me in for the season.  This means I have to scuff and seam seal the outer aprons and then get the car on the body cart so I can sand blast the front frame extensions where the rotisserie brackets bolt to so they can be primed as well.  Once I reach this point, I can get the outer aprons and lower rails coated in Raptor spray bed liner material to match the undercarriage of the car and move the attention to completing the firewall work and on to genuine body work.  More to come!
A taper reamer is used to carefully enlarge each hole to fit the steel plug tightly.  This makes for a much cleaner and easier time welding the plugs in to fill the many holes in the fender aprons and firewall.
 
Here you can see how tightly and flush the plug fits before welding.

Each plug is tacked in at four or more locations.
 
This shot shows how ridiculously huge my TIG torch is for this kind of work, but it works just the same.  Here, I am using a length of .030 MIG wire for a tad bit of filler material on this weld.
 
In most cases, filler material is used very sparingly, if at all if the fit is just right.
 
The battery of tools I use for this work is rather straight forward.  The copper plate at the bottom is used to back up the weld to help prevent blowing through the metal.

Left front apron with all the holes filled and smoothed.
 
Left shock tower and rear apron filled.

Right shock tower and rear apron filled.

Right front apron filled and smoothed.
 
In this shot, I am finishing up the lower firewall hole filling.  Awkward, semi-squatting welding position is tough on the back!

Lower firewall holes filled under the heater box area.

A small touch-up in the trans tunnel.

All of the weld areas have been sanded and feathered in this shot in preparation for spot-priming with PPG DPLF primer.

Not obvious in this picture is the fact that I welded up the original upper control arm mounting holes and left only the "Arning" drop holes.  When this area is smoothed and sanded, you will never know these weren't the original holes.

Left outer apron scuffed and prepped for primer.

Right inner apron shows the extensive amount of work done to get these pesky holes filled.  Lots of bare metal that will need to be primed!

Lower firewall filling is less intense, but the effect is quite noticeable.

After spot priming, the right outer apron looks good.

The left outer apron also looks very clean after spot priming.

From the inside, the spot priming on the right apron really starts to show how much smoother the apron will look when finished.

Again, on the left apron, the priming shows how clean the filled apron will look.

Even with only a few holes filled, the firewall also shows a nice clean trend.  The remaining yellow circled holes still require filling.