Thursday, November 8, 2012

Left Rear Wheel Opening Repair

As luck (and mercy) would have it, I had election day 2012 off at the expense of a vacation day (whether I liked it or not).  I had been noodling the steps required to repair the left rear rocker panel and wheel opening most of the previous week and I felt pretty confident I had it worked out.  So naturally, with a little time on my hands, no adult supervision, and a full day to invest, I was all too happy to spend it in the shop tackling the last “large” repair I had left on the car (whoopee!).  But first, a little background:
As many followers on this blog will recognize, the damage on this car when I bought it was rather extensive.  In the case of the left rocker panel, the rear edge had been mashed severely by what looked to be a parking block or something that became wedged between the front of the left rear tire and back of the rocker.  Apparently, this damage was left unaddressed for quite a while as the mud that was trapped under the folded rocker end was responsible for ensuring the complete rust-through of the inner wheel tub behind it.  Nice.
I left this particular repair until later in the process as it is fairly involved, structurally speaking, and any goof on the rocker could mean a much more extensive repair if I wasn’t very careful.  The first thing I decided to do was invest in a full rocker panel assembly as opposed to the skins that are commonly available.  This got me the best available material and stamping quality available (more on this later), albeit at considerable cost.  Fortunately, I already had the remains of the outer wheel tub and fender opening repair panel skins I used to repair the rear corner of the wheel opening, so those investments were going to pay off twice for a change.
I began the repair by carefully assessing the damaged area and marking the repair area with my trust pain marker as an initial guideline.  In this repair, the order of repairs was going to be critical, so I needed to be especially careful to only remove material on each surface where it needed to be repaired and no more.  Then it would be equally critical to rebuild the corner in a specific order to ensure everything could be fully welded and that each section would fit with the others as perfectly as possible.
Once I was confident I had identified the full extent of each repair area, I truncated my trim lines and started making patches for each section, starting with the rear rocker cap, then the upper fender apron, and finally the inner wheel tub.
As in similar repairs before, I created the individual patches and after careful trimming, used them as patterns to allow the parent metal to be precisely trimmed to match the repair patches.  Then, with careful application of the screaming-wheel-of-death (a.k.a., cutoff wheel), the damaged material was removed from the rear rocker cap, fender apron and wheel tub and the edges fitted to the new patch material.
The patch installation began by welding in and metal finishing the inner wheel tub patch.  This effectively established a framework on which to align and anchor the apron and rocker cap patches as the repairs moved forward.  Next, the small apron patch was carefully positioned and tacked into place to establish position and solidify the joint line between the upper fender apron and rocker.  Then, attention was shifted to the rocker end cap and this is where the real challenges began.
When I first started fitting the repair patch, I measured the contour of the original rocker on both sides and confirmed they were identical in profile.  However, when I transferred this shape to the new rocker using my contour gage, it became obvious I would have a lot of metal forming work ahead of me to get the patch panel to match the contour of the original rocker.  In fact, I would need to completely re-contour the profile of the panel to get this fit I wanted (seems to be the trend throughout this whole project!).
The first order of business was to “un-bend” the character lines on the lower part of the patch to allow the curvature of the part to be hand formed to match the original profile.  I decided to use the panel seam as the guide surface and secured the rocker end cap patch at this edge first.  This would allow me to carefully form the patch and anchor it with small tack welds along the seam as I got each small section fitting perfectly.  Using this same technique and measuring and validating the contour at every step, I walked up the weld seam with tack welds until the entire patch was correctly fitted and the contours matched the original panel exactly.  At this point, both the apron patch and the rocker end cap were tacked into place and I could begin welding them completely.
Final welding of the rocker and apron patches began at the lower edge of the rocker cap and finishing at the apron patch seams.  In usual fashion, I skipped around with small stitches and cooling each with a strong jet of air to minimize warpage until the entire repair was fully welded.  As a final step, each weld was carefully ground and metal finished until the repair was finally complete.  A very thin skim of filler will be all that is required to make this repair equally invisible relative to the repair on the right side of the car I documented last week.
At this point, I have only one small rust repair that remains before the car will FINALLY be solid and no further rust repairs will be required.  Not sure what I’m gonna do with myself!

Even after prying the damaged rocker end cap out as far as I could, you can see the extent of the damage was considerable.  The rust behind this mess was even worse!

The first patch I roughed out was the apron patch.  I cut this from the remains of the fender arch repair panel I used to fix the rear wheel opening earlier in the project.

To make the rocker patch more manageable, I cut the entire end of the replacement rocker assembly off well beyond the area I would eventually use.  The white paint mark is my rough cut line.

The white and yellow paint lines identify the maximum repair area.  I worked well within these lines to begin removing the damaged areas to better prepare for the repairs.  Here you can see that rust has completely destroyed the inner wheel tub lip.

With the rust-damaged inner wheel tub lip cut away, I was able to better assess the extent of the required repair areas.
 
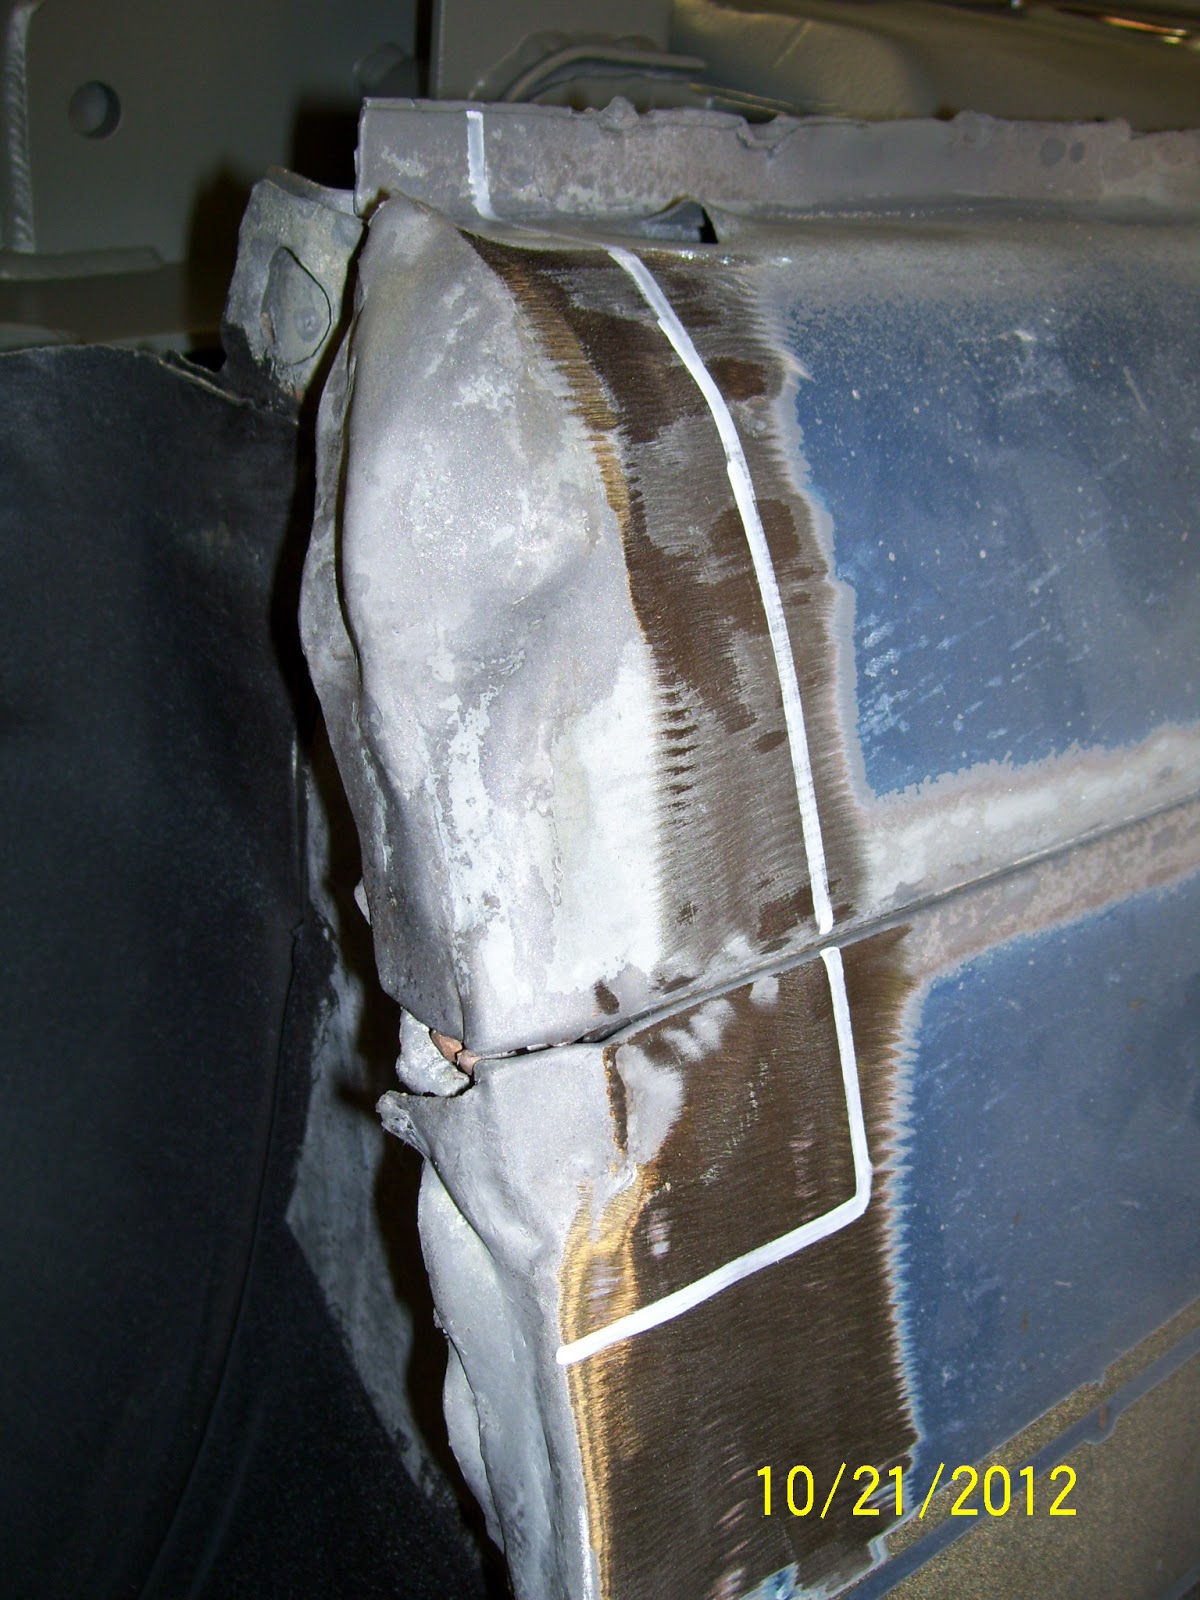
Based on the final damage assessment, I was able to reduce the size of the apron patch quite a bit as shown by the white paint lines.
 
Using my trusty contour gage, I established the correct rocker contour for reference against the new part.  My "calibrated eye" kept telling me the shape was not correct on the new panel and.........

......BOY WAS I RIGHT!  As can be clearly seen in this shot, there was no way the new rocker would work with this huge disparity in contour.  Needless to say, it was obvious a significant amount of metal forming would be required to get this corrected.

 
Using the apron patch panel as a pattern, I was able to trim the repair area to fit the new patch exactly.  The white paint lines show where I had originally estimated the repair area to be.  Less is definitely more in this game.

The black lines also show how much I was able to reduce the repair area on the inner wheel tub.  Also note the three spot welds that had to be drilled out to allow the old material to be removed.

Once again, by using the wheel tub repair patch as a pattern, I cut the offending damaged metal away.

New wheel tub patch is fitted and clamped into place with panel clamps and small locking pliers.  Looks good!  At this point, I tacked the patch into place to ensure position and fit and followed up by welding the patch in completely.

Next, the apron patch was tacked into place.  No welding yet!

Here, you can see I have rolled out the contour features of the rocker end cap and will start carefully forming the panel to fit the original contour perfectly.  Tricky......but worth the effort.

Here is the rocker end cap patch tacked into place and ready for weld.  At this point, the contour is nearly perfect.

Starting with the apron patch and finishing with the rocker end cap, the entire repair patch areas were fully welded.

And there it is.  The entire repair is complete.  All welds were ground smooth and all metal finishing is complete.

This shot give a good idea on how nicely the lower character line matches the original rocker.  I can work with this!


Thursday, November 1, 2012

Right Rear Wheel Opening Repair

As the weather continues to deteriorate here in Michigan, and I am desperate to avoid listening to political bull$h*t through every conceivable communication medium on the planet, I have had plenty of motivation to keep myself occupied in the shop as much as I can.

The latest bit of progress was to fix the front corner of the passenger side rear wheel opening where I discovered a small patch of rust that I had not seen before.  This spot was a bit of a heartbreaker as the outside skin only showed a very tiny pinhole of rust, whereas the back side was rusted through and hidden by a generous dollop of seam sealer that worked to trap moisture in this one area over the decades.  Once I got the sealer removed, this discovery let a bit of the air out of my sails knowing I’d have to cut deeper into the old girl than I had hoped.  But…….she deserves the rehab, so off I went!
The first order of business was to mark the general area that I would need to remove so I could fabricate the necessary patch and then use the finished patch itself as the pattern to make my final cuts.  I first cut out the damaged area well inside my marks to leave plenty of material to work with when the final fitting of the patch was at hand.  After the outer skin was removed, the full extent of the damage could be easily seen and assessed.  Then I made a pattern and fabricated the rather simple patch and then traced it on the parent metal to allow me to very precisely fit the rough opening to the new patch.

Once the patch was ready to go, I then carefully removed the damaged inner structure and then cut out the necessary patch from a leftover outer wheel house patch panel I had on hand.  This was a rather simple proposition that allowed the inner patch to be welded into place quite cleanly and the welds dressed down before the outer patch was to go into place for the last time.  I should mention that I tried to keep the gaps quite tight between the patches and parent metal to ensure good penetration without blowing holes through the whole works.
I finished the job by carefully clamping the outer patch into place and tacking it into place at several points around the patch to ensure good retention and to allow many heat paths to soak up the weld heat and dissipate it more easily without warping the panel.  Then I slowly and carefully stitched the patch into place and ground all of the welds down smooth.  The end result is a nice clean patch that will require only a thin skim of filler to become completely invisible.

Next stop will be to repair similar damage on the driver side rear wheel opening.  Because this will involve repair of the rocker panel as well, the complexities of the repair will be considerable in comparison to this one.  But I think I might have it covered!
The white paint lines show the max extent I intended to remove and the patch I began fabricating.

I start cutting out the repair area well within the paint lines to allow me to use the patch as a precise trim pattern.  As you can see, the damage behind the skin was rather severe, but fortunately pretty localized.

Here is the new patch fit and the parent metal trimmed to keep the gaps tight for good weld penetration without blowing through.  Once the fit was exactly as I wanted, I marked the patch for position and set it aside.

With the outer patch fitted, I could concentrate on fixing the more damaged inner wheel house section.  With careful measuring and some work with the air saw and cutoff wheel, the offending area was cut away and a patch was fitted and welded in place.

Finally, the fitted outer patch panel was welded into place and metal finished.  A very light skim of filler will have this area completely undetectable in finished form.

Saturday, October 20, 2012

Axle Tunnel Filling & Prime

I enjoy momentum on projects.  Once I get into a groove and things start clicking off according to plan, I really like the feeling.  Perhaps it’s the confirmation that comes from planning the work and working the plan when the results are exactly as intended.  Either way, I love the feeling of accomplishment, and lately that’s been a frequent thing.

On the heels of completing the rear wheel tubs, I moved directly to smoothing up and finishing the axle tunnel in hopes I could get it in primer.  As luck would have it, things lines up pretty nicely and I was off too it last weekend with a vengeance.
Early this past spring I was able to repair the rust damaged front trunk floor as well as weld in a patch to fill the hole that was once occupied by the rear staggered shock mount.  Once the metal work was complete, I moved on to repair the rear trunk floors and tail light panel with the intent of coming back to the axle tunnel to finish the area and prime everything at one time.  Well, the time was right to do just that.

During my last sand blasting episode, I was able to get the axle tunnel and trunk floor repair areas well prepped for the coming finish work.  The rear subframes cleaned up very nicely following all of the welding for trunk floors and suspension brackets, and the new rear rotisserie mounts allowed excellent access to the areas around the original leaf spring bushing holes as well.  At the same time, I made sure to hit the weld seams on the axle tunnel repairs to make absolutely sure they would be cleaned of any nasties that might have been living there over the spring and summer.
After what seemed like days vacuuming sand from every conceivable nook and cranny of the car just to keep my shop floor from looking like a beach, I went over the entire axle tunnel with a 60-grit disc to clean it up and give the surface good “tooth” for the All-Metal filler and the Rage finish filler I would use to tidy the area up.

I started my filler work with All-Metal applied generously over and into each weld seam area and rather widely applied filler to each side of the repair.  I like All-Metal for its strength and similarity to lead body solder when working it.  It’s a much more “structural” filler than Rage  and I like it as a base along areas where patches have been welded in but the down side is it’s a bit of a b*tch to sand.
Once the All-Metal base fill was cured for a few days, I drew it down with some 80-grit on my D/A sander and finished the surface with the same paper on several hand blocks.  This gets the contour pretty well established and makes for a very good base for the following coats of Rage filler to get the final contour perfected and finished.

I tend to go kind of heavy on my first coat of Rage to make sure I have plenty to grate off with my cheese grater files.  It makes for a bit more dust on the ground, but I can get the low spots filled pretty quickly that way and not have to come back as many times to get the areas filled.
After an overnight cure, I sanded the first coat of Rage by hand (no DA required or desired) using some of my longer sanding blocks and some 180 grit paper to ensure the surface wouldn’t get lumpy and bumpy.  This would have been a very tedious job if not for the excellent sanding characteristics of the Rage filler.  Awesome stuff.

The third (and final) coat of filler was applied in a thinner and less extensive layer and I tried to keep it as smooth as possible to reduce the amount of sanding required and to keep from messing up the contours I had worked to achieve.  After a few minutes, I grated the surface down and left it to cure overnight.  Then, as before, I started at it by hand with long sanding blocks and 180 paper until I had the surface ready for primer.
With the filling complete, I added the grommet hole needed for the fuel sender wire to pass into the trunk and sanded the remaining surfaces on the bottom of the trunk floor to prep them for primer.  Then, after tacking off the surfaces and swabbing everything with wax and grease removed a few times, I masked the areas I wasn’t ready to prime and tacked everything once more time.

I was pretty excited to try a new spray gun upgrade I added to my gravity feed HVLP gun.  I upgraded to the 3M PPS cup system which makes spraying consistency, paint utilization and clean-up a TON easier.  The biggest plus I find with the 3M system is that I can now paint with the gun in any position (even upside down!) and never miss a beat.  When clean-up time comes around, you pop the liner and cap out of the cup and toss it in the trash.  Then a little wash of the gun head with reducer and you are pretty much ready to go again.  The cost savings in reducer alone will pay for this system very quickly even though the liners and caps are kind of pricey for what they are.  At this point, it doesn’t matter to me one bit as I LOVE this system and will be purchasing the small and medium sized cups for the future as well.
With my new painting weapon in hand and a fresh mix of PPG DP40LF primer in the cup, I laid down two medium wet coats of primer on the entire axle tunnel and bottom trunk floor with about a 20-minute flash time between coats.  Then, I cleaned up what little mess there was, removed the masking very carefully and then shut off the lights and left the primer to cure overnight undisturbed.  The next day I was thrilled with how everything looked and it was quite inspiring to see the entire bottom of the car in one color and looking mighty solid. 

Next on the agenda is to make the small repairs at the front of each rear wheel opening, and a tiny repair to the right rear lower window opening flange, which will mark the completion of all of the rust repairs required on the car!  Whooooohoooo!  Any rust left to address is simple surface rust on the interior surfaces of the body bracing where no factory primer was ever applied.  This will be an interesting application for my trusted chelation rust removal techniques and should work very well.  More to come!
Passenger side rear subframe cleaned up nicely after sand blasting.

Driver side subframe was also in good shape after sand blasting.

I am very happy with the decision to make the new rotisserie mounts that use the rear leaf spring shackle bushing locations as mounts.  This allowed me to blast the entire area surrounding these mounts without a problem.  Should make priming and painting far easier as well.

Here you can see the joint line that I blasted nice and clean before going forward with filling.  I am very happy with how this repair turned out, especially given the amount of rework that was required to get the trunk floor patch panel to even come close to fitting!

After a good going-over with my 2" angle grinder and some 60-grit discs, the axle tunnel was ready for the base coat of All Metal filler.

All Metal filler is awesome stuff indeed.  It is very tough (and therefore tough to sand) but is has excellent mechanical properties and behaves much like lead body solder when finishing.  I love this as a base filler where patch panel repairs are made.

I sanded the All Metal filler with my D/A sander with 80 grit paper to give the next layer(s) of filler good "tooth" to adhere to.

Here is a look at the first coat of Rage filler after it has been knocked down while soft with a cheese grater file.

After hand sanding with long sanding blocks, the first coat of filler is ready to be tacked off and a second coat applied.

The second coat of Rage filler is less extensive and far thinner than the first.  Here, it has been grated down and will be left to fully cure.

And there it is.  Though the different colors of filler make this area look rather lumpy, the actual surface is quite smooth.

One detail I had to add before primer is the grommet hole required for the fuel sending unit wire to pass through into the trunk.

With everything cleaned and tacked off, I masked off the trunk area I didn't want primed yet and started mixing up the DP40LF primer.

The first medium-wet coat of primer is on and after a 20 minute flash time, the second can be applied.

The second medium-wet coat of primer is on and looking great!

Here's a look down the driver side rear subframe rail.  Soooo much nicer than where we started!

A look at the passenger side rear subframe and trunk floor.  Nice!
 

Monday, October 15, 2012

Rear Wheel Tub Prep & Fender Lip Rolling

Rear wheel tubs are kind of a pain in the butt for the home-restoration artisan to tackle.  Generally speaking, they are the dirtiest parts of the car, have lots of difficult-to-repair issues and are generally not very friendly from a work space perspective.  Mustang rear wheel tubs are not different, but the time had come for me to finally tackle the tubs on my Boss 302 once and (hopefully) for all.
The first order of business is getting all the undercoating and various levels of crap dislodged from the tubs to see what the base material looks like.  Some of my regular followers will recall the trick I use to remove 40 year-old undercoating quickly and rather painlessly.  In short, I use my air chisel dialed down to low air pressure (~25psi) to “shatter” the coating and then vacuum up the debris.  This method works so well in fact, it is truly amazing how little thought you give to further undercoating removal once you try it.  In any case, after about ½ hour dedicated to each tub, the undercoating was removed and vacuumed up and I could have a look at what the tubs looked like “nekid”.
As fortune would have it, both rear tubs in my car were in remarkably good shape!  Other than the damaged corners which were a “known” when I started the project, the metal was in excellent shape and the center seam was easily cleaned with a little sand blasting work.  From there, I dove into the job of cleaning the bulk of the tub surfaces with my angle grinder and a box full of 60-grit discs.  For the inner surfaces of the fender lips, I used an abrasive brush and wire wheel to clean everything down to bare metal and followed it up with a coat of phosphoric acid-based metal prep to get the surface cleaned of any residual corrosion and prepared for the next phase of the project:  Fender lip rolling.
Rolling a fender lip is a bit of a misleading description.  Actual “rolling” of a fender lip is usually done on a fully assembled car to make room for oversized tires and involves a tool specially designed with a hard-faced roller to gently fold the inner fender lip toward the inner wheel tub.  The fanciest fender “roller” tools bolt to the wheel hub and are quite nifty, but they are of little use when the body is on a rotisserie during restoration.  As such, folding the fender lips on a raw body shell requires a different technique but the results are much easier to achieve in my opinion.
The key to success when folding fender lips is patience and light, purposeful blows with a hammer to gently “persuade” the metal to its new location.  Also, in 99% of the cases, you do not need to fold the entire lip as the tire doesn’t require the same clearance at the front or rear as it does at the top during full suspension compression.  At the same time, folded fender lips are much harder to keep clean and without proper maintenance, can accumulate debris that will work to promote rapid corrosion propagation if left unattended.
I started folding each fender lip with light blows from my 16oz ball-pein hammer.  A ball-pein gives the metal just enough stretch to fold cleanly and not be lumpy along the flange.  I use a wooden paint stick (free @ Home Depot!) as a gage to determine when I have the right amount of fold by placing it against the wheel tub and folding the lip until it is just snug against the stick.  This leaves just enough gap to allow corrosion protective paint to be applied by brush and will allow debris to be washed away if needs be in the future.  Each lip took about 45 minutes of gentle hammer work to get just right and the results are very nice if I say so myself.  A little filler along the flanges will even hide the spot-weld divots and make for an exceptionally smooth wheel opening.
Once the rear fender lips were completed, I moved on to coating the wheel tubs with Zero Rust for corrosion protection.  I decided to apply the Zero Rust with a brush this time as I needed to make sure I got the lip areas fully coated and the resultant brush strokes would be of no consequence when you consider that the entire wheel tub will eventually be primed with DP40LF, seam sealed, painted flat black and finally coated in textured bed liner material as a final finish.  I would have preferred to spray the coating, but the space constraints in the confines of the wheel tubs prevented using my existing spray equipment effectively, so I stuck to the brush and made do with that even though I am embarrassed that there are brush marks to be seen at all!
So there ya go!  Wheel tubs cleaned and prepped.  Wheel lips rolled for fat meats and everything coated to keep it nice for the rest of my lifetime.  Next on the agenda is to finish the axle tunnel and front trunk floor and get the entire outside trunk floor area in primer.  I’m on it!
After cleaning all of the nasty undercoating off the surfaces of the rear wheel tubs, I was stunned to see the underlying metal in excellent shape.  Nice!

The shinier "reddish" area in the center of the tub shows the area that was originally covered in undercoating.

Both wheel tubs were in equally good shape after all was said and done.  This left a lot to work with and made the sand blasting work very straight forward and relatively easy.

Sand blasting could be concentrated on the seam area and the fender lips.  The rest of the surfaces would be easily prepped with sanding and surface conditioning discs.

After a few hours work with the angle grinder and a box full of 60-grit sanding discs, the wheel tubs were cleaned and ready for metal prep chemical etching.

Rolling fender lips is a common technique to gain more tire clearance.  Here, you can get a general idea of what the fender lip looks like before any rolling/folding is done.

Working the lip with light blows evenly distributed along the lip surface, I eventually had the lip nicely formed with absolutely no damage to the outside skin.

Here is another shot of the finished rolled fender lip.  Not there is a small gap left between the wheel tub and the lip to allow paint to be applied to the area and cleaning of debris in the future.  Ignore the body hammer in the background!  This is NOT the hammer I used to form the fender lips!  It was just looking for some temporary recognition it didn't deserve!

I used Zero Rust coating thinned down a bit to coat the inner wheel tubs.  I applied it with a brush to make sure I got the folded fender lips properly coated and the brush strokes will never be seen as them will eventually be covered in textured bed liner material.  Also, this shot shows the rolled fender lip in pretty good detail.

I left the areas at the front corners of the wheel tubs bare as I will soon be making repairs in this area.  No point making it anymore difficult.

Right side wheel tub coated and dry.  Note the folded fender lips are pretty easy to distinguish here too.

Left side wheel tub coated and dry.