Monday, March 4, 2013

Fitting a Stainless Fuel Tank & Interior Floor Seam Sealing

We are ROLLING and it feels good!  With the interior primed and scuffed we had reached the point that a brandy-new fuel tank was needed to finish up the fitting requirements before the interior panel seams could be sealed in preparation for finishing.

In the interest of longevity and fuel system integrity, I had long ago decided I would fit a stainless steel fuel tank in my car.  The availability of stainless tanks is unfortunately not very good, particularly if the goal is to have something that looks like a production tank when bolted in place.  Fortunately, I was able to find a very nice polished stainless tank through recommendations on several Mustang forums.  In less than a week, I had the new tank sitting in the shop and began fitting the tank to the car.
One major change I made right off the bat was to drill out the self-tapping screw holes to allow conventional bolt-and-nut fasteners to be used to secure the tank.  Why?  Because I like it this way and the fastener choices are much more pleasing to the eye when finished.  Also, I positively hate sharp pointy things lurking under a car that never seem to spare an opportunity to bite you when you least expect it and the self-tapping screws are excellent in this capacity.  Out they go…..

As expected, I had to do a small bit of trimming of the outer tank mounting flange to eliminate the hard edge interference on one corner.  This was a very minor detail that was quickly remedied with a cutoff wheel and some quick file work.  However, once this was done, the tank fit the opening perfectly and I was able to mark and drill the final three mounting holes in the forward trunk floor lip, and after a quick pass with the deburring tool, I was mixing up a small batch of primer and spotting over the fresh holes in preparation for the seam sealing work to come.
For me, seam sealing choices represent a real struggle.  Some require bare metal, some require primed/painted metal, some are solvent cured, some are moisture cured, some are clay based, some are polymer based, etc., etc.  At the end of the day, I have firmly decided I don’t like seam sealers designed to be applied over bare metal.  Too many opportunities to trap evil things and with the experiences with the factory seam sealers and the piles of rust under them I discovered, I will not duplicate that condition again if I can help it.

At the end of the day, and following many, many hours of research, I settled on the 3M Ultrapro Urethane seams sealers designed to be applied over primed/painted surfaces.  By definition, this type of urethane sealer is “moisture cured”, which means it uses atmospheric moisture to start the curing process.  That, of course, is the reason that this type of sealer should never be applied over bare metal as it will simply accelerate the rusting process as a function of the curing process.  However, since I had all surfaces solidly primed with PPG epoxy and my ultimate faith in the PPG product is quite solid, I liked this option best of all of those I examined.
For the interior, I decided on the 3M #08363 black urethane seam sealer as it would be essentially unseen in finished form and will be painted in flat black urethane paint as a final interior finish before carpet and upholstery installation.  This product is a moisture-cured urethane and can be rather easily tooled with water, or most thinning solvents like paint thinner, wax & grease remover or Xylol (xylene).  It’s worth noting that the interior was a perfect place to experiment with smoothing techniques since I wanted to make sure we had the technique down before moving on to the “cosmetic” seams on the exterior floor later on.

The application gun used for these sealing products is not your run-of-the-mill caulking gun, although they look for all intents and purposes the same.  Specifically, the gun required to apply the heavy-bodied sealers has a higher leverage ratio by about twice over the home improvement variety caulking guns.  Generally speaking, you are looking for a leverage ratio of about 26:1 minimum to push seam sealers without killing yourself.
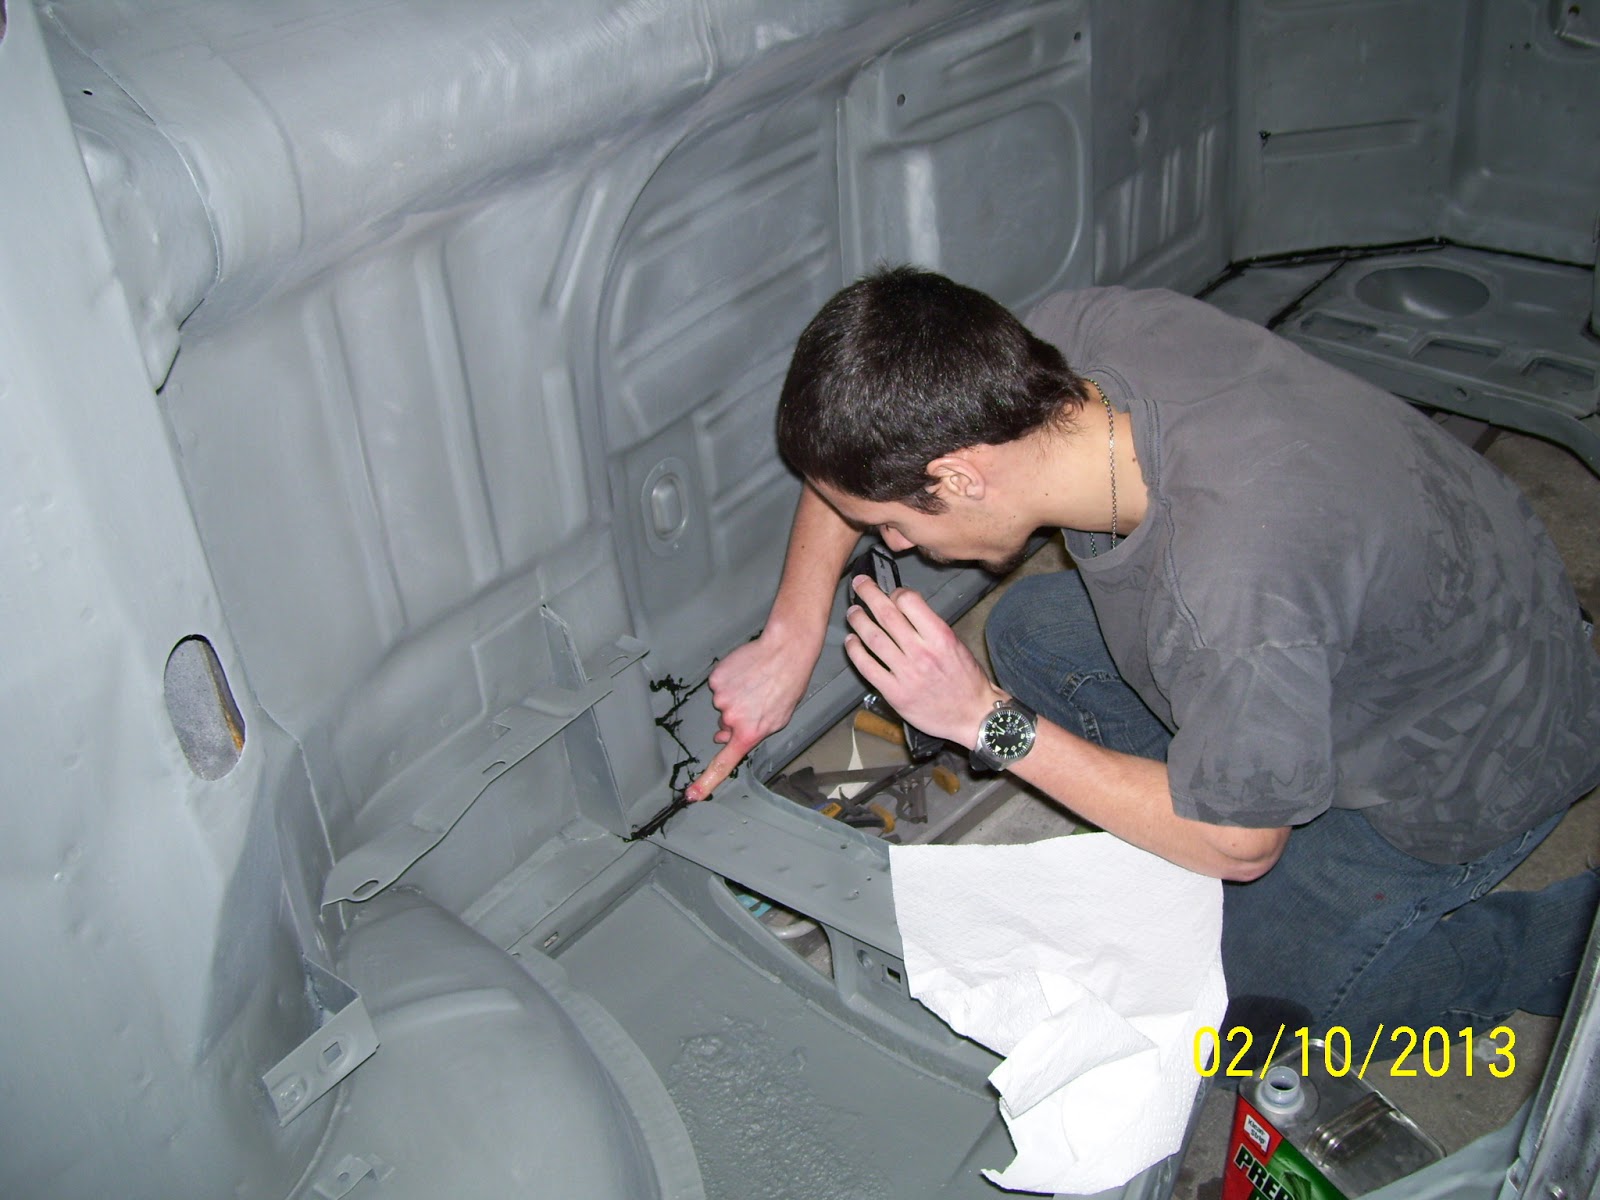
With all of the prep work in place, the time was right and conditions perfect for Ted and me to set off sealing ½ of the interior seams on one evening and finish up the balance on a following evening.  This is very slow work as you can only apply about 12-18 inches of sealant at a time max before you must shift to smoothing or it starts getting pretty gummy.  This time amount gets proportionally shorter as the humidity goes up as this directly accelerates the cure time and therefore leaves less time for tooling the seam.  In any case, making this a two-person job is the most efficient way to get the job done with relative ease and consistent results.  It’s messy work and you end up contorted into rather unflattering positions, but having extra hands and eyes on the job makes for a much less tedious experience.

After about three tubes of sealant and two solid evenings of effort, the interior seam sealing was complete and we could allow a few days of cure time to evaluate the job.  Fortunately, the finished product looked very nice and the cured material was staggeringly durable and well cured.  I like this stuff.
With confidence in the 3M sealer high and a comfort level in the application technique and smoothing, we began preparing the exterior floor for the same treatment.  This is a bit larger job as there are several more seams that require careful smoothing.  This will involve masking almost every seam and smoothing and pulling the masking as we go.  This makes for very tedious work, but also ensures the best quality finish and the smoothness I am looking for.  At the end of the day, I want the seams under the car to appear smooth and molded after the application of the bed liner material.  We will tackle that work in our next update!

Here's Ted looking over the fuel tank mounting area.  Gotta fill it!

Where the alignment drift is seen through the mounting hole was once the location of a self-tapping screw hole.  I don't like these punched holes and the jagged and unfinished look they have so each one was drilled out and smoothed to allow standard bolts to be used for tank mounting.

The buff stainless tank looks very tidy under the Boss.  Also note the convenient fuel drain on the right front corner of the tank.

Only slight flange trimming was required to get the tank to fit perfectly.  Here is a shot of the nicely polished top from the interior of the car.

Another shot of the polished stainless fuel tank top from the rear trunk lid opening.  Too bad no one will ever see it!

And the trick shot of the day!  Here is a look at the INSIDE of the stainless fuel tank.  just as nice on the inside as the outside.  Lovin that.....

 
Here's Ted again showing his well-honed skills at smoothing the 3M urethane seam sealer with a bit of Xylol.
 
Right front interior panels all sealed up!


Right rear interior panels seam sealed and drying.

We tried a few different techniques for smoothing the seam sealer and settled on one that requires masking, smoothing, de-masking, and smoothing one last time.

Left rear view of the sealed interior and trunk area.

Friday, February 8, 2013

Interior Floor & Trunk Priming

The last couple of weeks have been very productive in the shop!  The trunk floor and interior floor prep is complete and all of the SEM Rust Shield paint is nicely cured and with an extra pair of capable hands to help, the entire interior and exterior floor and trunk area is scuffed.

The main focus on this round of work was to get the interior areas that we recently coated with the Rust Shield primed along with the door sills and B-posts.  This would pretty much get all of the remaining bare metal surfaces in the interior locked down in preparation for seam sealing.
As with any coating application, the first task was to vacuum all of the loose dust and clag out of the car and swab every surface thoroughly with grease and wax remover until the surfaces were clean and the solvent had flashed off.  Then a few fresh tack cloths were used to scrub away the last reaming particles of debris before setting off to mix up a batch of primer/sealer.

As many of the followers of my blog have become accustomed to, I am a HUGE fan of the PPG line of products and swear by the entire system.  Just follow the instructions to the letter and apply good equipment and spraying techniques and this stuff just works.  Bare metal, original paint, EDP, or any combination of these is easily handled by the PPG DPLF line of primer/sealers.  This was once again proven by shooting the SEM coated surfaces with two coats of DP40LF primer mixed as a sealer by adding about 15-20% DT870 reducer by volume.  While there, I chose to touch up a few of the thinner spots that were created when scuffing the previously primed floor surfaces.
After a few days of letting the fresh primer flash off, I was very pleased to see the Rust Shield and the DP40LF had played exceptionally nice together, showing absolutely no signs of crazing or lifting on any surface.  This is a significant different between the Zero Rust product and the SEM Rust Shield in that the Zero Rust had a slight tendency to craze and lift at the edges of the thinner films. 

I suspect the primary reason for the Rust Shield’s advantage is that I used the recommended hardener which definitely made a huge different in the final coating durability.  Zero Rust had no such hardener either available or recommended.  The one distinct DIS-advantage to the Rust Shield is it is an absolute B*TCH to spray smoothly and by the time it is thinned enough to spray it has a very annoying tendency to sag or run………at least in my limited experience.  Zero Rust was a clear leader in this category, so take that for what it’s worth…….
Getting back on topic, Ted and I jumped on scuffing the fresh primer after a few days to make the job immensely easier.  One thing to note about PPG DPLF primers is that it gets HARD after about a week of solid cure time and it is a miserable pain to sand by hand in that state.  So, if you know you will not be going straight to a finish coat right away, it’s best to scuff it when it’s still relatively “soft” and then it can be left indefinitely in the “scuffed state” until you are ready to re-prime it and begin the wet-on-wet application of finish coats.

So at the end of this part of the adventure, we now have the interior and exterior floor and trunk surfaces in primer and all of the surfaces scuffed.  Next on the menu is fitting the new stainless steel fuel tank, spot priming the areas that need it and then begins the process of seam sealing the interior and exterior floor areas in preparation for exterior floor painting and the application of U-POL Raptor urethane spray bed liner material on the entire lower surfaces of the car and wheel tubs.
Lot’s more exciting stuff to come in the next several weeks and the spring and summer should be interesting!

Like color-matched luggage, young Ted fits in the trunk area like he was made to be in there!  Here he is finishing up the wipe-down of the interior with wax and grease remover before the priming fun begins!

After a brief bit of strategic planning, we decided to tackle priming of the rear wheel tubs first along with some small spot prime areas that got a bit thin when we scuffed the exterior floor.

Looking toward the right rear corner, you can see how well the PPG epoxy primer covered the areas that were previously coated in SEM Rust Shield.

Still tacky in this shot, the driver door sill and B-pillar look quite nice in fresh primer.

Some of the detail in the left rear trunk.  After upgrading my spray guns to the 3M PPS cup system, getting into tight spots has never been easier.  The gun works in any position so you can shoot just about any surface in a position that you can manage without ever worrying about spilling a drop!  Money well spent!

Another shot of the left rear trunk floor primer fresh out of the gun.

And finally, the passenger door sill and B-pillar with a fresh coat of primer.  Nice!

Tuesday, February 5, 2013

Trimming Rear Fender Lips

You know you’ve “made it” in the Mustang hobby when you get your new NPD parts catalog in the mail early.  After the past few years’ worth of investment in the NPD product line, I was kinda expecting an autographed copy…….but alas……no joy (just kidding).
On the cover of the new catalog, a beautiful cream-colored fastback is shown from the left rear ¾ view with emphasis on the rear wheel opening (to my eye anyway).  Taking nothing away from how nice the car is, this photo reminded me of a detailing trick I use in this area that is decidedly against the “concours bible”, however it makes for a nicer presentation of almost any car nonetheless:  Wheel lip trimming.
Basically, the rear wheel lips on almost all classic Mustangs are the model of variability.  Mass production techniques being what they were, you can often spot huge variances in the fender lip width from car-to-car and even from one side to the other on the same car.  Coupled with the “normal” alignment doodads and lumps-n-bumps, this bugs me considerably and is especially noticeable on lighter colored cars, like the one on the NPD catalog cover (made ya look!).
Since my Boss 302 will be a shade of “Screamin” white, the fender lips will be very obvious and any inconsistencies easy to detect.  As such, I thought it would be a good idea to document how I trim the rear fender lips to be nice and even on their exposed edges and offer a few hints on how it’s done and what to be aware of if you choose to do this to your car.
The most important rule in making this simple modification is to remember to stay outside the spot weld line, toward the lip edge and do not cut through the spot welds.  This weakens the joint and makes sealing the lip areas quite a bit more difficult.  Generally speaking this means the lip width will rarely get narrower than about ¾” on most cars.  Fortunately, this seems to allow plenty of room to clean them up, but careful measurement is still in order to make absolutely sure to clear the spot welds.
Once the appropriate lip width is established, I simply use a machinist’s square set to that width and trace along the lip to mark the cut line I need to follow with the cutoff wheel.  Then it is a relatively simple matter of carefully trimming off the lip to the line and finishing the edges with a body file, an angle grinder and/or sand paper.
For the investment of about an hour, I was able to tidy up both rear fender lips and they are now ready to be finished off nice and smooth as the body work phase approaches.  It’s simple and easy and makes quite a difference to the eye when finished.  So there ya go!  A quick tip to correct an often overlooked detail.
Ragged fender lips are a peeve of mine.  With a little work, I was able to clean up the inner lips and even the width so they present much better than when they were produced.

This poor photo shows the cleaned up edge of the passenger side rear fender lip.  Lots of bodywork yet to be done in this area, but you can clearly see how much cleaner a consistent inner edge and even width makes this area look.

Driver side rear lip is also nice and tidy.  Most times, very little material removal is actually required to get the fender lips looking nice.

The passenger side rear edges also look nice following a little trimming.  You can also see that I stayed clear of the spot welds to avoid any compromise to the strength of this critical joint.

Friday, January 25, 2013

Attention in the Trunk Area

Time is a fickle thing when working on an old car.  It ebbs and flows frequently and often without much of a wake.  Sometimes you turn around and dust yourself off and realize you actually made some use of it when you weren’t paying so much attention to it.  Poetic eh?

Anyway, a lot of time has been spent recently, tackling the preparation and base priming of the rear interior areas of the Boss.  There is no small amount of surface area to deal with in this section of a fastback Mustang and I wanted to make sure I didn’t miss anything on my way to planning some finish work this summer.  Also, of significant importance in the project, I now have HELP!  My daughter has managed to hang on to a young man that happens to have a particular interest in just about everything involved in car restoration and has been rather quietly watching my work from the sidelines for a few years.  We’ll call him “Ted.”
“Ted” has been hanging around the shop, asking good questions, lending a hand and heading out to car shows and cruises with me when opportunity presents itself.  At the same time, he’s been attending trade classes at a local school in the paint and bodywork trade and I’m happy to report he’s top of his class!  At some point, in a moment of weakness (and in an attempt to get him to quit drinking all my damn coffee!), I asked him if he’d like to get in some genuine “work” time on the car and help me on a regular basis.  Luckily, after a mandatory consult with his parents, he agreed to dedicate a few days a week to the project and I have definitely appreciated the extra pair of capable hands.  I have agreed to hold back absolutely nothing and will do my level best to educate him on every aspect of the work I do.  So the bottom line is:  You can expect to see a lot of Ted in future blog entries as I believe he deserves credit for every stitch of his effort and I believe he has the potential to make the experience more valuable than we might expect.  It is important for me, and the hobby in general, to pass along what I can, when I can, to preserve the future of our beloved restoration hobby and ensure our passion lives on for generations to come.  More on this in a later blog.

With the bulk of the bare metal preparations complete, I needed to tackle a few more small modifications to the body and floor I have been pondering over the last several months.  The first was to remove the original e-brake cable brackets from the frame rails as they are no longer required with the new Lokar tunnel mounted e-brake handle I will be using.  These took all of about 15 minutes to remove since the spot welds holding them in place were very easy to identify and cut, leaving only a little bit of welding and grinding to clean things up.  Then a quick scuff with a sanding pad and each of the spots was shot with a coat of PPG DP40-LF primer and this job was done.

Next, I set about filling the seam between the lower rear quarter panel and the rear rocker.  This was another seam I have always found rather unsightly and I wanted to smooth this area up in similar fashion to what I did in the upper trunk lid area I mentioned in my last post.
After thoroughly cleaning the seam of all remnants of debris and leftover seam sealer, I carefully stitch welded the groove, cooling between small stitches with air until the entire seam was no more.  I repeated this same procedure on the opposite side and then started the delicate process of smoothing the welds.

When the welds were as close to flat as I could get them, I smeared up the surfaces with an oversized Sharpie marker and finished the surfaces with a 36-grit pad on my DA sander.  This technique shows the low spots that will require more metal finishing quite easily.  As it turns out, the surfaces were surprisingly smooth and the work in this area should be rather minimal in preparation for final finish work.
At this point, we were in good shape to begin sanding the trunk area and axle tunnel area on the interior to prepare the surface for the SEM Rust Shield paint that I decided to use under the PPG DP40-LF epoxy primer that would follow.  In the course of a solid evening, Ted and I had the scuffing completed and had time to go ahead and scuff the already primed surfaces in preparation for the final primer and paint layers that are planned in the near future.

With the sanding complete, it came time to swab everything down with grease and wax remover and let it all dry overnight.  Then it was time to mask off everything that didn’t need coating and tool up the spray gun to apply the SEM Rust Shield to these freshly prepared areas of the trunk and floor.  Somehow, I managed to get my daughter Desiree’ into the act and the masking went very quickly. This allowed plenty of time to apply two solid coats of SEM to all of the bare metal surfaces that remained inside the car and let it dry thoroughly before the next round of scuff-sanding could begin.
After several days of drying time, it was time to scuff the freshly primed surfaces to make way for a good coat of PPG primer/sealer to lock everything down. I recruited Ted to scuff the “tight” areas given he weighs about 120 pounds soaking wet and can fit into small spaces I can only dream about reaching.  Another solid evening worth of work and the surfaces were fully scuffed for the next round.  We did identify a number of spots that required brush application of the SEM product to ensure complete coverage.  However, the bulk of the surfaces looked very well covered and ended up being rather easy to scuff with heavy Scotch Brite pads alone.  Another round of touch-up priming with the SEM Rust Shield product and we will soon be ready to seal up the entire interior area with PPG DP40-LF epoxy.
Original e-brake brackets needed to come off, so I marked each one for removal.  This is the bracket located under the driver seat area.  Notice the very clear spot weld locations.  This made it very easy to drill them out for easy removal.

Each rear frame rail had one of these brackets installed, so off it will come!

After quickly drilling out each spot weld, these brackets came right off with little effort.

Under each bracket flange was minimal rust, making clean-up very easy to accomplish.

Passenger side area has been smoothed and is now ready for primer.

Left side e-brake bracket surface ready for primer.

Here is a close up of the former front left e-brake bracket location.

A quick few coats of PPG DP40-LF primer and the modification is totally invisible.

Right side rear e-brake bracket location is smoothed up and primed.

Front e-brake bracket area is ready to go!

While we were working on priming the spots where the e-brake brackets were removed, I decided to prime the floor drain covers I installed some time ago.

With momentum on my side, I decided to weld up the quarter seams just behind the doors.  Here, the seam has been thoroughly cleaned and is ready for welding.

Left side all welded up!

And the right side too!

The dark lines are lo areas that are highlighted by the use of a jumbo Sharpie marker as an indicator and sanding the surface with a 36 grit DA sander.

Here is a peek at the passenger side filled rocker seam after sanding with the DA.

All of the work in the previous month or so has the rear inner quarter structures in good shape for priming.

Front trunk floor is etched and ready for primer.

Left inner quarter is also in good shape for priming.  The "wet" area between the outer wheel house and the quarter is leftover wax and grease remover that hadn't dried yet when I took this picture.

This is Ted.  Ted works hard.  Ted is skinny.  Ted fits in small places.  I like Ted.

All of the EDP coated parts are scuffed with sanding pads prior to application of SEM Rust Shield primer.

While we were at it, we decided to sand the entire interior floor at the same time we did the rear trunk area.  A trick I use to do this kind of work and save HUGE amounts of time is to use a 6" nylon cup brush on my body grinder to scuff-sand the surface.  This is the exact tool used by spray on truck bed liner installation companies.

Here, Ted is sanding the inner tail light panel surfaces.

Everybody loves playing with masking tape!  My daughter Desiree' decided to join in and help mask the trunk area in preparation for the SEM Rust Shield.

Here is the inner trunk areas after the SEM Rust Shield has dried.  Nifty!

Another view of the freshly applied SEM.

I left the original sound deadener in the rear quarters since it was adhered so well and there was no rust underneath.  The SEM Rust Shield applied right over this with no trouble at all.

Here, Ted is sanding deep inside the rear quarters to prep them for PPG epoxy primer.

Scuffing the rear trunk floors.

Ted scuffing the inner tail light panel for primer.

And there ya go!  The rear axle tunnel and divider is scuffed and ready for the PPG epoxy primer.

Front trunk floor ready for primer.

Rear inner tail light panel is fully scuffed.  Can't wait to see these surfaces in fresh, smooth PPG primer.