Saturday, November 20, 2010

Frame rail repair

Another good, solid few days of work on the Boss.  This weekend, I decided to tackle the repair of the left frame rail damage where the P/S bracket was ripped from it's mounts and a jack-wagon repair was attempted (more than once) at some point in the past.  In earlier postings, I show the damage and remnants of the repairs, so have a look to get a good idea as to the extent of damage.

I started off by fabricating the upper frame lip section.  This was the smallest piece that was required but it also acts as a sort-of "guide" to the rest of the job.  Using a clean sheet of 14 gage cold rolled steel, I transferred the pattern from the frame to the material and cut the patch slightly oversize on my band saw.  Now that the piece was a very manageable size, I slowly worked the edges with files, belt sander and angle grinder until the fit was just right.  I then clamped it up with locking pliers and tacked it into place with the MIG.  With it tacked up, I worked the shape just a little with a hammer and dolly to make sure the proper curvature was achieved.  Once I was satisfied with that, I stitched the patch in place starting from the inside out.  This essentially means the seam is fully welded from each side, ensuring complete penetration and a very strong repair.  Once welded, I ground all the welds down and prepared to fabricate the large lower patch.

In similar fashion to the lip patch, I traced the shape of the required patch on the sheet steel and cut it out a bit oversize to allow working stock.  I massaged the edges as above until the fit was just right then drilled plug weld holes along the outer edge.  After a quick trip through the blast cabinet, I treated the underside of the patch with weld-thru primer and let it dry while I had lunch (and sold a pair of Lincoln Versailles disc brake rear axles at the same time too!).  Once the primer was dry, it was time to tack in the lower patch.  Because this patch has a compound curve to it, I tacked the panel in from the end and slowly worked my way around, tweaking the alignment of the patch as I placed each tack.  This allowed me to exactly match the curves of the frame rail and gently form the joints to ensure a perfect fit.  With all of the tacks in place, I stitched the panel in place by staggering small, half-inch long welds around the seam until the entire seam was welded solid.  I also filled in all of the plug welds I had made room for and ground everything smooth.

With all the welding and grinding done, I moved on to applying a small amount of All Metal filler to the surfaces to ensure I had everything smooth and to fill the slight remains of the "ding" left in the inner frame wall that I couldn't safely pull.  With everything skimmed lightly in filler, I had a bite to eat for dinner with the family and let the works dry.  About an hour later, the filler had set nicely and I sanded everything smooth.  The end result is something I am quite happy with.  Since this car will be converted to power rack & pinion steering, I have decided to fore go drilling the two lower bracket holes for the original P/S ram bracket in the lower frame to keep everything tidy and weather tight.

The next step is to order a new corner brace from CJ Pony Parts so I can complete the torque box to frame corner area and prime the works again for protection.  One more headache out of the way!

Frame lip was the first repair.  Here the patch has been trimmed and fit to the frame and is clamped into position with locking pliers.

Here is a look from the bottom (actually top) of the frame lip patch in place.

Frame lip patch tacked into place.  A little hammer and dolly work was required at this point to slightly tweak the curvature of the lip to match the frame rail.

Although you can't tell it in this picture, the lip patch was fully welded on both sides of the seam to ensure weld penetration and strength.

Finished lip patch from the bottom.

Finished lip patch from the top.

Here, the lower frame rail patch is clamped into place after the final tweaks were made to get it fitting just right.  Plug weld holes have been drilled along the lip flange as well.  Next, the patch was blasted clean in the blast cabinet and the inboard side was coated with 3M Weld-Thru primer before welding.

The patch is fully welded in by staggering small, half-inch long welds along the seam.  You can see the relatively small heat affected zone around each weld which keeps warpage to a minimum.

With the welds ground flush, the patch is virtually undetectable from the original frame sheet metal.

Another angle of the completed repair.

I added a thin skim of All Metal filler to make sure I ended up with a smooth repair and to fill the dimple that remained near the rear mounting hole.

Here is the completed repair ready for the installation of the corner brace and then primer.

Tuesday, November 16, 2010

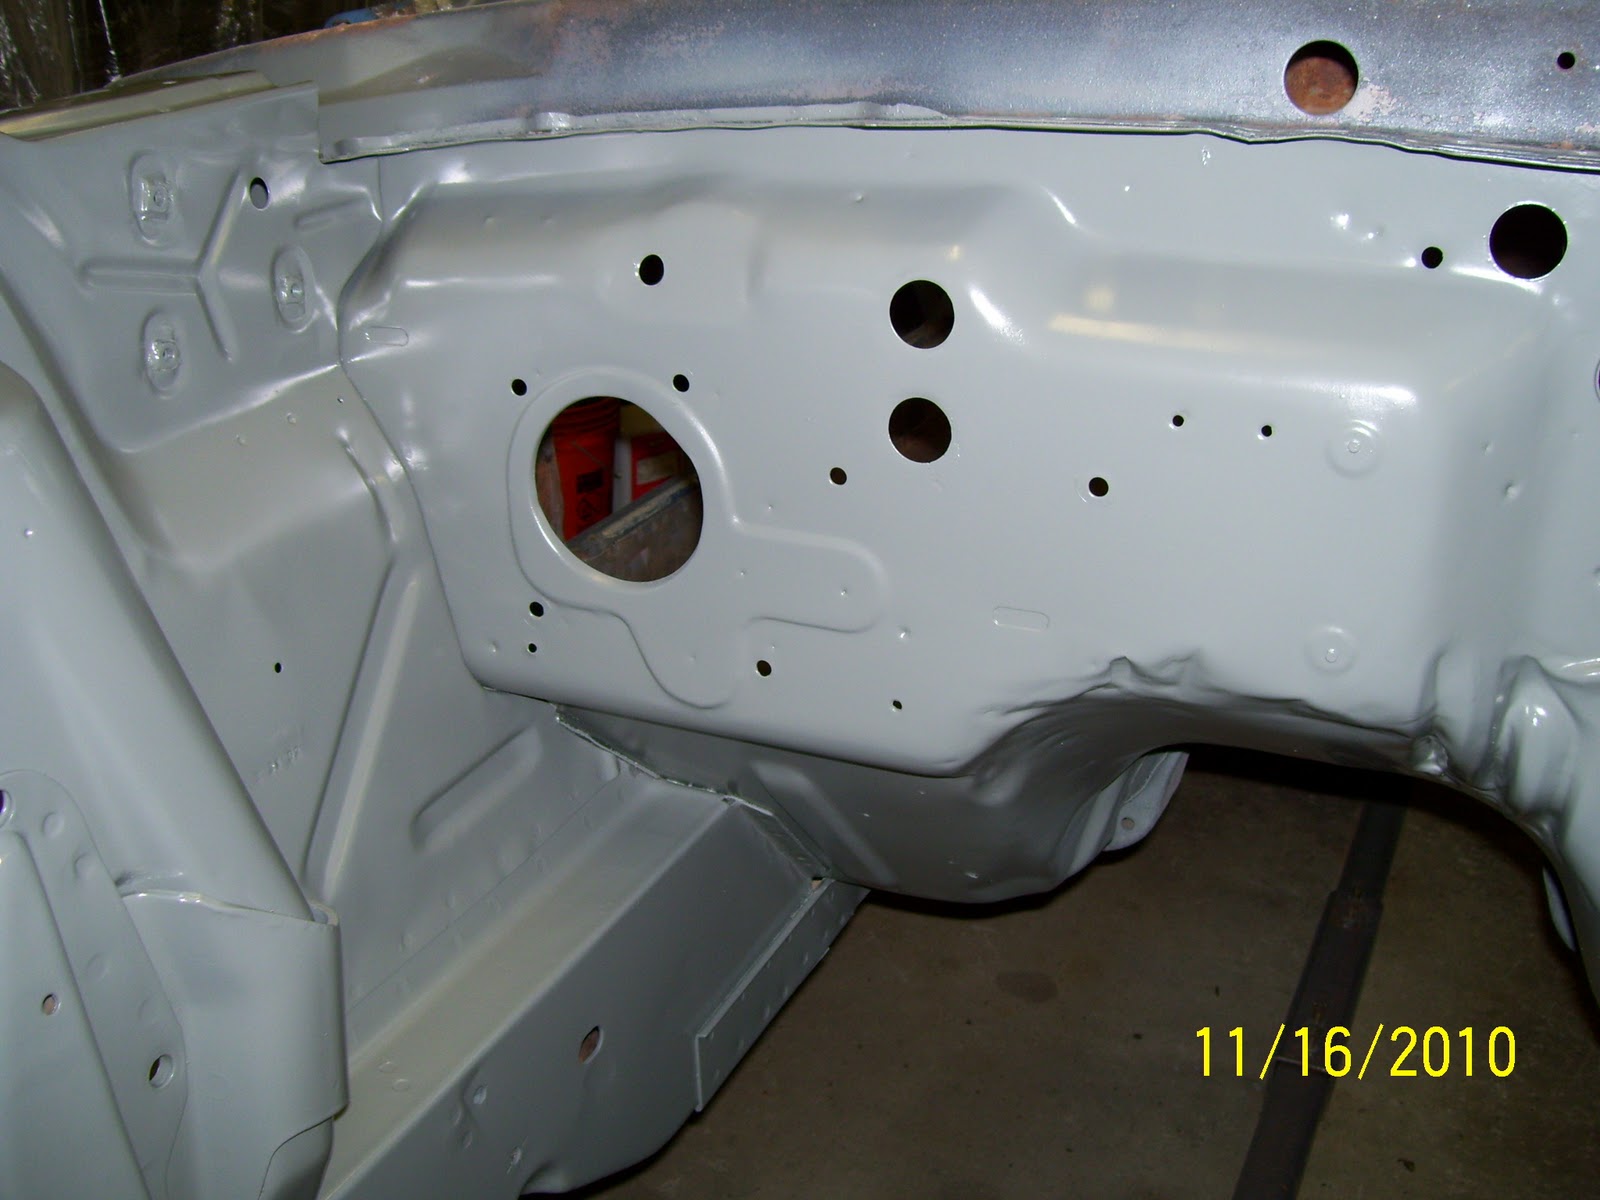
Engine bay is PRIMED!

Today was one of those days where just about everything "clicked" (I love those days)!  It has been a VERY long time since I painted anything of significance, so it took a bit to re-acquaint myself with my spray equipment and the process of painting.  However, after a brief learning period, we were up and running and the end result is great!

First, a little about the equipment and materials I use:

I pretty much use PPG products exclusively for a few reasons (and cost ISN'T one of them).  First, PPG products simply work as advertised.  Follow the instructions to the letter and the stuff simply works every time.  Secondly, PPG HQ and their local retailer reps are awesome for getting help and information whenever you need it.  I should take a second to thank Chris and the folks at GNE Paint in Lake Orion, MI for all their help with anything PPG and automotive painting in general.  Third, I'm used to PPG products, having painted my 1988 Mustang drag car over 10 years ago with PPG products and it still looks like I just shot it yesterday.  Incidentally, that was also the last car I painted and I was a bit rusty indeed.

On the "hardware" side, I stray from the "norm" in a fairly big way where my spray equipment goes.  I use and LOVE my TP Tools HVLP Turbine spray system for all of my painting needs.  I spent a very long time studying the popular conventional painting equipment options and finally settled on the turbine HVLP for it's many advantages where my particular needs were concerned.

The TP Tools turbine HVLP has the one big advantage of delivering totally clean (filtered in fact), dry, oil free air every hour, every day, all the time.  No fish eyes, no moisture.  Secondly, there is absolutely no compressor required and therefore, none of the usual headaches and expenses associated with delivering clean, dry air to a conventional HVLP spray gun.  Third, the cost of the total system was (and is) far less than outfitting a shop with all of the equipment necessary to shoot with a conventional gun (e.g., compressor, filter, dryer, regulator, piping, hose, higher-end spray gun(s), etc.).  And finally, much like PPG products, it works!

Now, during my research phase, I ran into my share of hard case, self-proclaimed old school "professionals"  that sh*t all over turbine HVLP units.  So I started asking questions and found that not one single guy that was spouting off about turbine HVLP's supposed inferiority had EVER used one of the machines.  Arm-chair quarterbacks full of BS, armed with a keyboard and too much time on their hands instead of dried paint and experience.

Like any new tool, you have to take the time to understand it to use it effectively.  A turbine HVLP system is absolutely NOT the same as a compressor-based system and any attempt at using it in the same way will certainly result in disaster.  Your mix requires about 10-15% more reducer than with a conventional gun and you work a bit closer to the surface than you would otherwise.  Once you learn how to use the system it is absolutely amazing how efficient and clean it is.  Transfer efficiency is usually better than 80% and there is almost no overspray whatsoever.  Anyway, I bought one over 10 years ago, I loved it then, I love it now.  In fact, I will be upgrading to a gravity feed gun and a touch-up gun in the near future to round out my gun selection for this project.

Finally, on with the primer!  As I mentioned above, PPG products work very well when their application instructions are followed.  In the past, I was using PPG DP-40 primer and loved the stuff.  Today, their newest product is called DP-40LF (the "LF" stands for Lead Free).  As I discovered, the behavior of the newer products was quite a bit different than the old DP-40, but with a bit of adjustment and a quick learning curve, the stuff laid on the surfaces nice and smooth and we were in business.

I decided on 2 coats of primer for all of the surfaces.  I started by degreasing everything with DX-330 and once it dried, we tacked everything down to remove any lingering dust.  After that, I mixed up about a pint of primer and let it fly (twice).  About 5 hours later, the engine bay, inside and out, wore a nice, smooth coat of epoxy primer!  I must say, everything looks sooooo much better in one solid color.........even if it is battleship grey.

Supplies laid out and ready for battle.  I love the PPG products and highly recommend them to anyone tackling a restoration of their own.

More essentials:  Mixing ratio cups, tack rags, and a cleaned and adjusted turbine HVLP spray gun.

Here is the air supply unit used with my TP Tools turbine HVLP spray system.  I love this thing!

French-made SICMO turbine HVLP gun.  I'm not one to give the French credit for much of anything, but this gun works very well.

What a TERRIBLE mug!  Actually, this is just a reminder to use a good respirator mask for ANY type of work like this.  No compromise.

PPG DP-40LF primer all mixed up and ready to spray.

Yet another advantage of having a car on a rotisserie is being able to spray every nook with primer from just about any angle.  This job would have been hateful with the car on stands!  Blech!

After two nice coats of primer, the left outer apron looks very nice.  A sign of things to come......I hope.

Left inner apron looks equally good.  Now I'm getting a little excited.....

LR corner of the engine bay showing the new NPD apron and firewall.

RR corner of the engine bay and firewall.  Here you can see the damage at the top of the trans tunnel where the engine/trans had been crashed into the firewall pretty hard.  One more thing I gotta fix.

Right inner apron full view.  Notice how nicely the weld seam is hidden at the top of the RF apron?

New front radiator support from Dynacorn looks ok.  Very irritated with the crooked hood bumper mount seen here.

Right outer apron full view.

Sunday, November 14, 2010

A bit more history....

As I sit in my hotel room in one of the more dismal parts of Mexi-hole wasting away a Sunday because there are no flights out of here, I took the opportunity to dig around the net trying to find out anything I can about the history of my car. As luck would have it, I stumbled on some information a fellow that contacted me a few years ago had posted on the Boss 302 Registry forum when he was looking for my car. All told, there's still about a 10-year gap in its 40-year life that remains unknown, but if any of the following is reasonably accurate, I can account for about 75% of the car's life.

The original buyer was a man named Ray Guy. It was purchased from Bird-Kultgen Ford in Waco, Texas and raced around the Waco area until it was sold to a Johnny Patrick and apparently raced some more.

Sometime between September and December of 1974 Mr. Patrick sold the car to Moon's Used Cars in Waco, Tx.  Perhaps a sign of the times in '74 given the gas crunch, etc., Moon sold the car through one of the Houston-area auto auctions.  At that time, the car was reported to have Hooker Headers decals on both front fenders, (and presumably Hooker headers since that's what was on the car when I bought it).  The license plate at the time was reported as Texas "DTF-261".

Between late '74 and 1983, the car drops off the radar screen and eventually ends up for sale in Del Rio, Texas, a West Texas / Mexican border town just south of the Amistad Reservoir and west of Laughlin Air Force Base.  By this time, it's been hit in the left front and the rear end, possibly in the same (apparently minor) accident.  In about the middle of '83, a fellow by the name of Russell Barnes out of Austin, Texas bought the car and moved it to a pole barn in Wimberly, Texas.  This is where the car was when we bought it in 1984 from Mr. Barnes.  Curiously enough, there was another Boss 302 parked beside it in the barn that was front-to-back solid bondo and in much worse shape than my car.

Since buying the car in 1984, it was stored in the condition that I bought it, in South Texas; first in the coastal towns of Rockport, then Aransas Pass, until June of 2007 when it made the temporary move to my Uncle's home in Lufkin, Texas.  In August of 2009, my uncle loaded the car on his very nicely appointed car hauler and drove it to Michigan, and the comfort and security of its current home.

As much as I'd like to fill in the missing 10-year gap, I am reasonably happy with this most recent information.  I would love to know if there are any original pictures and/or paperwork still in the possession of the first two owners (or their families).  But that may remain an unfulfilled wish at this point.

Saturday, November 13, 2010

Sand blasting the engine bay and filling the RF fender apron seam

Sand blasting and I have developed a love-hate relationship over the last two weeks.  On the one hand, it is probably the nastiest, dirtiest, most uncomfortable job involved in restoring a car and takes a long time to do yourself, even with fairly good equipment and great help (thanks Dad!).  Couple that with the undeniable fact that you will discover sand can get into just about any place a man shouldn’t EVER have sand…….well…….you get the picture.
On the flip side, however, there is probably no better way to get decades worth of crap, paint, sealer and rust off a car’s most intricate surfaces.  This reason alone gave me the motivation to spend about 10 solid hours squirting about 1100 lbs of sand toward the the engine bay of my car inside and out.  What I discovered after the job was done was possibly the biggest, most welcome surprise in the 25 years or so I’ve owned the car; beautiful, solid sheet metal!
To further the enigmatic nature of this car, I was pleasantly surprised to find that many of the “normal” rusted out areas expected on old Mustangs were actually in exceptionally good shape!  Torque boxes, lower shock towers, and front frame rails were all very solid and will require very little work to get into pristine condition.  There is no better motivation!
Once everything was blasted clean, I set to filling the weld seam along the top of the RF fender apron where I grafted the original apron top containing the VIN to the new panel from NPD.  I managed to keep distortion to a minimum during the installation and thus a minimal amount of filler was required to get it into shape.  For filling weld seams, I like to use a product called All Metal from USC.  This product is about 80% aluminum filler and is often used as an alternative to the lead used in leaded body seams (like the Mustang C-pillars).  It spreads fairly smooth but is a bitch to sand.  However, once it’s there it is very strong and finishes like metal.
The final step in this series was to clean up the remaining undercoating on the firewall that sand blasting didn’t remove and then chemically treat the bare metal to remove any remaining rust.  I managed to scrape and brush the remaining undercoating patches clean with little effort and used laquer thinner to clean any residue off before etching. 
For metal treatment, I use a phosphoric acid-based metal prep designed to remove any remaining rust from metal surfaces, etch the metal and leave a crystalline-phosphate surface primer behind to inhibit flash rusting and provide an excellent base for primer/paint adhesion (that’s the white, powdery coating you will see in photos).
The next step will be to clean the surfaces with PPG DX330 Acryli-clean solvent to remove any residues and other schmutz that remains and coat everything in two coats of PPG DP40LF epoxy primer.  This will effectively seal the entire engine bay from future corrosion and allow me to move forward making further repairs to the chassis without worry of having bare metal surfaces constantly at risk.  I learned a lesson here and that was to put everything in primer once a job is complete before moving to the other work, no matter how small the project.  I have been making such wonderful progress getting things repaired forward of the firewall, I almost got too far ahead of myself.  Lesson learned.
As you can tell by the picture, the dust hadn't settled yet when I snapped this shot.  My driveway looked like a beach, but the nice clean metal was quite a pleasant sight.  Dad and I screened and recycled 350 lbs of sand 3.5 times to get this job done and still managed to keep about 225 lbs for future use.  That's about 1100 lbs of sand through my little pressure sand blaster in about 11 hours!

Right side apron area showed absolutely no signs of heavy rust anywhere!  A miracle to be sure!

Left front shock tower and frame rail were also exceptional.  You can see the leftover undercoating on the firewall around the clutch pushrod hole.  I will remove this after I have filled the apron weld seam and used the metal prep solution to etch the bare steel.

Right front shock tower and rear apron looked very good after blasting.  At this point, I was starting to feel pretty good about the ol' girl.


Here's a close-up of the left frame rail where some of the scabbed-on pacthes were welded.  No evidence they were ever there!  I still need to patch the lower rail, but this should be undetectable when I'm done.  Also, I removed the corner brace between the torque box and frame rail before I blasted everything to make room for the frame repairs.  I will re-install the corner brace once everything is complete.


Before setting off to etch the bare metal surfaces with metal prep, I decided to finish the weld seam on the right front apron.  After a thin skim of All Metal filler, the weld seam is ready to sand.  I ended up skimming and sanding it twice to get the surface just right.

Here's a wider angle look at the filler.


With everything sanded down, you can see how little filler remains in the seam.  I'm pretty happy with that!


Since it had been a few days since I sand blasted eveything, I decided to etch the bare metal before trying to clean up the firewall.  This is the result after the first coat of metal prep solution.  The white powdery residue is actually a good thing!

This is a beautiful sight to any classic Mustang restorer!  The lower shock tower "pockets" are in excellent shape with clean, solid metal everywhere.  Another miracle with this car.......

With the surrounding metal treated, the firewall undercoat residue is quite noticeable.

Here again, the etched metal patina in interrupted by the leftover undercoating on the firewall.  Time to take care of that!


After only a few minutes with a sharp, flexible putty knife and an abrasive wheel in a drill motor, the remaining undercoating was gone and clean, bare metal remained.  I degreased and treated the fresh metal immediately with metal prep and the results are an even coating of phosphate on the metal.


Finally, the firewall is clean an prepped for the next step.  Next on the agenda is epoxy primer!


Friday, November 5, 2010

Prep work leading up to engine bay sand blasting & priming

The latest round of work has been a mixed bag of various things in preparation for sand blasting and priming the entire engine bay (firewall forward).  I apologize if the following pictures look a little "disconnected" but there really is method to my madness.......at least that's what I keep telling myself.

Anyway, the series starts will the first official job using the rotisserie:  the entire undercarriage of the car was thoroughly pressure washed to rid the car of  as much of the caked mud, grease, loose rust, etc. that lived on it's belly all these years.  Once all the washing was done, I was absolutely stunned at the volume of crap that was once stuck to the car!

The second phase was surgically removing the scabbed-on weld patch on the driver's side frame rail where the power steering bracket was ripped from the rail and a "repair" was slobber-welded in place.  After  a few tedious hours with all manner of air tools, the patch was removed, only to reveal some hidden cracks and broken parts inside (as expected).  I carefully cut away the damaged metal in preparation for a patch to be carefully fitted in place of the damaged material.  I also had to pull a small crease in the rail to get it as level with the other surfaces as possible.  For this job, I pulled out my trusty draw-pin welder and pulled the crease with a series of welded draw-pins.  Once this was done, I cut the pins off and ground them smooth, leaving no evidence that such work was ever required.  I plan to thoroughly sand blast the area to remove the surface rust before any further patchwork is done.

Third, I was able to identify three additional cracks in the suspension pickup points that required repair.  I used the same technique I used to repair the crack in the shock tower and all repairs will be invisible once they are primed and painted.

Next, I spent several hours touching up the sport welds forward of the firewall.  I don't like the spot welds that snag you every time you work on the car and vowed to make sure I smoothed every one of them as part of the restoration.  The shock towers in particular seemed to be one of the worst areas for this.......but not anymore!

And finally, THE BIG ENCHILADA!  As an unexpected gift, my uncle "sponsored" a brand new cowl panel assembly, which arrived in good order via the trust UPS guy.  At first blush, this looks like a really nicely made piece.  Like much of the other restoration sheet metal parts available for the 69-70 body Mustang, this part is made by Dynacorn.  This will be a pretty major undertaking that I plan to get accomplished over the next 2-3 months while the cold weather socks us in here in southeast Michigan.  Exciting stuff!

The rotisserie allowed me to pressure wash the bottom of the car very well.  The amount of crap that came off the chassis was unbelievable!

Bottom actually came out pretty clean!

After the washing, an interesting little detail was revealed.  Can you guess what it is?  Answer:  Not much red oxide primer and lots of blue paint.  Seems the car was perhaps repainted at some point in it's life.

Letting the body drip-dry after a bath......

This is the dreaded frame path after delicately cutting it away from the rail.  You can see the slobber weld beads still on the frame.

Here, I have cut away the damaged frame material and you can see how the frame "patch" is no longer part of the equation.


Another view of the frame with the damaged material removed.

The P/S bracket damaged the frame when the lower section of the frame rail ripped out and left a fairly significant crease in the frame that can be seen just to the left of the mounting hole in the image above.  Also, you can barely make out the crack through the mounting hole (running vertically through the hole in this picture) that required welding as well.

This nifty tool welds steel pins to the surface of the metal and allows the use of a special slide hammer to pull dents without the need to drill holes all over the place.  This tool has proven to be worth its weight in gold and I highly recommend one if you ever decide to tackle a restoration like this.

In this picture, I have a pin welded to the crease, ready for the slide hammer to be attached and the pull to begin.  It took about 6 pins to pull the crease, but the end result will require only a thin skim of filler to be undetectable.


This image along with the following two show small stress cracks I was able to identify with the car inverted on the rotisserie.  These cranks were virtually invisible while on my back under the car during previous inspections.

I need to straighten this flange a bit as well......


The cracks were excavated with a rotary tool to allow good weld penetration, welded up and finish-ground.

Every spot weld forward of the firewall prone to snagging flesh was dusted with the angle grinder to remove any nasty burs.  I also finished all of the other spot welds left over from the radiator support installation at the same time.

A nice, new, rust free cowl panel courtesy of my uncle!  Can't possibly thank him enough and can't beat support like that!

The next time you see this cowl, it will be in the process of being installed in the car!  Winter project on the way......