Friday, January 25, 2013

Attention in the Trunk Area

Time is a fickle thing when working on an old car.  It ebbs and flows frequently and often without much of a wake.  Sometimes you turn around and dust yourself off and realize you actually made some use of it when you weren’t paying so much attention to it.  Poetic eh?

Anyway, a lot of time has been spent recently, tackling the preparation and base priming of the rear interior areas of the Boss.  There is no small amount of surface area to deal with in this section of a fastback Mustang and I wanted to make sure I didn’t miss anything on my way to planning some finish work this summer.  Also, of significant importance in the project, I now have HELP!  My daughter has managed to hang on to a young man that happens to have a particular interest in just about everything involved in car restoration and has been rather quietly watching my work from the sidelines for a few years.  We’ll call him “Ted.”
“Ted” has been hanging around the shop, asking good questions, lending a hand and heading out to car shows and cruises with me when opportunity presents itself.  At the same time, he’s been attending trade classes at a local school in the paint and bodywork trade and I’m happy to report he’s top of his class!  At some point, in a moment of weakness (and in an attempt to get him to quit drinking all my damn coffee!), I asked him if he’d like to get in some genuine “work” time on the car and help me on a regular basis.  Luckily, after a mandatory consult with his parents, he agreed to dedicate a few days a week to the project and I have definitely appreciated the extra pair of capable hands.  I have agreed to hold back absolutely nothing and will do my level best to educate him on every aspect of the work I do.  So the bottom line is:  You can expect to see a lot of Ted in future blog entries as I believe he deserves credit for every stitch of his effort and I believe he has the potential to make the experience more valuable than we might expect.  It is important for me, and the hobby in general, to pass along what I can, when I can, to preserve the future of our beloved restoration hobby and ensure our passion lives on for generations to come.  More on this in a later blog.

With the bulk of the bare metal preparations complete, I needed to tackle a few more small modifications to the body and floor I have been pondering over the last several months.  The first was to remove the original e-brake cable brackets from the frame rails as they are no longer required with the new Lokar tunnel mounted e-brake handle I will be using.  These took all of about 15 minutes to remove since the spot welds holding them in place were very easy to identify and cut, leaving only a little bit of welding and grinding to clean things up.  Then a quick scuff with a sanding pad and each of the spots was shot with a coat of PPG DP40-LF primer and this job was done.

Next, I set about filling the seam between the lower rear quarter panel and the rear rocker.  This was another seam I have always found rather unsightly and I wanted to smooth this area up in similar fashion to what I did in the upper trunk lid area I mentioned in my last post.
After thoroughly cleaning the seam of all remnants of debris and leftover seam sealer, I carefully stitch welded the groove, cooling between small stitches with air until the entire seam was no more.  I repeated this same procedure on the opposite side and then started the delicate process of smoothing the welds.

When the welds were as close to flat as I could get them, I smeared up the surfaces with an oversized Sharpie marker and finished the surfaces with a 36-grit pad on my DA sander.  This technique shows the low spots that will require more metal finishing quite easily.  As it turns out, the surfaces were surprisingly smooth and the work in this area should be rather minimal in preparation for final finish work.
At this point, we were in good shape to begin sanding the trunk area and axle tunnel area on the interior to prepare the surface for the SEM Rust Shield paint that I decided to use under the PPG DP40-LF epoxy primer that would follow.  In the course of a solid evening, Ted and I had the scuffing completed and had time to go ahead and scuff the already primed surfaces in preparation for the final primer and paint layers that are planned in the near future.

With the sanding complete, it came time to swab everything down with grease and wax remover and let it all dry overnight.  Then it was time to mask off everything that didn’t need coating and tool up the spray gun to apply the SEM Rust Shield to these freshly prepared areas of the trunk and floor.  Somehow, I managed to get my daughter Desiree’ into the act and the masking went very quickly. This allowed plenty of time to apply two solid coats of SEM to all of the bare metal surfaces that remained inside the car and let it dry thoroughly before the next round of scuff-sanding could begin.
After several days of drying time, it was time to scuff the freshly primed surfaces to make way for a good coat of PPG primer/sealer to lock everything down. I recruited Ted to scuff the “tight” areas given he weighs about 120 pounds soaking wet and can fit into small spaces I can only dream about reaching.  Another solid evening worth of work and the surfaces were fully scuffed for the next round.  We did identify a number of spots that required brush application of the SEM product to ensure complete coverage.  However, the bulk of the surfaces looked very well covered and ended up being rather easy to scuff with heavy Scotch Brite pads alone.  Another round of touch-up priming with the SEM Rust Shield product and we will soon be ready to seal up the entire interior area with PPG DP40-LF epoxy.
Original e-brake brackets needed to come off, so I marked each one for removal.  This is the bracket located under the driver seat area.  Notice the very clear spot weld locations.  This made it very easy to drill them out for easy removal.

Each rear frame rail had one of these brackets installed, so off it will come!

After quickly drilling out each spot weld, these brackets came right off with little effort.

Under each bracket flange was minimal rust, making clean-up very easy to accomplish.

Passenger side area has been smoothed and is now ready for primer.

Left side e-brake bracket surface ready for primer.

Here is a close up of the former front left e-brake bracket location.

A quick few coats of PPG DP40-LF primer and the modification is totally invisible.

Right side rear e-brake bracket location is smoothed up and primed.

Front e-brake bracket area is ready to go!

While we were working on priming the spots where the e-brake brackets were removed, I decided to prime the floor drain covers I installed some time ago.

With momentum on my side, I decided to weld up the quarter seams just behind the doors.  Here, the seam has been thoroughly cleaned and is ready for welding.

Left side all welded up!

And the right side too!

The dark lines are lo areas that are highlighted by the use of a jumbo Sharpie marker as an indicator and sanding the surface with a 36 grit DA sander.

Here is a peek at the passenger side filled rocker seam after sanding with the DA.

All of the work in the previous month or so has the rear inner quarter structures in good shape for priming.

Front trunk floor is etched and ready for primer.

Left inner quarter is also in good shape for priming.  The "wet" area between the outer wheel house and the quarter is leftover wax and grease remover that hadn't dried yet when I took this picture.

This is Ted.  Ted works hard.  Ted is skinny.  Ted fits in small places.  I like Ted.

All of the EDP coated parts are scuffed with sanding pads prior to application of SEM Rust Shield primer.

While we were at it, we decided to sand the entire interior floor at the same time we did the rear trunk area.  A trick I use to do this kind of work and save HUGE amounts of time is to use a 6" nylon cup brush on my body grinder to scuff-sand the surface.  This is the exact tool used by spray on truck bed liner installation companies.

Here, Ted is sanding the inner tail light panel surfaces.

Everybody loves playing with masking tape!  My daughter Desiree' decided to join in and help mask the trunk area in preparation for the SEM Rust Shield.

Here is the inner trunk areas after the SEM Rust Shield has dried.  Nifty!

Another view of the freshly applied SEM.

I left the original sound deadener in the rear quarters since it was adhered so well and there was no rust underneath.  The SEM Rust Shield applied right over this with no trouble at all.

Here, Ted is sanding deep inside the rear quarters to prep them for PPG epoxy primer.

Scuffing the rear trunk floors.

Ted scuffing the inner tail light panel for primer.

And there ya go!  The rear axle tunnel and divider is scuffed and ready for the PPG epoxy primer.

Front trunk floor ready for primer.

Rear inner tail light panel is fully scuffed.  Can't wait to see these surfaces in fresh, smooth PPG primer.

Saturday, December 29, 2012

Preparing For Bigger Things: More Interior Sheet Metal Prep

As the 2012 thankfully comes to its controversial end, I find it’s been a month since my last update.  And while it seems I have made little progress, I have managed to move forward, albeit with little outward proof of the fact.  The reality is that I am in a phase that is boring, tedious and generally lacking in most of the “fun” associated with the hobby.  Since I last checked it, I have been consumed with preparing the rear interior and trunk area for an upcoming coating of SEM Rust Shield (gunna try something new!) and then the trusty PPG DP40 primer.  Following that, the entire interior will get a finish coat of PPG matte black urethane.  But as simple as that all sounds, I have a lot of work to do before any coatings can be applied and that is the phase I’m in.

The latest concentration has been treating the light surface rust in all the critical areas in any way I could approach.  At first, I ventured to use my trusty chelation process, but quickly found that I had reached a practical limit in its application in consideration of the limits of my space and the difficulties in the recovery of the chelant in such complex structures as those in the rear of a Mustang.  As such, I resorted to the old tried and true wire brush and elbow grease method for the majority of the job.  Of particular interest was cleaning up and prepping the areas surrounding the door openings and the roof drip rails.
As I have mentioned in several posts in the past, I have learned that it is critical to remove every bit of factory seam sealer that can be removed in the process of a proper restoration.  This is especially true of the roof drip rails and window surrounds on any classic Mustang.  In keeping with that, I again turned to acetone to soften the compound and using scrapers and wire brushes of various configurations to remove it from all of the door opening surfaces.  Next, I dove into the task of cleaning up the inner door openings, rocker sills and B-pillar posts.  For the most part, the bulk of this work involved removing the original paint and primer and then treating the slightly rusted spots with phosphoric acid-based “prep & etch” solution to remove it and protect the bare metal until it was time to apply primer.  B-O-R-I-N-G and time-intensive work, but the results were very good and I managed to fit all of it in in spite of the requisite Christmas preparations and associated activities that demand as much time as any resto work ever did!

So, with the door openings in good shape, I decided to tackle a few repairs/modifications on the rear bodywork.  One was by necessity and the other by choice.  Of priority was the need to repair to cracks about 1¼” long that radiated from the top corners of the trunk lid opening out into the quarter panels.  This is a common crack area in Mustangs, especially in car that have been extensively drag raced without added structural reinforcement like a roll cage or subframe connectors.
These repairs are pretty simple in concept, but a bit tricky in that they often traverse many body character lines and welding them up takes a pretty fine tune on the welder to ensure minimal distortion and weld bead size.

The first order of business is to stop the crack’s propagation by drilling a small hole just beyond its end.  In my case, I used a sharp 1/8” bit for the job and this did the job perfectly.
Next, I tack the inboard origin of the crack to lock down that end and to keep the panels as stable as possible.  At this point, the crack is isolated on both ends and can now be repaired.  Using my trust Dremel tool, I used a thin cutoff blade and carefully cut directly along the crack to provide a gap that would allow full weld penetration without buckling.  This gap only needs to be about .030-.050” wide max when using .023” MIG wire and can be as tight as .015-.020” with TIG.

With the prep work complete, the crack was welded up using a step-stitch method with the MIG set at a slightly hotter range than recommended to allow a quick burst of weld that would lay flat and fill well.  After each stitch, I would cool the area with a blast of air and repeat the process until the gap was fully welded.  This technique is a little different than welding in patch panels as it is of much shorter duration and is essentially stacking a series of small spot welds in a row until a complete bead is formed.  The truth is, I often resort to this method when installing patches as it helps keep weld distortion to a minimum, at the expense of considerable increase in repair time.  But HEY, this is a hobby right?  What’s a little extra time?????
With the cracks fully welded up, a few minutes with the sanding disc in the angle grinder was all that was required to get the surface back to smooth with no evidence the cracks were ever there.  Now, not being one to leave well enough alone, I took the opportunity to do one more small tweak to the body that I have been planning since day one.  The fact that it fires yet another shot across the bow of the purist elite makes it all the more enjoyable.

Since I was working in the “neighborhood”, I took the opportunity to fully weld up the seams between the upper trunk panel and the quarters.  As long as I can remember, my eye has been drawn to this area of 69 and 70 Mustangs as one that always seemed unfinished at worst and inconsistent at best.  In fact, I am not sure I have ever seen these seams look the same way twice and it peeves me to no end.  Well not on MY car it won’t!  So, after a quick wave of the magic smoke-wand, they are no more!
And that is pretty much a wrap for now.  I apologize it wasn’t a bit more of an adventure, but those days are coming soon.  But for now, the tedium will continue for a while longer.  Until next time!
I was very luck that the B-posts in my car were in great shape.  After stripping the seam sealer away and scrubbing the old paint and primer off, the bare metal was treated with phosphoric prep & etch.

The driver side rocker sill was pretty nasty, especially along the "wire groove" just underneath where the aluminum sill plates attach.  But once the munge was removed, the metal was found to be extremely solid and in fine shape. 

As fortune would have it, the passenger side rocker sill was also in excellent shape after clean-up and etching.

Although a crap picture, the quarter glass surrounds cleaned up well and are completely solid.

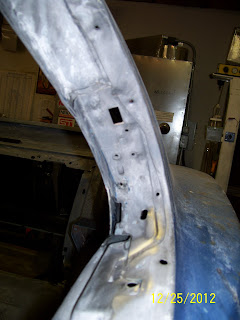
The underside of the roof drip rails required quite a bit of work to remove the seam sealer and surface rust.  However, the end result was good clean metal around both the driver and passenger side openings.  Bonus!

While I failed to document the "before" shots of the trunk-to-quarter cracking, here you can see the 1/8" "stop hole" I drilled at the outboard end of the crack and the inboard anchor tacks welds at the root of the crack.  Also, I have already cut a thing groove along the crack to allow full weld penetration.  You will also note that I have hinted at my next modification as evidenced by the short string of weld along the gap between the upper trunk closeout and the quarter panel.

As a middle-finger salute to obnoxious "purists" everywhere, I welded the trunk/quarter gaps completely just to watch them point out the "flaw" when the car is complete.  Actually that's bullsh*t.  I absolutely HATE how this area looks on "restored" cars and didn't want mine to look that way (but I still like my original story better).

Though a slight bit of finish work is still left, this shot shows the gaps filled and the crack repaired.

Tuesday, November 27, 2012

A Milestone Reached & Another Chapter on the Horizon

Sometimes, it seems major milestones are marked with small accomplishments.  Such is the case with the most recent few bits of work I have completed.  Specifically, I was able to confidently declare the major damage and rust repairs complete on the car and man does it feel good!

All that remained in the way of welded repairs was a small rust perforation at the right lower corner of the rear window opening and the eight rear louver hinge bracket holes that will no longer be used.  Following that, a small bit of clean-up on the roof drip rails marked the work complete as well as a significant change in the work plan moving forward.
The repair in the window opening was as textbook as it gets.  A combination of a cutoff wheel and pneumatic body saw, coupled with a little file work, was all that was required to prepare the aperture for the welded patch.  From there, simple paper patterns were made to replicate the inner and outer structural patch “coupons” and a few minutes of fab work had the patches duplicated in metal and ready for installation.

Starting with the inner repair, I tacked the patch in place in several locations to allow the outer patch to be fitted before final welding.  Next, the outer patch was punched for plug welds.  Then the patch was clamped, tacked and then fully welded into place.  Final finishing of the welds was accomplished with deft use of the angle grinder and the job was complete……..no drama, no blood, no cussing……just done.
Rounding out this phase of work was a revisit on the roof drip rails.  I had been struggling with effective seam sealer removal procedures in confined areas like roof rails.  Sand blasting is not an effective method of removing old seam sealer, and the roof rails are quite restrictive in terms of tool space to simply scrape the sealer out effectively.  Secondly, old seam sealer is often as hard as rock and doesn’t lend itself to removal with even forceful application of tools.  Obviously, this is quite different from easily accessible sealed areas where many different tools (some even dedicated to the job) can be employed.

I have been experimenting with a few ideas intended to make seam sealer removal easier from restricted areas (like drip rails) and have managed to devise a combination of tools and methods that make this a much more approachable.  The first ally in this battle is acetone.  Acetone works very well in softening old seam sealer and loosening the bond to the metal substrate.  The second tool I use is a version of “mini-scraper” I made using a very long, thin flat-blade screw driver with the end sharpened to a slightly angled cutting face.  This tool has a bit of flexibility to allow it to reach sealer in what are otherwise inaccessible areas.
The process is rather simple.  First, I apply acetone to the sealer with a rechargeable sprayer and allow it to soak a bit.  It helps to scar or prick the surface of the sealer to allow deeper penetration of the acetone into the sealer.  This softens the sealer much more quickly and the removal process is much more efficient.  After a minute or two of “soak time”, it’s simply a matter of scraping layer after layer of sealer away until you get down to the parent material.  This simple process can be used over and over, until the majority of sealer is removed.  As a final step, I use a combination of wire wheels in my drill motor and small picks to remove the last remaining bits of sealer residue with the acetone softening treatment in between each cycle.  While somewhat labor-intensive, the end result was a pair of drip rails that were exceptionally clean and (fortunately) almost rust free.  As I have experienced in the past, old seam sealer is notorious for hiding rust and the removal of it is absolutely critical to a long-lasting repair.  With this method, hidden rust can be exposed and removed/treated such that it is no longer a concern.

The final project in this batch was simply welding up the eight drilled holes that were left over from the long dispatched louver hinges.  I welded these up is short bursts from the MIG gun and then quenched the hot spots to reduce warpage.  The real key trick in getting this to work well is the use of a copper backing plate on the back side of each hole.  The copper acts as a casting surface to let the weld flow and form in the hole while molten.  The copper dissipates heat so quickly that it doesn’t melt into the puddle.  Secondly, the copper acts as a gas dam, preventing the shielding gas from simply flowing through the hole and out the back rather than remaining around the weld puddle where it belongs.  In fact, this method is so effective, I had all eight holes welded up and dressed down in under an hour.
Well, there it is.  The major repairs on the “tub” are complete and I now have a solid car that I can confidently move forward into more “cosmetic” work without concern for the foundation.  Two years of constant work has led to this point and it is interesting and exciting to begin thinking and planning the next phases of the build.  The immediate plan is one more round of chelation to remove the rather minor surface rust on the interior panels that were primarily bare metal from the factory.  Then priming, sealing and painting the interior in preparation for the move to the finish work on the underside of the chassis.

In this shot, I have already removed the inner and outer rust damaged areas of the right lower corner of the rear window opening.  This is the last rust damaged area that requires welded repair!

Here is another view showing the outer window flange repair area already cut out.  With these edges dressed, I was able to make simple paper templates for each repair "coupon" and fit them perfectly before welding.

Looking down on the repair, you can see the curvature that will be required in the inner repair and the simple flat repair required on the outer flange (on the left).

With little ceremony, the repair is tacked into place on both sides and then welded into place.  This is the outer flange after finish grinding.

Here is the inner window flange repair complete.
 
Fore removing seam sealer from drip rails, I needed to devise a flexible, thing scraper.  This slender old screwdriver was just the ticket!

I carefully ground the tip into a sharp, beveled chisel point to allow easy scraping without bending or dulling the tip.  Works great!

Here is another priceless tool in the restoration shop!  Sure Shot rechargeable sprayers are worth their weight in gold!  I fill this sprayer with acetone and pray old seam sealer with a generous mist to soften the sealer for easier removal.

After about 30-45 minutes of softening with acetone and scraping (repeated as necessary), the drip rails were surprisingly clean.  You can just see slight evidence of hidden rust that can now be effectively removed before priming.

Here is a look down the A-pillar drip rail after the sealer has been scraped away.  The lead joint filler is clearly visible in the middle of the frame.

After a few minutes work with a wire wheel in my drill motor, the drip rails are ready for chelation to remove the slight traces of rust found underneath the old seam sealer.
 
To weld up the louver hinge bolt holes, I back each hole up with this copper plate.  This acts as a dam, keeping the weld puddle in contact with the repair surface and prevents the shielding gas from blowing through the hole and past the weld area.
 
With the copper backer, you can rather easily weld up holes in thin sheet metal like this.  A very thin skim of filler will be all that is required to complete this repair.