Thursday, January 9, 2014

Stripping the Rear Quarters and a Lesson to Share

Steady progress has been the order of the realm this past few weeks and I am quite happy with the ground that has been covered.  With a few new parts and tools added to the inventory, I had reached a point where it was time to get the rear quarter panels stripped of all remaining original paint to see what measures would be required to get them into a clean, rust-free bare metal state that would allow proper bodywork to proceed. 

Of the options available to remove paint from exterior surfaces of the body, I prefer chemical stripping over all other methods most of the time.  Chemical paint stripper is very easy to control, does an excellent job, and does not damage or alter the surface of the parent metal at all.  By using a razor blade scraper to skim the softened paint from the metal, the job of stripping an entire panel goes surprisingly quickly even with the “wait time” involved in letting the stripping chemical do its job.
After a short ceremony to pay homage to the last vestiges of medium metallic blue color that remained on the car, I applied the first coat of stripper using proper chemical resistant gloves, respirator and eye protection.  Allowing about 20 minutes for the surface coat to completely lift from the surface, I scraped the top layer of paint easily away from the surface with the razor scraper.  Generally speaking, this would leave the primer layer(s) on the surface that would simply require a second coat of stripper to remove completely.

Once all of the original paint and primer was completely removed, I rinsed the panels clean with distilled water on a shop towel to remove any stripper residue and neutralize the stripper.  The result was nice, bare metal panels that were ready for a close inspection and evaluation in order to begin planning the repair and prep work required to plan for primer and the sequence of conventional bodywork to come. 
The panel evaluation work is best accomplished without any sort of prep coatings or etchants on the panel so that even small details are not lost or masked.  This is particularly important on 40+ year old muscle cars as many manufacturers had not yet adopted immersion priming methods or anti-corrosion primers on all surfaces of the body.  EDP primers were still decades away before the last genuine muscle car rolled off the assembly line.  A close inspection is often remarkably enlightening as was the case here.  In fact, what I realized based on my inspection was I had a very unique opportunity to educate on the hidden evils that can exist under “survivor” original paint or older restoration work.  As such, the next section will cover this critical information with some very graphic examples of “what lies beneath” in more cases than you might imagine.
Aircraft stripper is a favorite of mine to chemically strip the last bit of factory paint from the rear quarters.  One thing to notice here is how relatively "rust free" the left rear quarter appears before the stripping work begins.

The first coat of chemical stripper very quickly starts to lift the original finish and is very easy to manage as evidenced by the lack of runoff of the stripper to the side of the quarter.

Nitrile gloves and an inexpensive razor scraper are an excellent combination for removing loosened layers of paint quickly and easily with relatively little mess.  I use a grout mixing tub to catch the debris for ease of clean up and to avoid crapping up my shop floor.

A bit closer look at the large curls of paint that are removed with the razor scraper.  Also note the remaining layer(s) of primer that will require a second coat of chemical stripper to remove.  Believe it or not, there is red oxide primer under the grey coating.

The top of the rear quarter has had its first round of chemical stripping complete and you can start seeing evidence of more extensive rust being exposed.  We will detail this discovery more in the second half of this article.

Moving to the front half of the quarter, the stripping process is identical and equally efficient.  A quick few minutes with the scraper and the second coat is applied over the same area and left to work for another 20 minute soak period.

After scraping off the second coat of stripper, the front half of the quarter is clean and down to bare metal.  Again, we see more evidence of the extent of surface rust that existed under the original paint and primer.

With all of the original paint and primer removed, the left rear quarter is completely exposed for a close inspection.

Moving to the right side quarter, the same stripping operation is applied.  In this shot, both the top and front half of the quarter has been completely stripped.

Here is an interesting detail that was revealed after the original paint and primer was stripped from the right rear quarter.  In the center of the picture, you can see where some sort of light sanding was done above the wheel arch at the factory before the car was painted.  It is not obvious what sort of flaw was being repaired, but 44 years ago, somebody thought it was important.
 
What You See Ain’t Always What You Get!

Nowadays, there is a tremendous amount of hype thrown around about preserving “original paint” as much as possible and avoiding stripping a car to bare metal during a restoration.  Well………bullshit.
Quite simply, with original paint left ANYWHERE on a body during restoration, you simply don’t what you don’t know because you can’t see what can’t be seen.  As it turns out, the rear quarters on the Boss were a perfect example in the most exemplary way.  If you look at the pictures below, you will see there are hints of what most describe as “minor surface rust” starting to peek out from the very weathered original paint.
As each layer of paint and primer starts to come off the panel during the stripping process, more and more evidence of surface rust starts to become exposed.  In fact, until the last trace of the base primer layer is completely gone, the full extent of the rust propagation is hard to imagine.  In fact, a general rule of thumb is that for every spec of rust you see perforating the surface of “original” paint, the extent of rust repair requirement is roughly 10-15 times larger in scale.  In other words, if you see a ¼” rust spot on the surface, the expected repair area will be approximately 2.5 to 3.75” across and often this can be a conservative estimate.
This simple fact is shown in undeniable and explicit detail in the following photographs of the tentacles of rust spreading widely across the panel that were completely hidden beneath the original finish.  Only until the panels were stripped to bare metal was the true extent of damage revealed.  Without this revelation, there is no way a proper assessment of the requisite repairs can be completed and any hope of a successful restoration of these surfaces is simply impossible.
With that, the lesson is to strip absolutely EVERYTHING to bare metal during a restoration to make absolutely sure the hundreds of hours of labor and untold thousands of dollars of investment you will make will be spent with maximum effect and long-term return.  It really is that important.
In the next update, I will document how to deal with the “ugliness” we have discovered.  Also, I will describe a simple process to reliably detect almost microscopic rust and how to eliminate it permanently.  Also, we will start getting into the repair of some small and moderate sized dents and dings.  Until the next update!
During the paint stripping process, the true extent of the surface rust propagation began to reveal itself.  In this close-up of the top of the left rear quarter, you can just start to see how the rust has extensive "tentacles" that extend far beyond the small spec that was revealed at the top of the painted surface.

A bit further rearward on the left quarter and this "rash" of rust became more and more visible as each layer of paint and primer were removed.  If you look closely, you will see a fair amount of primer is still left in the rusted area.

This is getting pretty ugly now.  After removing only the top layer of factory paint, the surface rust has been exposed and the true extent of coverage is pretty amazing.  Very quickly, it becomes obvious that the area that was originally visible is magnified many times over once we get all of the original paint and primer off the surfaces.
 
Pure ugliness.  Careful compare the detail in this photo to the one immediately above.  The speckles of rust here and there that were visible when we started have been revealed to be an extensive matrix of rust that extended all over the surface.  Roughly 75-80% of this rust was absolutely invisible on examination of the original paint!  Had I tried to preserve this finish in any way, the results in just a few years' time would be a total devastation of a very expensive paint job and likely the loss of the original panel.
 
With the top surfaces of the quarter stripped bare, you can clearly see why it is critical to avoid getting caught up in trying to save original paint in a full restoration.  What you can't see can definitely hurt you!

Monday, December 16, 2013

Final Firewall Hole Filling

Over a month between updates is a rather shameful state, but like most of 2013 it seems, the month of November was less than kind or accommodating to the Night Mission project and yours truly.

Beginning with a significant setback on getting customer powder coating work out the door at the quality level I maintain, I spent a few week getting caught up before allowing myself the opportunity to dive back into the Boss.  In the middle of all this, I took ill for a rather extended period of time (which I NEVER do) and the end result was a rather extended recovery that I did not quite expect.  Before I knew it, it was December and I finally realized that the entire month of November had escaped me with absolutely nothing to show for it.
Fortunately, the first week of December allowed me to press through the powder work with a reasonable level of success and work that looked pretty nice and should please the customer(s) well.  Following this, I was finally able to get refocused on the Boss project and dove into the final hole-filling work that would see the firewall void of any extraneous holes and with a much cleaner, smoother final form than anything Ford has ever made in production.

Earlier work in this area allowed me to complete the lower half of the firewall while the car was still on the rotisserie, making this part of the project much easier.  Now that the car was on the body cart, it allowed relatively easy access to the upper portion of the firewall to finally complete this phase of the project without killing myself.
Before I dive into the latest work, I should apologize that I did not photo-document this particular update as well as I normally try to do, so please feel free to comment with any questions or clarifications you may have.

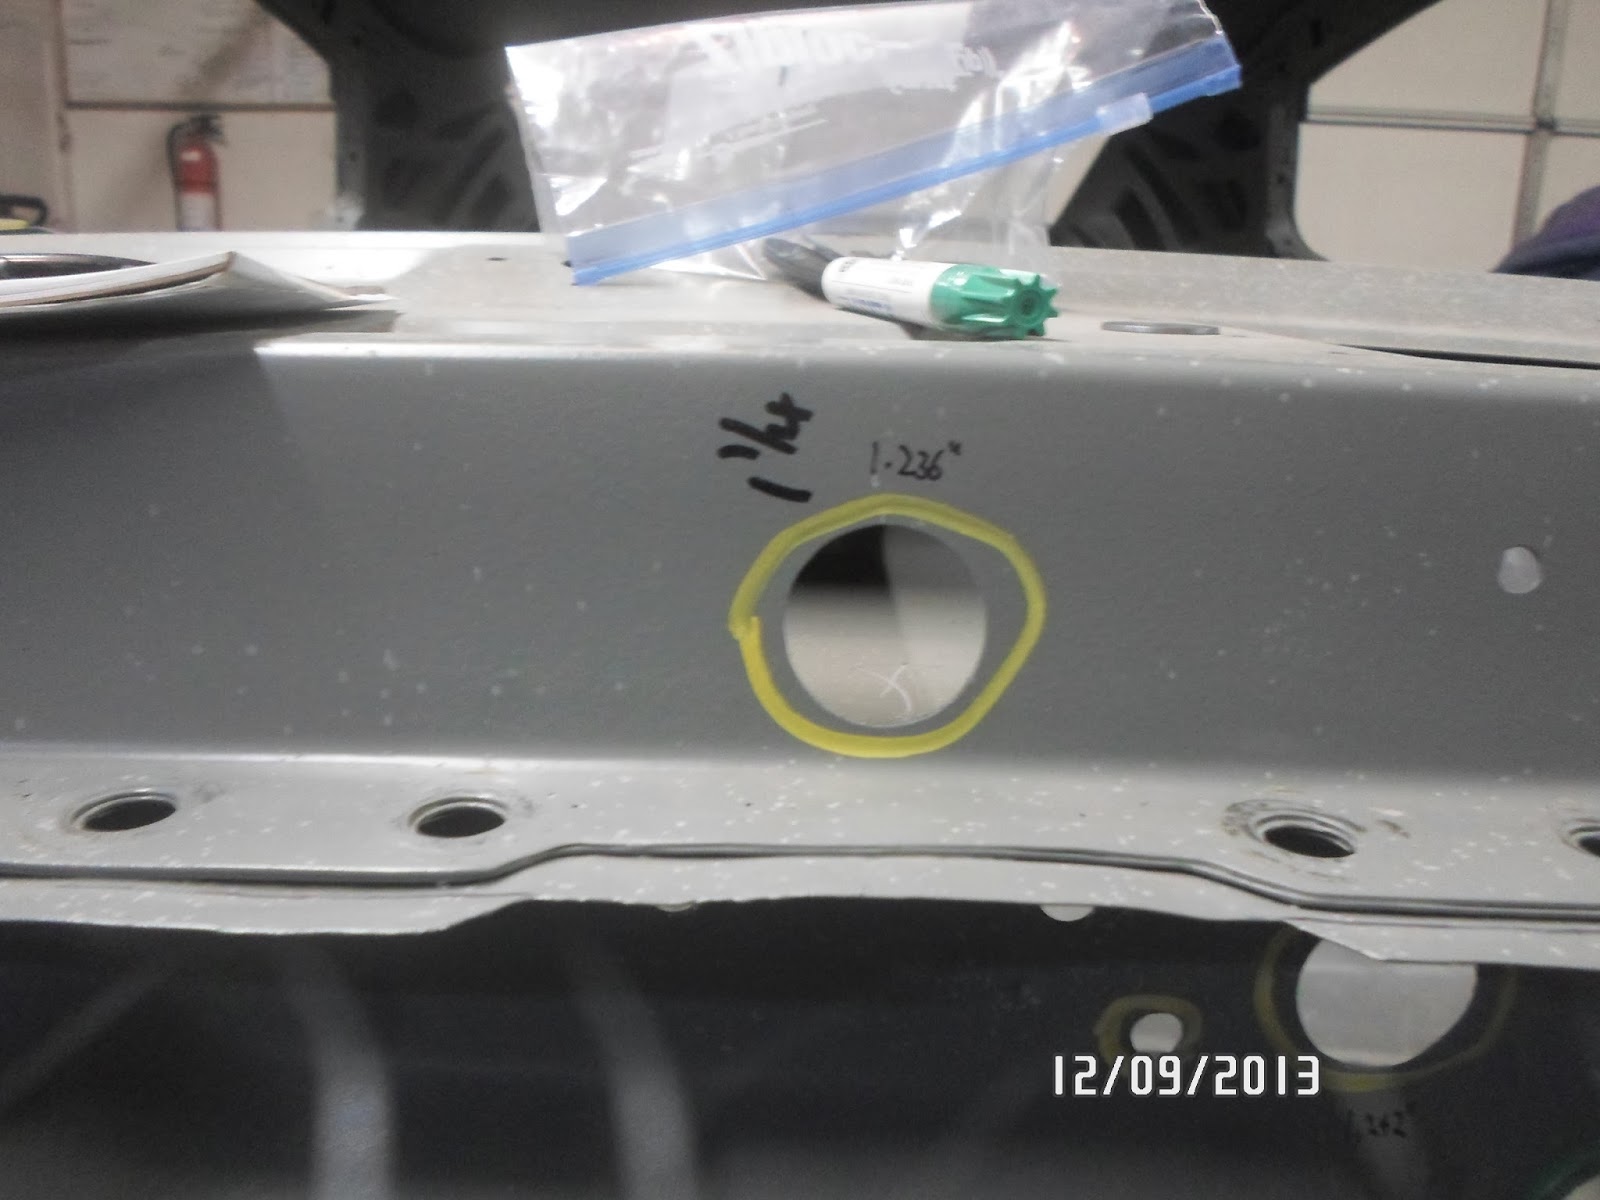
Perhaps the biggest challenge in this area of the firewall was the number of very large holes that required filling, some as large as 1.242”!  Secondly, since I would be welding these plugs in using the TIG (GTAW) welding method, the fit of the plugs would have to be extremely tight and precise.  Therefore, in order to get the final appearance I was after, I would first have to measure each hole and then machine a sheet metal plug to the exact spec that each hole required.  Sounds easy, right?
Well, for anyone who has ever tried machining thin sheet metal without totally destroying the project or severing an appendage, the idea itself is MUCH easier than the execution by orders of magnitude.  Complicating the matter even further was that I would not accept a hole drilled in the middle of the plug that I would just have to weld up later.  Yeah……I make this soooooooo easy on myself sometimes.

Anyway, though I didn’t document the solution properly here, I machined a “friction mandrel” that allowed very precise locating of the sheet metal blank in my lathe chuck, and with gentle cutting passes, allowed me to carefully machine precise plugs of sheet steel that fit each individual large firewall hole perfectly and allowed them to be welded into place with a minimum of filler material required.
A few nights of tedious and often out-of-position welding exercises and the entire upper portion of the firewall was filled and smoothed.  With only a thin token application of filler material during the “finish” phase, these modifications will be complete undetectable and very hard for even the trained Mustang enthusiasts’ eye to detect.  To my observation, the firewall appearance was far less cluttered up with holes and held the promise that this subtle modification would look very nice when in final color.

Since this would be an area that I would revisit at a later date, all that remained in this phase of work was to treat the bare metal with Prep-and-Etch to ensure there was no microscopic rust on the surfaces.  Then, a few coats of my ever trusty PPG DP40LF epoxy primer and this phase of the project was complete.
At this point, I can hardly wait to get deep into the next project!  Once I get the car flipped around in the shop, I will begin fit and finish work on the rear of the car, starting with stripping and priming the rear quarters.  Then comes the actual process of fitting the entirety of the components and panels to the rear of the car, along with all of the custom touches I have planned.  One of the biggest fabrication projects will be the construction of a tucked and smoothed rear bumper with hidden mounting bolts.  So……..’ol man Winter may be here for a while, but I have my work plan set and the throttle to the floor!


The upper firewall and cowl had some rather large punched holes that needed to be filled with metal.  However, the fit of the plug would need to be precise to allow each one to be TIG welded in place.  In this shot, you can see that the hole diameter has been marked to allow a plug machined to this exact dimension to be installed and welded using very little filler metal.  In the lower end of the frame, you can see some smaller holes that have been marked for size as well.

Here is a machined plug fit into place and ready to weld.  Note how tight the plug fits the hole.  This will allow much easier TIG welding with minimal filler metal and less chance of burning a hole through.

Using a weld-cool-weld-cool, etc. method, the plugs are welded into place.  In this shot, you can clearly see there were four individual weld paths used, essentially connecting the tack welds that held the plug in place.  A few swipes with the sanding disc and this plug will be virtually invisible.

With all of the plugs welded into place and finished with the sanding disc, the surrounding areas were feathered with 80 grit paper in preparation for primer.

After two coats of trusty PPG DP40LF epoxy primer, the firewall looks remarkably cleaner and simpler.  Not a single hole that doesn't have a purpose!

Brake booster, steering column and clutch master cylinder mounting holes are all that now populates the driver side corner of the firewall.

Heater box, heater hoses, export brace, gas pedal and a single wiring harness access hole make up the middle and passenger side hole population.  Nothing more required.

The firewall is not ready for action when we return to the engine bay for finish work later on.  When this is seam sealed and in body color, it will look fantastic!


Tuesday, October 29, 2013

Apron Seam Sealing & Undercoating with U-Pol Raptor

As Fall weather began imposing itself on Southeast Michigan, I began keeping an eye on the sky and the calendar to maintain momentum getting the front apron work completed and to find a window of opportunity in the forecast to complete this, my last “outdoor” project for the year.

With the car now solidly sitting on the body cart, the process of masking the exterior apron seams in preparation for seam sealing was a rather easy, albeit time consuming process.  Using the same techniques that were used on the floor pan, the seam sealer was applied on each masked seam and smoothed with a finger wet with xylene.  This smooths the sealer very nicely and makes the seams almost disappear when finally coated in bed liner material.  A few evenings dedicated to the job and the entire exterior apron area was fully seam sealed and scuffed for the final preparations before coating with spray bed liner material to match the floor.  However, before that could be undertaken, I had one small bit of repair work to complete.
Specifically, I needed to rebuild the left front lower valence mounting location that was torn away during one of the cars archival mishaps decades ago.  I reasoned this job would be a good one to tackle at the same time I cleaned up the areas of the front frame horns once concealed by the front rotisserie mounting arms now that they were perfectly accessible with the car on the body cart.

With a small swatch of clean sheet metal in hand, I simply traced the shape of the right side frame tab on the sheet and cut out the profile with material to spare on the back side to allow the parent material to be trimmed and perfectly fit to the new repair part.  Then it was a simple matter of fitting the repair to the prepared spot and tacking it up.  With a few small adjustments to the position and shape, I carefully TIG welded the mounting tab in place and dressed the welds smooth.  The final step was to drill and lightly chamfer the mounting hole and we were off to the next adventure.
Next up, was a thorough cleaning of the surfaces once masked by the rotisserie mounts and treatment with “prep & etch” to prepare the surfaces for a few coats of PPG DP40LF epoxy primer.  I like to let the DPLF cure for several days before topping it with any coating that is not designed for a “wet-on-wet” application over it.  This allowed plenty of time to begin masking the entire engine bay and aprons for application of the U-POL Raptor bed liner.

The final process before the bed liner application was several days’ worth of careful masking of the inside and outside engine bay, lower frame rails and front radiator support.  For this kind of work, the masking process is a “top down” operation.  In other words, I started by masking the upper surfaces of the inner and outer aprons, radiator support and firewall and methodically moving down until the entire complex was masked.  As always, I started by defining the sharp paint lines with tape and them coming back and masking the large, uncoated areas with more tape and masking paper.  As the process moved lower on the chassis, I made sure to overlap the masking paper such that all of the seams faced toward the ground to help prevent them from blowing open when the bed liner was sprayed as it is sprayed at a rather high pressure of 45psi and is very heavy-bodied so it’s impact force is rather high as well.
As the process continued to progress, the masking formed a very nice “road map” of sorts that allowed me to start focusing on the areas that required coating with little distraction.  This makes it much easier to visualize the end result in my minds’ eye and starts to tease out a hint of what it will look like when completed.

The final masking was a simple application of plastic drop cloth as an easy means of covering a lot of area in a simple and economical way that works well and quick to apply.  Then……we wait…….with a “weather eye”.
After several days waiting on Mother Nature to decide freezing temps and/or rain were deserving of a short break, we saw our opportunity and were ready to capitalize.  In short order, the car was in the drive and in position for the application of the U-POL Raptor bed liner material to begin.  The plan, as was predetermined days before, was to apply two solid coats of material with a third “texture coat” used to achieve the desired finish and touch up any “holidays” in the job we may have missed.

With my dad’s sharp eye and helping hands, the application of the Raptor went just about as textbook as it could have.  With weather cooperating perfectly, the first coat was concentrated on the areas we had predetermined to be problematic to coat and then we simply filled in the blanks between these areas.  This established a nice base coat that we allowed to flash for one hour before the second coat was applied.
The second coat was a purposefully even application over all of the surfaces with more attention paid to achieving the finer grained texture I prefer.  This coat was also intended to fill in any obviously thin areas as well and was again allowed to flash for an hour before the final “texture” coat was applied.  This was a light, “dusting-coat” applied from a greater distance to firmly establish the finer grained finish I prefer.

After about a 15 minute flash time on the final coat of bed liner, we immediately began remove the masking very carefully to ensure the sharpest masked edges and prevent the masking from becoming glued to the surfaces forever as the Raptor is some of the stickiest, most tenacious coatings you will ever run into.
And with that, I can comfortably declare the entire underside of the chassis finished and the work will now progress to more cosmetic challenges ahead.  Back to the firewall work first, then on to “real” bodywork!


Masking for neat seam sealer application is no less work than masking for paint.  The end result is well worth the effort.

Clean and smooth seam sealed joints are a favorite of mine and look great under spray bed liner materials.

I took a little extra time to seal up the areas around the lower control arm mounts to ensure a clean look under the car.


Outer firewall seams often require a fair amount of seam sealer to get them sealed properly.  By using the masking technique, even these seams are very tidy.

This is the final chassis repair I needed to make before primer and bed liner application.  This corner of the front left frame rail was torn away at some point in the past.  This is the repair just after smoothing up the weld.

The final step in this repair was to drill the new mounting hole for the lower front valence brace.

After brushing the front frame sections that were hidden by the rotisserie mounts, each side was treated with Prep & Etch and primed with PPG DP40LF epoxy.

Even after decades in a very harsh climate, these front subframe sections are very solid and straight and look quite nifty in fresh primer.  The mounting tab repair is virtually undetectable in this shot.

The really BIG job in this phase was masking the entire front of the car in preparation for the Raptor bed liner application to the outer aprons, radiator support and lower frame rails.  I start from the top and clearly define every tape line that will be seen to ensure clean and crisp tape edges.

As the process moves down the panels, the intricate masking details soak up lots of time.

The front radiator support is a bit tricky to mask.  I planned to have the forward surfaces coated in Raptor, but the interior surfaces in paint in such a way that the bed liner will not be seen when examining the engine bay.

Front the front, you can now get an idea what surfaces on the radiator support will be coated in Raptor.


Along the top edges of each apron, I leave a small 1/8" reveal to ensure the edges of the sheet metal are completely coated in Raptor.  This edge will be hidden completely by the fender when the car is assembled.

At the front of the radiator support, I mask down 5/16" from the top to ensure there is no Raptor visible above the gap cover that will hide this area from above.


Here, the front of the engine bay is completely masked.

Work now begins in the rear of the engine bay and firewall.

The driver side firewall and cowl are completely masked off.  You can also see how far back into the transmission tunnel the masking is carried.

With the passenger side firewall and cowl fully masked, it's time to finish up the prep work and head to spraying the bed liner material!

The windshield and front part of the roof and door openings is covered with plastic drop cloth material for an easy way to cover a large area.

Go time!  A quick review of the U-POL Raptor application instructions and we were ready to spray!

To make it easier to spray the underside surfaces, we jacked up the front of the body cart and placed it on stands.

First coat is concentrated on the hard-to-reach areas and then what's left in the gun is evenly applied to all of the other surfaces.  Full coverage is not the goal on this coat as it is more directed at the details.
After an hour of flash time on the first coat, the second coat is applied with a more even hand over all of the surfaces.  This establishes a nice even color and coverage.  Another hour of flash time and a much lighter third coat is applied to establish the final texture desired.

After the third coat has flashed for about 15 minutes, we begin to carefully remove all of the masking to ensure all of the taped edges are crisp and nothing sticks under a coating of bed liner.  This stuff is some of the most sticky poop you can find and will glue ANYTHING permanently in place if you let it.

Left side apron coated and looking very nice!

Right side apron completed as well.  I wonder if anyone will notice the relocated upper control arm holes????


Monday, October 14, 2013

1077 Days: A Small Update on a MAJOR Milestone

1077 days.  I look at this number and shake my head.  That’s a long time.  In fact, 18 days short of three full years.  It’s hard to imagine that the Boss has been hanging in the rotisserie for this amount of time, all the while getting its much needed and deserved reconstructive surgery.  In that time, I have dedicated over 2000 hours in all of the work that was required to return the chassis to a “buildable” state and I am only now reaching the point where “normal” restoration work will commence.  But more on that at another time.

At long last, a major milestone was finally reached in that we were finally able to take the car off the rotisserie and mount it on the body cart to begin the next phase of the build.  As exciting as this moment was, it came with a certain disbelief that so much time had been invested in the car to get it to this point and yet to the casual observer, it still looks like a gutted shell of a car that appears to flirt with the fringes of hopelessness. In fact, the before-and-after shots below are what finally gave me that “holy SH*T!” moment of realization that a lot of ground has been covered and every bit of it has been documented to an extent that I had never really imagined or put into perspective.

To say I am thrilled to have finally reached this point of the build is an understatement to be sure.  The enthusiasm to get on with making it look like a car again is building at a rapid rate and my ever-stirring brain is already working on the more intricate details of where I will start and how I will move through the preparation of the body.  I hope that the next phase of work will start showing larger leaps of obvious progress as panels start to take their rightful place, gaps are aligned, and contours perfected.  There is still a mountain of work to do, of course, but with every challenge, the therapeutic repayment the car delivers more than makes up for the strains of the work.

As it goes, I will let the pictures and captions tell the story of our latest success and thanks to all of the folks in “our” small circle of support who have kept the encouragement and positive energy coming.  It is more appreciated than you may ever know.

Thanks!


BEFORE
(ALMOST) AFTER


AFTER (1077 Days)!


The Big Move to the Body Cart!

After a bit of measuring, I determined all that was needed to provide a solid mounting surface for the chassis were these two simple wooded "pads".  The front pad (left) has the locator blocks already screwed into place.  Once the rear locator pads are in place, the car will be secure in both the fore-aft and side-to-side directions.

With the center spine brace removed from the rotisserie, the cart was positioned under the car and the entire works was placed on jack stands placed carefully on the body cart surface.  This allowed the front and rear rotisserie frames to be easily removed from the body mount brackets.


The body was lowered on the jack stands at their lowest settings in preparation for lowering the body down on the wooden support blocks.  Note the body brackets are still in place as they will be used as the final jacking points to lower the body to it's final place on the cart.

And there you have it.  For the first time in almost 3 years, the body is off the rotisserie!  Kinda looks like a car all of a sudden!

I kinda like this perspective.  This shot clearly shows how much working room this cart provides.