Showing posts sorted by relevance for query chelation. Sort by date Show all posts

Tuesday, June 21, 2011

Thinking Outside the (Rusty) Box – I Think I’m On to Something Here

It is no secret that I couldn’t hate sand blasting more.  Having spent hours in sweltering heat shoving sand into every imaginable orifice of my car and my body, I’ve had plenty of time to think, cuss, pray and hope for some “miracle” method of removing rust without having to beat the snot out of the metal surfaces that I may not necessarily have wanted to.  At the same time, it became more and more obvious to me that sand blasting is, in many ways, most limited in its “line-of-site” cleaning method, and no matter how many “tricks” I could come up with, I simply could not figure out a good way to remove rust from enclosed panels (e.g., torque boxes, frame rails, rockers, etc.) or from the back side of many exposed panels like the interior body structural panels.  I have talked to countless restorers and hobbyists who evidently resolve themselves to simply do their best to remove what they can by hand after sand blasting or simply choose to ignore the issue figuring it will never rear its head during their lifetime.

Another drawback for me was the simple fact that sandblasting is a “fair-weather” operation that simply ceases to be an option for the better part of six months out of the year here in Michigan when winter weather socks us in.  This has a way of bringing good restoration progress to a grinding halt, allowing the dreaded “cabin fever” to set in at the most unwelcome time.
Alternative methods of rust removal are actually fairly few.  The almost universally ill-advised method of “dipping” a body shell in a caustic solvent concoction to remove all manner of paint, sealant, undercoating, adhesive, rust and a fair amount of good metal was never a prospective solution on my car.  Too many times have I heard and seen the terrible after-effects of the acid cleaning solution leeching its way out of hidden seams and flanges years down the road, ruining expensive bodywork and paint and sometimes even the very structure itself even after thorough rinsing when the job was completed.  No sir……not for me.

So anyway, I have been pondering and researching other alternative methods of rust removal and may have just stumbled on the closest thing to an automotive restoration “miracle”.  The process is generically called “chelation” (Key-Lay-Shun) and is quite new technology, having only been around for about the last 10 years or so.  Apparently, chelation technology has been around in the medical industry and is used in the event of “heavy-metal” poisoning (e.g., lead, mercury, arsenic, etc.) to rid the bloodstream of toxic metallic ions.  Essentially, the chelant (Key-Lint) captures the metal ions and holds them in suspension in the bloodstream in a form that allows the body to naturally rid itself of these toxic ions.  Clever technology to be sure.
Somewhere along the way, someone got the idea that this same characteristic may apply to rust (iron oxide) and pretty soon, the chelation process was found to be a surprisingly mild but amazingly effective rust remover.  Acceptance of the idea that a fluid that is 80% water and can be disposed of like mop water could actually remove rust anywhere water could go is another thing entirely.  Even though I too found the idea somewhat hard to grasp, I set off to research the possibilities of such a rust removal method and got increasingly intrigued by the possibilities. 

From a commercial rust removal standpoint, it’s not likely that you will find many restoration shops rushing out to adopt chelation as a profitable means of rust removal.  First off, it’s a slow process that can require a good bit of simple, but rather bulky equipment to get working.  Secondly, the chelant itself can be rather expensive and somewhat short lived.  But once you see the process work, you mind races around just LOOKING for rusty parts to restore.
After a while, I decided a test flight was a necessity and quickly took inventory of the landscape surrounding the chelation process and few things became glaringly obvious.  To begin, the selection of chelation products is can be categorized into two groups:  1) “ready-to-use” product or 2) concentrated product.  Now, remember I mentioned earlier that the chelant was an 80% water solution and the products are expensive?  Well, the tightwad in me quickly decided I wasn’t about to pay someone else to ship me several gallons of WATER via the costly ground shipping services just to get a few pints of chelant.  So, without further contemplation, I decided to focus on purchasing the concentrated product and supplying my own water, realizing a SIGNIFICANT savings in the end.  Suddenly, the up-front cost of entry into the chelation process just got a little less painful.

So for my first foray into the chelation experiment, I purchased two gallons of concentrate from a supplier who had perhaps the most visually convincing websites on the subject.  After a few pointed Q&A emails, I dropped the bones and waited for the product to arrive.  When it did, I wasted no time in reading every shred of material included with the product and promptly set off mixing up my very own chelation solution in a 1:4 ratio (1 gallon chelant with 4 gallons distilled water).  Having no real idea what I was doing, I mixed up a full 10 gallons of solution (won’t do that again) and started my experimentation.
The chelation process has two basic methods of application to remove rust from any part.  If the part is relatively small, it can be very effectively cleaned of all rust by immersing it completely in the chelant for a period of time.  The time required will depend heavily on the cleanliness of the part (no oil, grease, dirt, etc.), the amount of rust and the temperature of the solution.  Removal of the rust can take a little as a few minutes to several hours.

The second application method is constant spray of the chelant onto the rusted part.  This is quite good at removing rust from large body panels, but requires quite a bit of equipment to be effective and tends to be a bit messy until you get the hang of corralling the fluid and keeping waste to a minimum (still working on this little detail).
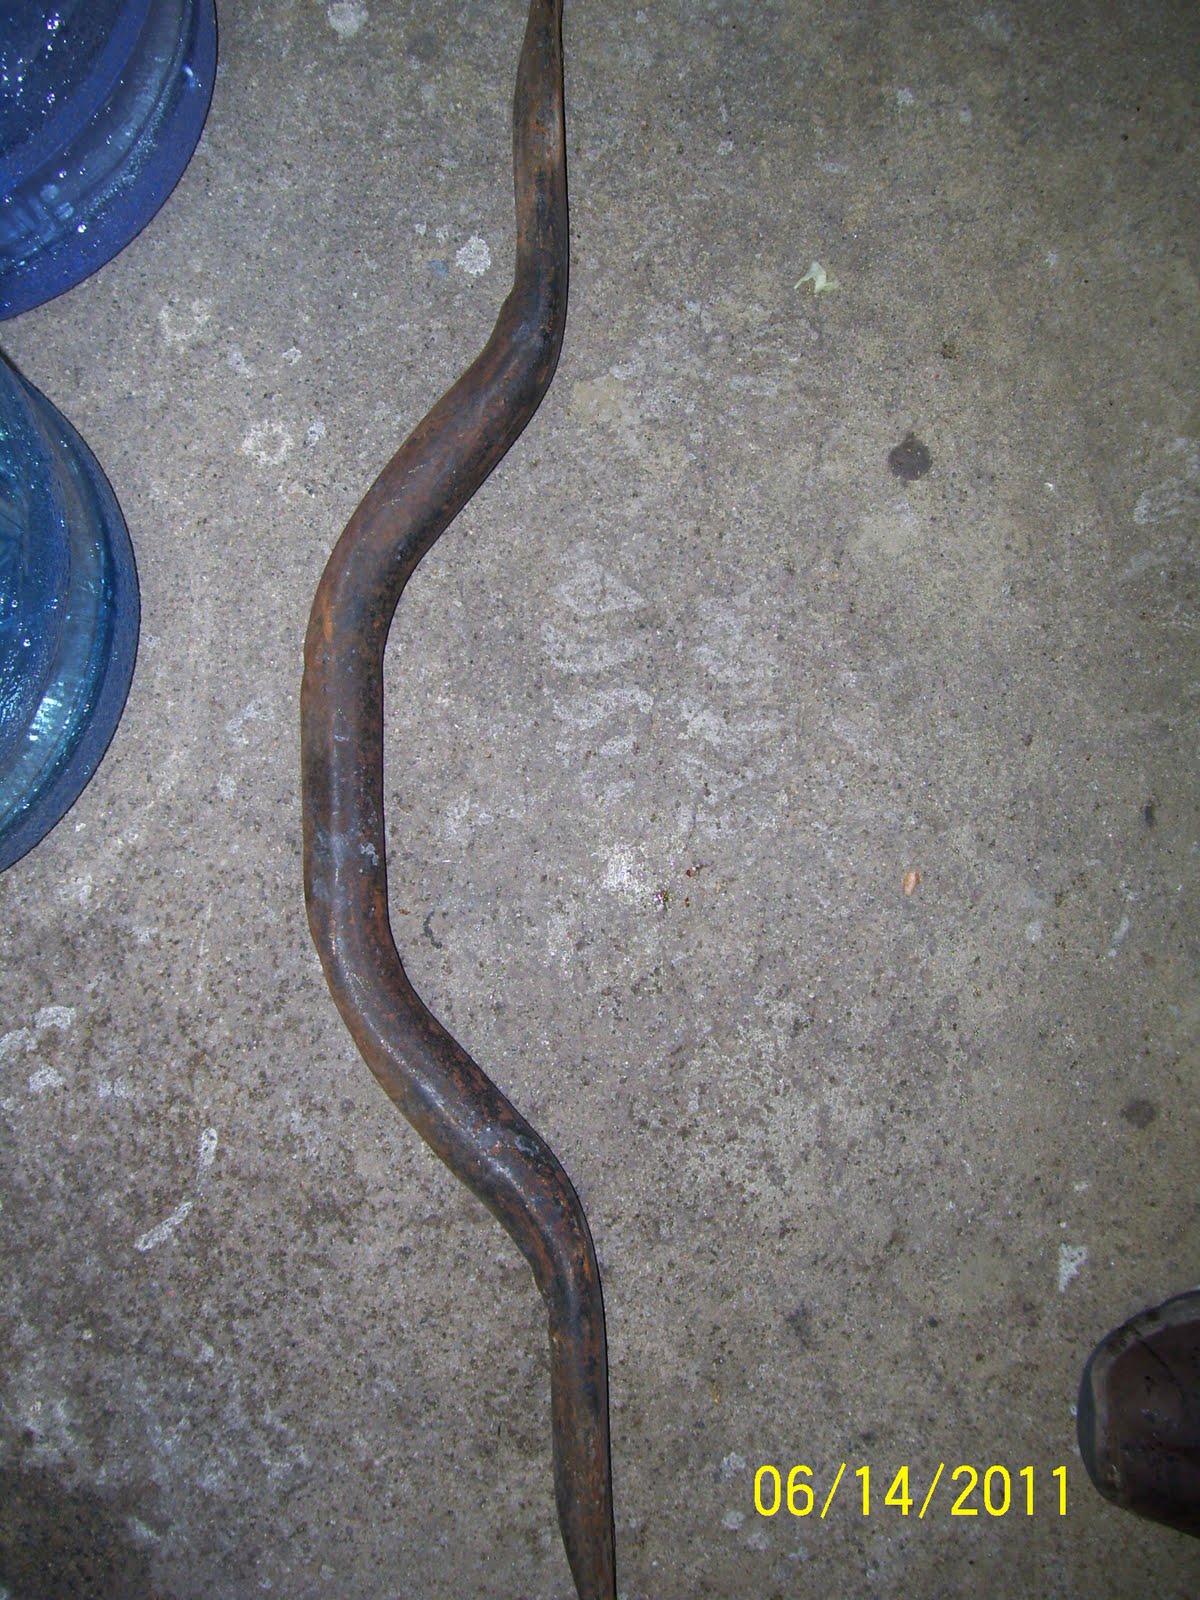
I started quite simply by immersing my crusty old front cross member and a pair of rear headliner tack strips in the solution overnight.  All of these parts were covered in rust and I figured I could afford to lose them if everything went wrong.  To my absolute amazement, all of the parts were completely void of all rust after about 10 hours of soak time in the solution!  Forty years of crusty rust was simply washed away from the cross member and both tack strips looked as though they were fresh out of the stamping die.  Not being so easily convinced, I took one of the tack strips to work with me and put it under a 100x stereo microscope to see just how effective the rust was removed.  Again, to my utter amazement, there was not one single hint of rust on the part even in the deepest pores of the micro-pitted surface.  This stuff is truly amazing.

My next experiment involved cascading the solution over my severely pitted roof panel to see how that technique would work.  Here is where my own carelessness bit me as I found the tarp I used to try and channel the solution into the wading pool reservoir I fashioned leaked and deposited over half of my precious miracle fluid all over my shop floor.  Ugh!  After a string of choice expletives and mental fit-throwing, I managed to get a Rube Goldberg recovery apparatus configured that worked pretty well and also refined my application method by building a spray bar delivery system from some PVC pipe and fittings.  This worked acceptably and the roof began showing incredible improvement after several hours of soak time.  Unfortunately, my fluid volume was no down to about 4 gallons and it quickly saturated with rusty solute and the process slowed considerably.  I should note that this is NOT the fault of the fluid but my own carelessness.  Had I not managed to loose so much of the fluid on the floor, the cleaning action would have been much quicker and more efficient.  In spite of my rookie failings, I consider the experiment an overwhelming success and I will continue to refine the process and experiment more thoroughly as I continue eradicating the rust on my car.
Before I wrap on this installment, I must share a few caveats to this entry for clarity.  First, I purposely have not mentioned the product I used as I am not quite ready to offer an endorsement given I have only tried one of the two concentrated products on the market.  My next round will be with the second product and after a fair evaluation of each; I will divulge the source I feel is best.  Secondly, I have discovered MANY ways the process can be refined and improved for the home restoration enthusiasts.  Things like heating the solution for increased effectiveness and speed and filtering the solution to increase life are all tasks I intend to tackle and fully document here.  So, rest assured, there will be at least two or three more installments on this subject as I move forward and I truly hope it will provide inspiration to many on what the chelation rust removal process can do.  As for me, I can hardly contain my enthusiasm for the prospect of walking away from sandblasting for the majority of rust removal work that remains!  Stay tuned!

As I have decided to dedicate to using the chelation rust removal process throughout my restoration, I decided to invest in clear, 5-gallon storage jugs to store my stock of fluid.  The chelant concentrate is to the right in the two one-gallon jugs and has a slight yellow tinge to it.

The chelant concentrate will not become "active" until you add water.  However, the quality of water you add can have a huge influence on the effectiveness of the solution.  The absolute best option is to use pure distilled water, which runs roughly $1/gallon at the local grocery store.


In my other life as a custom powder coater, I am constantly fighting flash rust problems on bare steel.  This custom bike frame was a great candidate for gentle rust removal and I discovered the solution works fantastic on removing flux residues from the brazed areas.  The color of the fluid is very exaggerated here due to the influence of the lavender-colored material of the wading pool combined with the slight yellow color of the chelation solution.

My first "real" test of the chelation rust removal process was on my old, original Mustang cross member.  Other than being power washed, what you see is the sum of 40 years of neglect.

Side view of the rusty cross member.

Close-up view of the cross member for future reference.

After an overnight soak in the chelation solution, All that remained of the original cross member was nice clean bare steel and original paint.
Here is the top view of the cleaned cross member.

Here is the "after" reference close-up.  The results were truly hard to imagine.  Absolutely no rust anywhere with the added benefit of leaving the paint untouched.
My second and perhaps most impressive experiment was to remove the rust from these two headliner tack strips.  You can see that both parts were completely covered in surface rust.

An overnight soak and both tack strips looked like they were fresh from the stamping die.  Cloe-inspection under a 100x microscope showed that every last bit of rust had been removed, even in the deepest mirco-pits in the metal surface.
To try the process on a larger scale, I needed to devise a way to apply a cascade of solution over the surface of the panel.  I picked up these inexpensive garden sprayers for my first attempt.

Careful adjustment of the "throttle" on the sprayer allowed a section about 10 inches wide to be treated at one time on my roof panel.  Not quite what I wanted.

Re-orienting the sprayer to the side and changing the spray pattern to more of a shower, I was able to cover slightly less than half the roof panel.  Also, this section had been previously sand blasted, so don't mistake the contrast line in this photo for an indicator of the effectiveness of the process.  That comes later.
With the cascade method of application, the task of recovering the fluid is tougher than you think.  It took a few fumbles before I got it right.
Unfortunately, my biggest fumble cost me over half of my expensive solution in only a few seconds.  Lesson 1 in "what not to do".

I had to devise a number of down-n-dirty recovery aids to avoid expensive fluid loss.  A scrap of aluminum dryer duct material worked great as a drain trough back to the wading pool reservoir.

After about one hour, the reduction in rust is quite noticeable.

After 4 hours, only slight traces of rust remain in the deepest pits.  The darker shaded areas are spots where black oxide residue has settled on the panel.  Black oxide is not detrimental and is easily cleaned off the surface.

This is a close-up of the deepest pitted section of the roof panel.  Absolutely no rust remains after about 10 hours of treatment.


As my enthusiasm and excitement gained momentum, I devised a spray bar from PVC pipe to distribute solution over the entire roof panel evenly.  This method proved very efficient and effective and I will use variations on the theme in future rust removal exercises.
Here, you can see the extent of rust on the rear half of the roof as I began the chelation process using the spray bar cascade method.  Take careful note of the large, oval patch of rust in the middle of the image.


After about 4 hours under the cascade, you can see that the large patch of "rust" actually included a significant area of red oxide primer that was otherwise undetectable!  Also, note the significant reduction in rust on the surrounding surface.

As the chelant holds more and more rust in suspension, the fluid becomes darker.  The instructions say the fluid remains effective until it becomes pitch black (saturated).  Unfortunately, I lost so much of my fluid in my inadvertent "spill" I couldn't complete the roof before the remaining fluid was saturated.  Valuable lessons learned in any case.
Here is an eye-opening contrast.  The left side is the roof panel as it started and the right side is the roof panel when I reached the stopping point.  While some rust still remains to be removed in the deepest pits, the rest is completely gone and the remaining metal looks almost factory fresh.  Yep........I think I'm definitely on to something here!

Tuesday, November 1, 2011

Thinking Outside the Rusty Box: Part 2 – Success with a Twist

Back in June of this year (2011), I started evaluating the chelation rust removal process as part of my ongoing restoration efforts on my Boss 302.  Though I entered the experiment as a skeptic, I now have a new-found appreciation for this technology.

I started my evaluation of chelation by making the decision to only evaluate the apparent top-of-the-line products marketed directly to the automotive market as a concentrate.  My reasoning was simple:  Why pay good money to ship a solution of 80% water when I could mix it myself for less?  I stand by this position and maintain that this is the only practical approach to incorporating chelation rust removal effectively and affordably on a larger scale for the hobby automotive or motorcycle restorer. 

In my previous installment, I purposely left out the name of the original product I evaluated until I had a chance to evaluate a second competitive product and report the results. After careful consideration, I have decided to reveal BOTH products with the caveat that I do not exclusively endorse either one.  They have very similar performance characteristics but at the same time, they have their idiosyncrasies as well.  I will try to identify these further as I go. For reference, in each test, I purchased 2 one-gallon jugs of concentrate for evaluation.

The first product I tested is marketed by a company called Ultra One Corporation in Hackettstown, NJ and goes by the name of Ultra One Safest Rust Remover.  Safest Rust Remover is available in one-gallon concentrate (and premix) in gallons jugs and 55-gallon drums.  Please reference my original chelation test here for more information on the Ultra One Safest Rust Remover concentrate:


The second product I tested, and featured in this installment, is marketed by a company called Rust Depot in Horseheads, NY and goes by the name of Esprit Performance Rust Remover.   Esprit Performance Rust Remover is available as a concentrate only in quantities from 16 ounce bottles to 55-gallon drums.

The Esprit Performance product is also mixed at 4:1 (4 parts distilled water to 1 part concentrate) just like the Ultra One, but it has the distinction of being clear and colorless in the jug, where the Ultra One was pee-yellow.  Esprit also touts their product as having an added “metal cleaner” in the mix to help remove light oils, grease and dirt.  This, in my opinion, is not much of an attraction since I believe you should start with a cleaned surface.

Application of the Esprit product is the same as the Ultra One with either constant spray/cascade or complete immersion.  Since the spray application was the method of choice for me, I used the same equipment I used in my first test to apply the Esprit solution, but I did drop a few pieces into the solution just so I could see how effective the immersion technique would be.  I targeted the inner rear quarter panel of my Boss for this test since the rust in this area was about equivalent to the roof rust I removed with the Ultra One, so I felt I had as close to an apples-to-apples comparison as I could get.

One change I attempted to make was to heat the chelant with a 1500W engine heater plumbed in a constant bypass loop right off the circulation pump.  This would allow me to regulate peak flow at the sprayer by simply diverting any excess flow through the heater circuit and back into the tank, similar to a modern returnless fuel system.  This makes for a much easier job for the pump (no dead-heading) and still allows for simple plumbing to the heater.  The result:  FAIL!  Didn’t work worth snot and proved to be a total waste of time for several reasons.  Most influential was the slow thermal transfer of the heater to the fluid and the rapid heat loss of the fluid to the air as a function of spraying (atomizing) and wetting a rather large, cool surface with a thin layer of fluid.  In short, I need to look at an immersion-type heater to make this work.  Another trip to Tractor Supply…….

Because the scale of the project was considerably smaller than the roof treatment, I was able to use a small cement mixing pan as my containment pan and a fan head garden sprayer for delivery.  Having learned my lesson about fluid loss based on my earlier trials, I elevated the pan on a quartet of plastic 5-gallon buckets to minimize splash and keep everything closer to the work area. 

Satisfied that everything was secure and ready to work, I set the process in motion and adjusted the spray head to provide the maximum coverage possible without spraying expensive chelant all over creation.  After a few short hours, the results were quite impressive.  Rust was definitely being removed but I started to notice a few new characteristics I had not seen with the Ultra One product.  First, all of the plastic, rubber and vinyl parts and some of the painted parts that come into contact with the Esprit chelant develop a glossy, slightly sticky surface. 

Also, over time, the edges of the wetted areas develop a copper-like residue just outside of the grey/black film that develops as part of the process.  I am pretty sure this is a byproduct of the metallic ions leeched off of the brass/bronze valve & hose fittings I use in the plumbing scheme.  No big deal as it scrubs off rather easily with scotch brite pads, but interesting nonetheless.

I am happy to say the Esprit Performance Rust Remover works well.  I admit that it worked a fair bit slower than my June test of the Ultra One product, but this is mostly attributed to the fact that the chelant is forced to operate at about 70°F at this time of year in my shop given that my heating approach failed to function as intended.  A clear lesson I have learned is that rust removal time (a.k.a. chelant effectiveness) is drastically improved with increases in temperature, with my defacto target temperature being about 120°F.  Even though both product suppliers indicate the chelant can be heated to a higher working temp, I think the benefits vs. risks of going any higher than 120°F are such that it makes no practical sense to aspire to a higher temperature target.

So, with the test results from both the Safest Rust Remover and Esprit Performance Rust Remover in hand, what’s the verdict?  Actually, the answer is a bit complicated. 

1.     First and foremost, BOTH products work as advertised.  I remain absolutely convinced that the ONLY way to purchase chelant for any project that will require a volume exceeding ½ gallon is in concentrated form.  As such, this tends to steer a consumer to one of these two suppliers based on my experience and research. 

2.    Unfortunately, the specter of cost forges the point of my biggest complaint between the two suppliers.  The absolute straight skinny on cost is that Ultra One commands a comparative “King’s Ransom” for their gallon of concentrate at $100 US/gallon!  Rust Depot, on the other hand, commands “only” $62.50 US/gallon for what is functionally the same product.  Add the usual shipping premium that most any carrier applies and you are not talking about insignificant differences in cost.  Ouch!

3.    Performance of both products is quite good.  Equivalent for the most part, in fact.  The chelation process doesn’t give a crap at how nasty the rust is that it is being asked to remove.  As long as you keep delivering viable (e.g., non-saturated) chelant to the rusted surface, this stuff keeps eating it until there is absolutely no rust left.  All this without damaging the parent metal.  Think of chelation as “targeted rust removal”.  A “smart bomb” for rust, if you will.  In my experience, the speed of rust removal is directly proportional to temperature and I need to come up with a much better method of heating the chelant.  As development in this area continues, I will document it here.

4.    Both products react rather aggressively to leaded body filler and galvanized metals (particularly zinc I think).  This makes perfect sense as I think about what chelants are designed to do from a medical perspective.  They capture metallic ions in the blood and allow them to be excreted from the body.  Our old Mustangs use genuine lead body filler at the top of the A and C pillars where the roof seams are located.  As such, the chelant eats rather heavily into this material as it goes about removing surrounding rust.  Generally, this isn’t a big deal, but beware the effect this may have on the used chelant solution and how you treat and dispose of it.  Neither supplier had ever heard of or experienced this phenomenon so I was on my own.

5.    Customer service is one of those things that mean different things to different people.  I absolute abhor crappy customer service and I am of the opinion that the advent of the “internet-based” business has allowed the degradation in customer service to accelerate at an unnatural rate.  Fortunately, both suppliers proved somewhat available for questions and both suppliers were very familiar with the hands-on application of their product.  But without being too pointed, I spent less and got more.  I’ll leave it at that.

6.    Clean-up after treatment is one place where I found the two products diverged significantly.  As I mentioned before, the Esprit Performance remover left all non-metallic parts with a slightly sticky, glossy residue and areas where chelant was allowed to run and dry required a bit of scrubbing to get clean.  I did not experience either of these conditions with the Ultra One product and I expect this may be due to base formulation differences, like the addition of the detergents in the Esprit formulation.  For me, I would just as soon see Esprit do away with the detergents and lower the cost even more…..at which point their product would be a double-tough act to follow.

In summary, I am sold on the process.  However, I am convinced there is plenty of room to improve the application of chelation to the automotive restoration process.  Fortunately, I have several ideas I plan to test and report on this blog in the hope that my fellow restoration hobbyists can benefit.  Also, I have found one more chelation product that may just prove to be the silver bullet for most adventurous enthusiasts that want to try the chelation process for rust removal but either can’t or don’t want to invest in the equipment to spray and recover liquid chelant.  Also, I have a request (by a group of individuals, NOT a manufacturer) to review one of the most popular premixed, commercially available chelation solutions as well.  So there’s plenty more to come.
Here is my attempt at heating the chelant.  I used an inverted 1500W engine heater setup in bypass right out of the pump.  Looked nice and clean and worked for CRAP!  I'll have to come up with something else.....
 
Chelant is in the catch basin and the system is ready to go.  Note how clear the fluid is in the beginning.

With the flow regulated by the amount of fluid I allow to bypass through the heater, I set the spray head to cover the rusted area as completely as possible.

I managed to capture the bulk of the overflow quite successfully using this simple concrete mixing pan.  The foaming you see here is a result of the returned fluid agitation as it splashes into the recovery basin.  Within an hour, the chelant starts to take on the distinctive "rusty water" color seen here.


The next series of photos are intended to show the progression of the rust removal process over time.  The total spray time from start to finish is approximately 10 hours.


Monday, January 2, 2012

Tail Light Panel and Trunk Floor – Part 7: Chelation Rewind, End Cap Replacement & Rust Repair

Well, this entry happens to be my first of 2012, but actually chronicles some of the last work I completed in 2011.  To all who manage to slog through my missives on this blog, I appreciate your continued interest and wish all of you the very best in 2012!  Happy New Year!

It has been a few weeks since my last update, and I have been quite busy with work on the car as well as several other “paying” jobs.  I will be catching up on my blog entries to bring everything up to flush in the next few days.  So let’s get started!
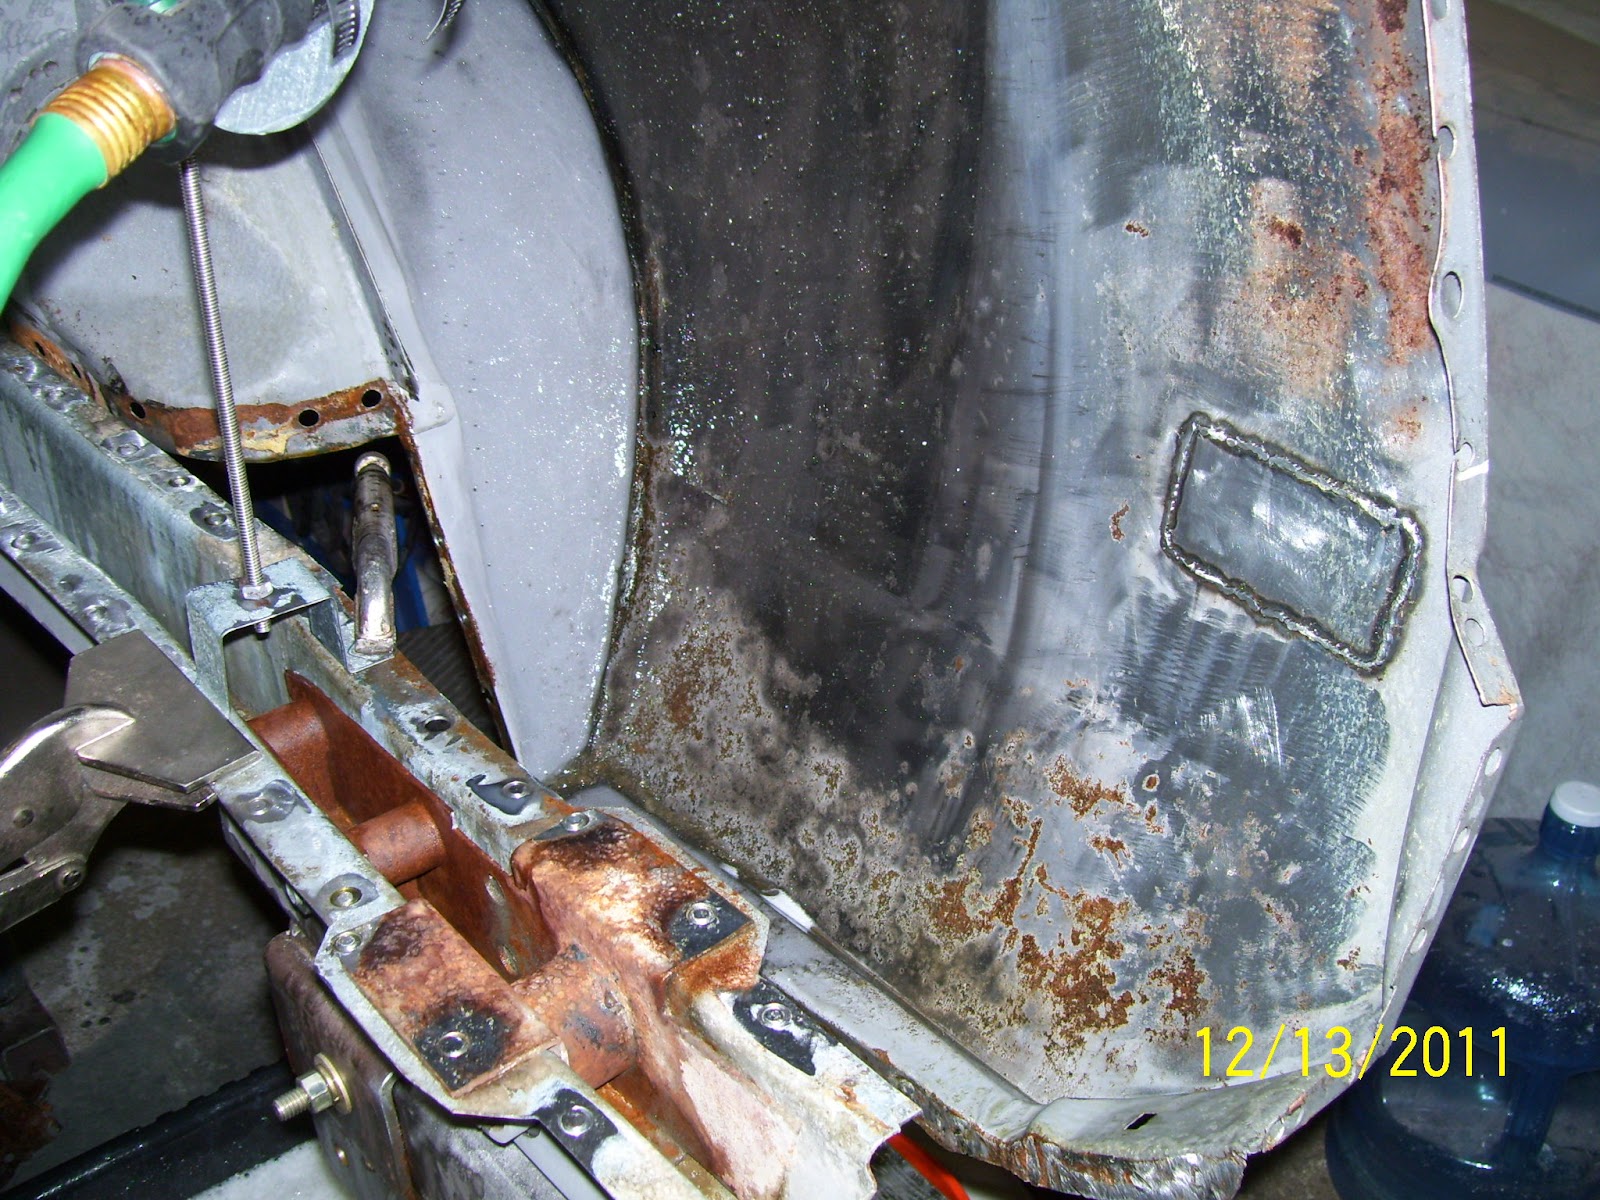
Having removed the rusty trunk floor bits and generally cleaning up the right rear trunk area, my first task was to set up my chelation rust removal “system” and remove the rust scale from the inside of the rear quarter panel before moving on to the actual repairs.  Using the remainder of my supply of chelant, I applied the exact same technique I used previously to remove all of the rust from the repair areas on the right side.  The scope of the job was nearly identical to the work required on the left side, so I knew in advance that about 10 hours’ worth of “soak” time would be required to complete the job.  So with my setup in place, I let the process do its thing and the reward was another success.  No more rust and a good, clean palette to work from.

Once again, I set up my chelation equipment and prepared to remove the rust scale from inside my right rear quarter.

As the chelation process is started, you can clearly see the "clean" metal versus the rusty sections.  This shot is the "zero-hour" mark for reference.

One hour in and you can already see the edges of the rusted patches showing obvious signs of rust removal as indicated by the frosty grey color around the edges of the rusty areas.

At about 3 hours, we are seeing some real progress on removing the rust scale.  Also, you can see I wasn't able to cover the entire inside surface of the rear quarter, so I will have to do the rearward portion separately.

Here we are at about 7 hours.

After 10 hours of soak time, the rust is gone on the forward section and I moved my sprayer to the rear section to continue the process.

I used a plastic trash bag as a splash shield to keep the spray directed into my recovery tray for recirculation.

Ugly but effective.  I used a few magnets along the bottom of the bag to keep it tight against the body and a clamp at the top.

The rear section only took about 5 hours to clean.  This shot shows the entire job complete with no evidence of rust remaining.

Here is an up-close and personal shot of the area that was most heavily rusted.  After a swabbing with grease remover, I treat the bare metal with phosphoric acid to prevent flash rust and etch the metal uniformly.  Now we're ready for the next step!

The end cap fitting was another familiar process and once again, I relied heavily on the body alignment holes to make absolutely sure the panel fit the rear quarter properly.  Again I took my time and made sure the fit of every edge was as good and tight as I could make it before marking the locations of every plug weld with my white paint marker.  This allowed me to sand away the paint from each weld location to ensure each weld would be as good as I could make it.

With all of the edges prepared, I fit the end cap into place one last time and carefully clamped the edges in as many places as I could to make sure everything stayed exactly where it belonged before tack welding the panel into place.  Then, after a final check for fit, I welded the panel in completely and ground the welds smooth.  As a final check, I bolted the quarter extension into place to check the contour of the fender to the extension.  With only minor adjustments, the fit was nearly perfect and I could move on to the more challenging job of repairing the rusted rear wheel opening corner.

After aligning the end cap with long drifts in the locating holes, I clamped everything up to ensure a good fit.

This corner is always a bit tricky to get nice and tight.  But with a little work and clever clamping, it will snug up just right.

I mark each weld spot with paint marker so I can carefully sand away the paint at each spot to bare metal for a good weld surface.

Here's the bottom corner fit-up.  Nice.

Once I am absolutely sure I have everything fitting as best as it can, I go ahead and tack the panel in place.

One last check for fit while everything is tacked confirms the panel fit is good and I can safely complete the welds around the entire end cap.

All of the welding is complete in this shot and ready for grinding.

With all of the welds finish ground, I could verify the fit of the fender extension was still as close to perfect as I could make it.

Since these fender extensions are die cast pieces, they are excellent body contour references for fit.  I am very happy with the fit after all of the reconstructive work on the rear of the quarter.

Another view to confirm the fit is nice and tight.  YES!

As I mentioned in my earlier posts, the right rear wheel opening corner was more heavily damaged by rust than the left and I knew the repair would be more involved.  Fortunately, I would be able to use the same repair techniques I used on the left side which limited the extent of metal replacement in the original quarter panel to just the rust repair area.  As welcome as this condition was, it was not without its own surprises.  Even though I was very careful to evaluate the extent of the rust damage and removed metal well outside the damaged area, I found that I ended up needing to repair a bit more extensively as I had originally thought.  This presented some additional challenges that I needed to address as you will see in the pictures below.

One thing I feel compelled to mention, as I have on numerous occasions throughout this blog, is patch panel quality evaluation.  In this case, I opted for another NPD repair panel which ended up being Canadian-made.  On the counter, the lower quarter patch panel I purchased look “ok”, so I drug it home and put it in my stock of parts until such time as it would be needed.  When the time came to use it, I started to notice many undesirable characteristics that would be rather significant IF I had chosen to use the panel as a whole.  By sheer luck alone, I was able to avoid having to do so and would only have to use the panel to provide two small patches.  Specifically, there was not a single stamped character line that was correctly defined on the panel and the rear bumper coves were quite simply wrong in every aspect.  In fact, save for the front few inches of the panel that I used to fabricate my patches, the panel was otherwise garbage.  In fact, the only saving grace was perhaps that it was made of decent metal and of the proper gauge.  Otherwise……..pure crap.

On the flip side, the outer wheel house panel that I picked up from NPD and used to donate the repair patch for the rusted section of the original panel was actually fairly decent.  Not perfect by a significant margin, but more than good enough for the area that I required for the repair.
So that catches us up to about the last week in December and sets the stage for the actual trunk floor installation and panhard rod mount installation, which will complete the chassis-side of the Heidts 4-link suspension installation.

See those two little spots that look like a snake bite circled in yellow at the top of the picture?  Well, they proved to be exactly that and bit me square in the butt as I started the rust repair.  You can see that the inner wheel house damage appears to be contained to the patch area I cut out, but as it turns out, there was a small, hidden area just under the "snake bite" that was rusted as well.  Crap!

This shot is ugly, but educational.  Notice how the chelation process cleaned the rust from the damaged area, but also notice how Ford's factory seam sealer actually promotes rust between the flanges as much as anything!

Here, I have already installed the wheel housing patch and tacked in the outer wheel opening patches.

Notice the small added patch above the large patch.  This is the area with the two "snake bite" holes I had to repair unexpectedly.

I am about 2/3 of the way through welding the patches in place.  Notice the short welds with minimal heat affected zone.  This is about as good as it gets with MIG welding.   Ideally, this would be a TIG job, but I don't yet have a TIG machine.  YET being the key word.

With the welds ground flush and the area scrubbed with a metal conditioning disc, the repair is complete.

Here's another look at the finished repair from the wheel opening side.

And finally, the repaired area from the inside.  Note the weld penetration on every seam.  This repair should last a lifetime.