I have always disliked the factory Mustang e-brake pedal and cable mechanism. To me, having 4 pedals on the floor always seemed to look odd and I’ve always been irritated by the look of e-brake cables dangling underneath the exhaust and trans. In the back of my mind, I was committed to do better than that on my car and after years of looking at factory late-model Mustang e-brake handles and not liking them much either, I ran across a very nifty e-brake handle from Lokar that couldn’t be more perfect for the job.
The part I settled on was one of Lokar’s floor mount emergency hand brake kits in black powder coat finish (Part # XEHB-7000F). If I didn’t know better, I’d think the folks at Lokar designed this e-brake handle kit just for the 1970 Mustang floor pan! The length is perfect for the space available. Of course, this handle will not work in any car with a center console, but I am not of fan of them in muscle cars. I have always been one for the lean-n-mean interior look in muscle cars: there’s nothing better than a 4-speed shifter dominating the trans tunnel landscape with a simple articulated shifter boot and a nice chrome bezel at the floor. To me that look just screams “ALL BUSINESS” and that’s the look I intend to preserve in my car.
The Lokar e-brake kit is very nicely made, but installation instructions were conspicuously absent. After a little study, I determined exactly where the handle should go and what size the opening needed to be in the trans tunnel to allow it to fit just right. I decided that I didn’t want to rely on the single layer of steel in to top of the tunnel to be all that supported the handle during operation, so I made a template that allowed me to make a reinforcement plate and to provide a consistent pattern to accurately locate the mounting bolt holes along with the tunnel slot.
Once I laid out all of the features of the template, I positioned the template on the trans tunnel in the exact location that the e-brake handle needed to go and taped it down with masking tape to prevent it from moving while I transfer punched the hole locations. I determined the slot needed to be 1” wide. This would allow plenty of clearance for the handle and make it very easy to drill the 1” holes at each end of the slot with a step-drill.
With all of the holes located and punched, I drilled 1/8” pilot holes at each location. I enlarged the 4 mounting holes with a 21/64” bit to allow a good fit for the 5/16” mounting bolts. Next, I enlarged the slot end holes to 1” with my handy-dandy step drill and deburred all the holes to remove any sharp edges and burs. Then, I simply connected the two large slot holes with straight lines on each side and cut out the center of the slot using my cutoff wheel. After a quick touch with the angle grinder, the slot was complete and I could now concentrate on the reinforcement plate.
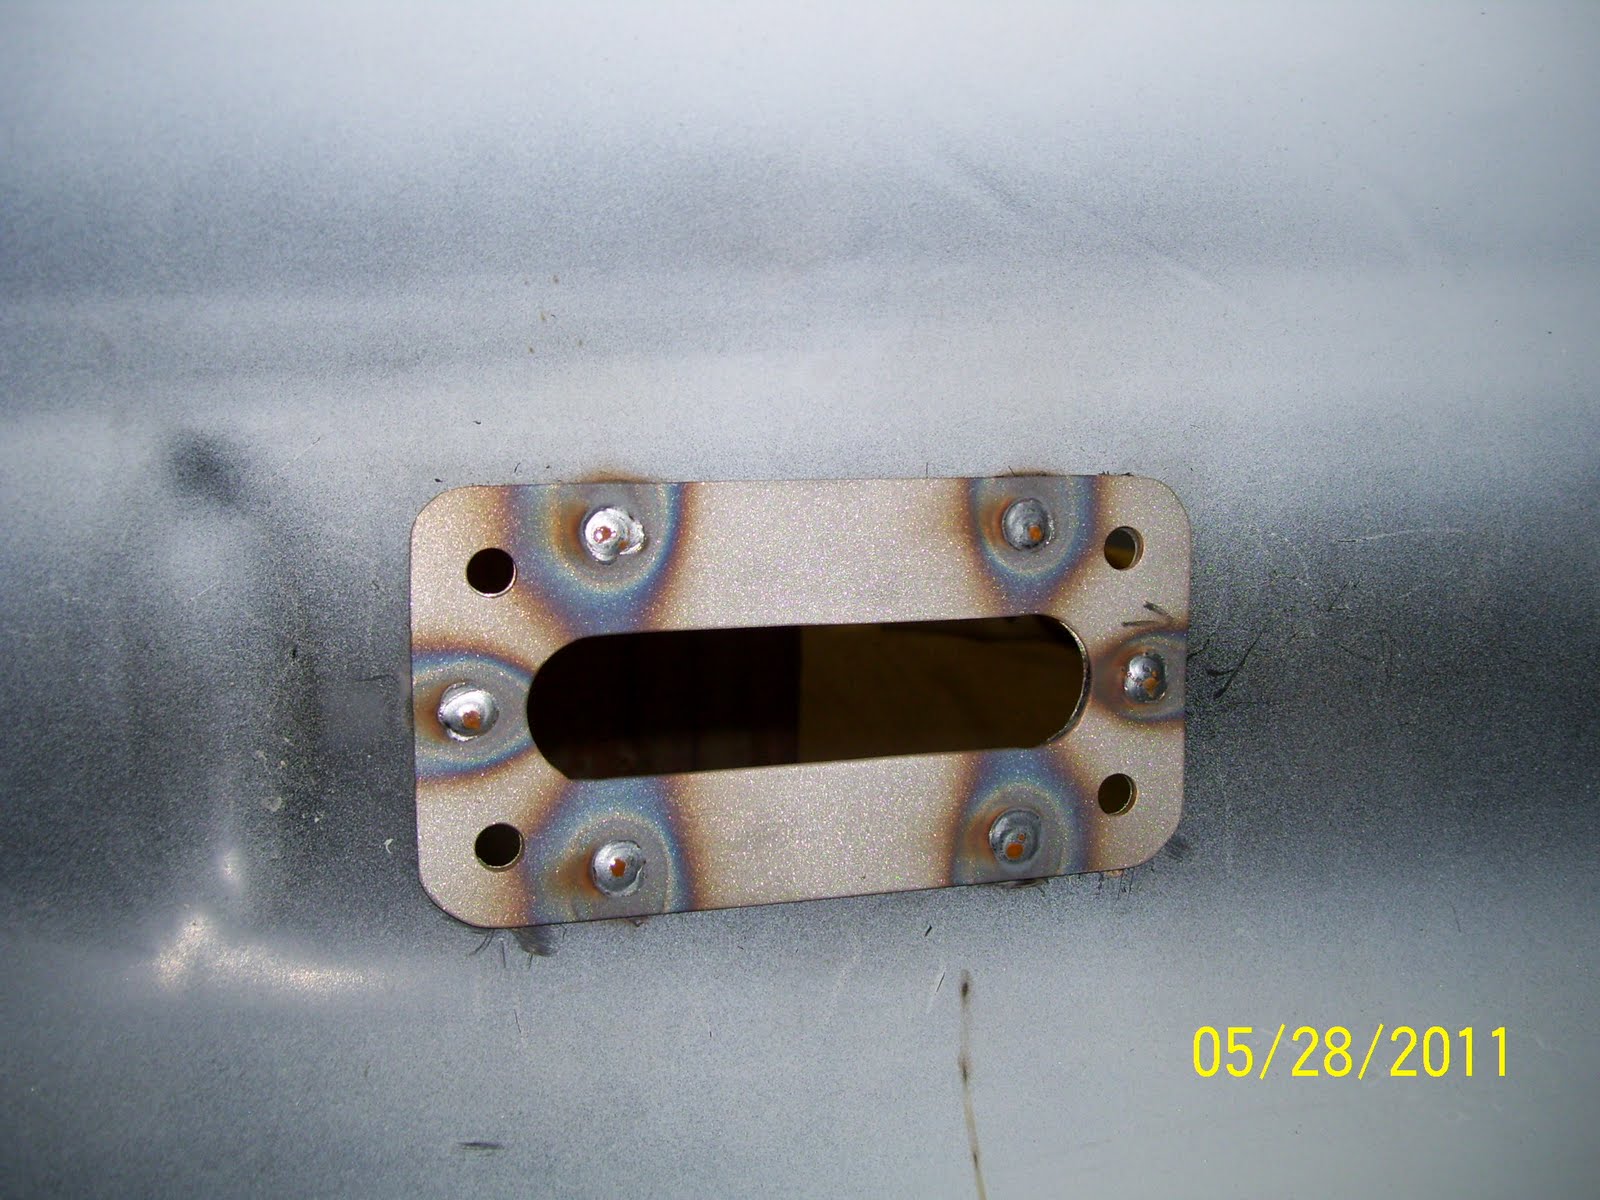
Using the same pattern I used to locate the holes on the tunnel, I laid out the same pattern on a piece of 16-gage sheet metal I stained with machinists dye. Using the same techniques I used on the tunnel, I drilled all of the holes to the aforementioned sizes and cut the slot as before. Now I had a reinforcement plate that perfectly matched the trans tunnel slot. Once I was satisfied that all of the holes lined up and the fit was perfect, I drilled six plug weld holes in the plate to allow me to weld the plate to the bottom of the trans tunnel. Using drifts to ensure perfect alignment of the plate to the tunnel, I plug welded the plate and ground all of the welds smooth on the top and bottom. After a quick couple of coats of SEM high-build primer, the plate looks factory made and the fit is fantastic!
The last step in the e-brake installation was to fit the cable anchor block into the tunnel, behind the handle assembly. There’s no real science to its placement other than to make sure the cables will transfer smoothly to the tensioner block on the handle. Once I had the location pinned down, a couple of holes were drilled for the ¼” mounting bolts and the entire installation was done.
 |
| Here is the Lokar floor mount emergency hand brake kit loosely assembled with the cable tensioner assembly already attached. The tensioner is part of the cable kit that corresponds to the handle kit. |
 |
| I made this simple template to allow accurate mounting hole location and to act as a template for a reinforcing plate that will be welded to the bottom of the trans tunnel for support. |
 |
| I taped the template to the tunnel in the exact location I wanted the handle to be so I could accurately locate all of the bolt holes. |
 |
| Using a sharp punch, I marked each hole center with a light tap of a hammer. |
 |
| Here you can see the center punch marks for each hole after the template pattern has been removed. |
 |
| I pre-drilled the center of each hole with a 1/8" drill bit to allow easy starting of the larger bits and accurate hole location. |
 |
| The slot was completed by cutting the flats using a cutoff wheel. Once all of the holes were drilled and deburred, I touched the edges with my angle grinder and the tunnel modification was done. |
 |
| I used the same drilling template pattern to make the reinforcement plate from 16-gage steel. I used Dykem machinist dye to aid in laying out the holes on the plate. |
 |
| A test fit confirms all is well and the time for drilling plug weld holes had come. |
 |
| The plate was plug welded to the trans tunnel using long drifts to align the plate with the mounting holes in the tunnel. |
 |
| Excellent weld penetration is reflected on the top of the tunnel. |
 |
| A few minutes with the angle grinder and the welds were in good shape for priming. |
 |
| After a coat of SEM high build primer, the e-brake slot and reinforcing plate look like they belong there. |
 |
| Here is a look at the Lokar e-brake handle mocked up in place. |
 |
| Doesn't that handle look right at home on the Mustang trans tunnel? |
 |
| Here is the handle in the fully engaged position. Perfect. |
 |
| Here is the e-brake handle with the cable adjuster installed. |
 |
| Here is a look at the handle and cable anchor relationship after all installation is complete. |
 |
| Here is a close-up look at the cable anchor plate from the handle side. |
 |
| And another look from the cable side. |
Interior Quarter Trim Mounts:
While I had the welder warmed up, I decided to reinstall the rear interior quarter trim panel mounts back in the rear floor area. Though covered in surface rust, by some miracle these mounts survived in good shape and were quite easy to return to serviceable condition. Using measurements I had taken before their removal, I welded the mounts back into the car in the exact location from which they were removed.
 |
| Left side interior quarter trim mounting bracket welded in. |
 |
| Right side interior quarter trim bracket. |
Cowl & Firewall Priming:
I am still trying to better discipline myself to avoid having bare steel unnecessarily exposed for any length of time. As such, I have been prepping the cowl and firewall area for primer/sealer to ensure I don’t have to chase rust until the end of my days.
In my last update, I had filled a few areas of the firewall where toe board and clutch explosion repairs had been made. While these repairs are not absolutely complete (glazing and high build primer will do the rest) I decided to prime all of these areas at the same time I did the cowl panel and end enclosures. I am quite happy with how everything turned out even though I have a few runs in the primer as a result of my trying a new gravity-feed HVLP turbine gun and having a bit of a time getting used to it. Nothing a nib file and some fine sandpaper won’t cure.
Anyway, that’s all I have for now. There’s quite a bit more prepping and priming to do on the floor in preparation for welding in the 4-link mounts and subframe connectors, so there’s plenty more to come.
 |
| Though there is still plenty of work left to do on the firewall, the major damage has been repaired and it looks 1000% better than it did just a few months ago. Clutch explosion damage is invisible as are the toe board repairs. |
 |
| With the cowl end enclosures and cowl tied together in a coat of primer, the whole works looks quite good. |
 |
| My new HVLP gravity feed turbine gun took a bit of getting used to, but overall, it put down PPG DP-40LF primer down quite well. |


Wow, nice work on that E-Brake. Darned thing looks stock.
ReplyDeleteThanks Alex! That is EXACTLY the response I am hoping everyone has!
ReplyDeleteLooking good! I never knew why they decided to put a foot parking brake on a sports car. Very nice job.
ReplyDeleteThanks James. I have pondered the e-brake things for so many years and just decided I hated the look of the pedal brake. Sure liking the prospects of this Lokar piece!
ReplyDeleteDang that does look good. Wanna do my 66 too haha
ReplyDeleteDon't laugh! I like this restoration work pretty well! Might not take too much arm-twisting to make me wanna do this stuff for a living! Ha!
ReplyDeleteI might have to get one of those e-brake handles for my car, never did like the under dash handle that came on the 67. Great job on it!
ReplyDelete