As luck (and mercy) would have it, I had election day 2012 off at the expense of a vacation day (whether I liked it or not). I had been noodling the steps required to repair the left rear rocker panel and wheel opening most of the previous week and I felt pretty confident I had it worked out. So naturally, with a little time on my hands, no adult supervision, and a full day to invest, I was all too happy to spend it in the shop tackling the last “large” repair I had left on the car (whoopee!). But first, a little background:
As many followers on this blog will recognize, the damage on this car when I bought it was rather extensive. In the case of the left rocker panel, the rear edge had been mashed severely by what looked to be a parking block or something that became wedged between the front of the left rear tire and back of the rocker. Apparently, this damage was left unaddressed for quite a while as the mud that was trapped under the folded rocker end was responsible for ensuring the complete rust-through of the inner wheel tub behind it. Nice.
I left this particular repair until later in the process as it is fairly involved, structurally speaking, and any goof on the rocker could mean a much more extensive repair if I wasn’t very careful. The first thing I decided to do was invest in a full rocker panel assembly as opposed to the skins that are commonly available. This got me the best available material and stamping quality available (more on this later), albeit at considerable cost. Fortunately, I already had the remains of the outer wheel tub and fender opening repair panel skins I used to repair the rear corner of the wheel opening, so those investments were going to pay off twice for a change.
I began the repair by carefully assessing the damaged area and marking the repair area with my trust pain marker as an initial guideline. In this repair, the order of repairs was going to be critical, so I needed to be especially careful to only remove material on each surface where it needed to be repaired and no more. Then it would be equally critical to rebuild the corner in a specific order to ensure everything could be fully welded and that each section would fit with the others as perfectly as possible.
Once I was confident I had identified the full extent of each repair area, I truncated my trim lines and started making patches for each section, starting with the rear rocker cap, then the upper fender apron, and finally the inner wheel tub.
As in similar repairs before, I created the individual patches and after careful trimming, used them as patterns to allow the parent metal to be precisely trimmed to match the repair patches. Then, with careful application of the screaming-wheel-of-death (a.k.a., cutoff wheel), the damaged material was removed from the rear rocker cap, fender apron and wheel tub and the edges fitted to the new patch material.
The patch installation began by welding in and metal finishing the inner wheel tub patch. This effectively established a framework on which to align and anchor the apron and rocker cap patches as the repairs moved forward. Next, the small apron patch was carefully positioned and tacked into place to establish position and solidify the joint line between the upper fender apron and rocker. Then, attention was shifted to the rocker end cap and this is where the real challenges began.
When I first started fitting the repair patch, I measured the contour of the original rocker on both sides and confirmed they were identical in profile. However, when I transferred this shape to the new rocker using my contour gage, it became obvious I would have a lot of metal forming work ahead of me to get the patch panel to match the contour of the original rocker. In fact, I would need to completely re-contour the profile of the panel to get this fit I wanted (seems to be the trend throughout this whole project!).
The first order of business was to “un-bend” the character lines on the lower part of the patch to allow the curvature of the part to be hand formed to match the original profile. I decided to use the panel seam as the guide surface and secured the rocker end cap patch at this edge first. This would allow me to carefully form the patch and anchor it with small tack welds along the seam as I got each small section fitting perfectly. Using this same technique and measuring and validating the contour at every step, I walked up the weld seam with tack welds until the entire patch was correctly fitted and the contours matched the original panel exactly. At this point, both the apron patch and the rocker end cap were tacked into place and I could begin welding them completely.
Final welding of the rocker and apron patches began at the lower edge of the rocker cap and finishing at the apron patch seams. In usual fashion, I skipped around with small stitches and cooling each with a strong jet of air to minimize warpage until the entire repair was fully welded. As a final step, each weld was carefully ground and metal finished until the repair was finally complete. A very thin skim of filler will be all that is required to make this repair equally invisible relative to the repair on the right side of the car I documented last week.
At this point, I have only one small rust repair that remains before the car will FINALLY be solid and no further rust repairs will be required. Not sure what I’m gonna do with myself!
 |
| Even after prying the damaged rocker end cap out as far as I could, you can see the extent of the damage was considerable. The rust behind this mess was even worse! |
 |
| The first patch I roughed out was the apron patch. I cut this from the remains of the fender arch repair panel I used to fix the rear wheel opening earlier in the project. |
 |
| To make the rocker patch more manageable, I cut the entire end of the replacement rocker assembly off well beyond the area I would eventually use. The white paint mark is my rough cut line. |
 |
| The white and yellow paint lines identify the maximum repair area. I worked well within these lines to begin removing the damaged areas to better prepare for the repairs. Here you can see that rust has completely destroyed the inner wheel tub lip. |
 |
| With the rust-damaged inner wheel tub lip cut away, I was able to better assess the extent of the required repair areas. |
 |
| Based on the final damage assessment, I was able to reduce the size of the apron patch quite a bit as shown by the white paint lines. |
 |
| Using my trusty contour gage, I established the correct rocker contour for reference against the new part. My "calibrated eye" kept telling me the shape was not correct on the new panel and......... |
 |
| ......BOY WAS I RIGHT! As can be clearly seen in this shot, there was no way the new rocker would work with this huge disparity in contour. Needless to say, it was obvious a significant amount of metal forming would be required to get this corrected. |
 |
| Using the apron patch panel as a pattern, I was able to trim the repair area to fit the new patch exactly. The white paint lines show where I had originally estimated the repair area to be. Less is definitely more in this game. |
 |
| The black lines also show how much I was able to reduce the repair area on the inner wheel tub. Also note the three spot welds that had to be drilled out to allow the old material to be removed. |
 |
| Once again, by using the wheel tub repair patch as a pattern, I cut the offending damaged metal away. |
 |
| New wheel tub patch is fitted and clamped into place with panel clamps and small locking pliers. Looks good! At this point, I tacked the patch into place to ensure position and fit and followed up by welding the patch in completely. |
 |
| Next, the apron patch was tacked into place. No welding yet! |
 |
| Here, you can see I have rolled out the contour features of the rocker end cap and will start carefully forming the panel to fit the original contour perfectly. Tricky......but worth the effort. |
 |
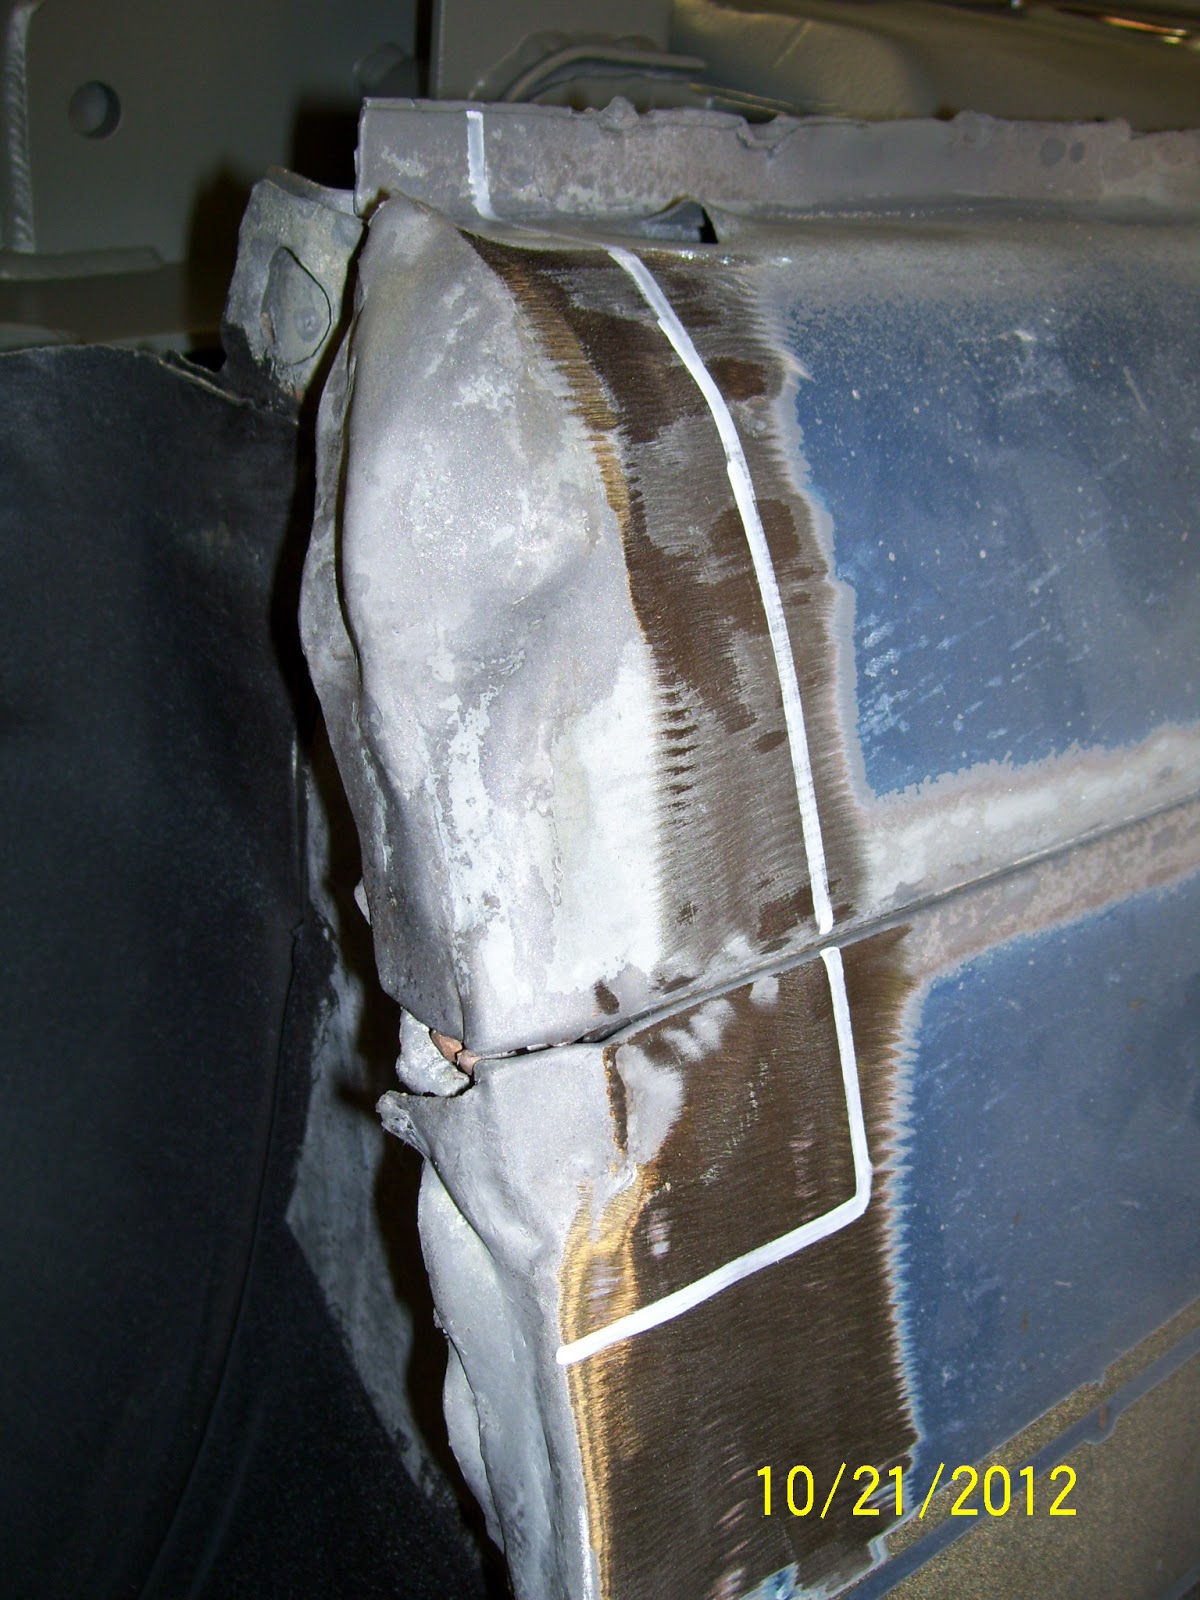
| Here is the rocker end cap patch tacked into place and ready for weld. At this point, the contour is nearly perfect. |
 |
| Starting with the apron patch and finishing with the rocker end cap, the entire repair patch areas were fully welded. |
 |
| And there it is. The entire repair is complete. All welds were ground smooth and all metal finishing is complete. |
 |
| This shot give a good idea on how nicely the lower character line matches the original rocker. I can work with this! |


Great job on this! You even managed to keep all the lines in the proper places. Excellent!
ReplyDeleteThanks Grant! I was sweating this repair a bit because there were so many critical lines to maintain. Luck was on my side I guess. Glad to see you got some work in on your resto as well. Nice work!
ReplyDeleteI finished my last patch job just in time. It has dropped about 4 inches of snow out here so far, which means the car has to stay covered for a little while.
DeleteI would say "luck" had nothing to do with it. It was pure skill at work, Sven. Your repair brought back memories of my firewall repair around the steering column. Tedious work, but your results are well worth the effort, not to mention you have a rust free body now. ;-)
ReplyDeleteThanks very much Dennis! I will be all too happy when this "phase" of the car restification is complete and more "construction" work gets underway. Soon!
DeleteThat was some intricate and well-performed surgery my friend.
ReplyDeleteSurgery is exactly what it felt like Alex! Very well put and thanks very much!
Delete