As the 2012 thankfully comes to its controversial end, I find it’s been
a month since my last update. And while
it seems I have made little progress, I have managed to move forward, albeit
with little outward proof of the fact. The
reality is that I am in a phase that is boring, tedious and generally lacking in
most of the “fun” associated with the hobby.
Since I last checked it, I have been consumed with preparing the rear
interior and trunk area for an upcoming coating of SEM Rust Shield (gunna try
something new!) and then the trusty PPG DP40 primer. Following that, the entire interior will get
a finish coat of PPG matte black urethane.
But as simple as that all sounds, I have a lot of work to do before any
coatings can be applied and that is the phase I’m in.
The latest concentration has been treating the light surface
rust in all the critical areas in any way I could approach. At first, I ventured to use my trusty
chelation process, but quickly found that I had reached a practical limit in its
application in consideration of the limits of my space and the difficulties in
the recovery of the chelant in such complex structures as those in the rear of
a Mustang. As such, I resorted to the
old tried and true wire brush and elbow grease method for the majority of the job. Of particular interest was cleaning up and
prepping the areas surrounding the door openings and the roof drip rails.
As I have mentioned in several posts in the past, I have
learned that it is critical to remove every bit of factory seam sealer that can
be removed in the process of a proper restoration. This is especially true of the roof drip
rails and window surrounds on any classic Mustang. In keeping with that, I again turned to acetone
to soften the compound and using scrapers and wire brushes of various
configurations to remove it from all of the door opening surfaces. Next, I dove into the task of cleaning up the
inner door openings, rocker sills and B-pillar posts. For the most part, the bulk of this work involved
removing the original paint and primer and then treating the slightly rusted
spots with phosphoric acid-based “prep & etch” solution to remove it and
protect the bare metal until it was time to apply primer. B-O-R-I-N-G and time-intensive work, but the
results were very good and I managed to fit all of it in in spite of the
requisite Christmas preparations and associated activities that demand as much
time as any resto work ever did!
So, with the door openings in good shape, I decided to
tackle a few repairs/modifications on the rear bodywork. One was by necessity and the other by
choice. Of priority was the need to
repair to cracks about 1¼” long that radiated from the top corners of the trunk
lid opening out into the quarter panels.
This is a common crack area in Mustangs, especially in car that have
been extensively drag raced without added structural reinforcement like a roll
cage or subframe connectors.
These repairs are pretty simple in concept, but a bit tricky
in that they often traverse many body character lines and welding them up takes
a pretty fine tune on the welder to ensure minimal distortion and weld bead
size.
The first order of business is to stop the crack’s
propagation by drilling a small hole just beyond its end. In my case, I used a sharp 1/8” bit for the
job and this did the job perfectly.
Next, I tack the inboard origin of the crack to lock down
that end and to keep the panels as stable as possible. At this point, the crack is isolated on both
ends and can now be repaired. Using my
trust Dremel tool, I used a thin cutoff blade and carefully cut directly along
the crack to provide a gap that would allow full weld penetration without
buckling. This gap only needs to be
about .030-.050” wide max when using .023” MIG wire and can be as tight as
.015-.020” with TIG.
With the prep work complete, the crack was welded up using a
step-stitch method with the MIG set at a slightly hotter range than recommended
to allow a quick burst of weld that would lay flat and fill well. After each stitch, I would cool the area with
a blast of air and repeat the process until the gap was fully welded. This technique is a little different than
welding in patch panels as it is of much shorter duration and is essentially
stacking a series of small spot welds in a row until a complete bead is
formed. The truth is, I often resort to
this method when installing patches as it helps keep weld distortion to a
minimum, at the expense of considerable increase in repair time. But HEY, this is a hobby right? What’s a little extra time?????
With the cracks fully welded up, a few minutes with the
sanding disc in the angle grinder was all that was required to get the surface
back to smooth with no evidence the cracks were ever there. Now, not being one to leave well enough
alone, I took the opportunity to do one more small tweak to the body that I
have been planning since day one. The
fact that it fires yet another shot across the bow of the purist elite makes it
all the more enjoyable.
Since I was working in the “neighborhood”, I took the
opportunity to fully weld up the seams between the upper trunk panel and the quarters. As long as I can remember, my eye has been
drawn to this area of 69 and 70 Mustangs as one that always seemed unfinished
at worst and inconsistent at best. In
fact, I am not sure I have ever seen these seams look the same way twice and it
peeves me to no end. Well not on MY car
it won’t! So, after a quick wave of the
magic smoke-wand, they are no more!
And that is pretty much a wrap for now. I apologize it wasn’t a bit more of an
adventure, but those days are coming soon.
But for now, the tedium will continue for a while longer. Until next time!
 |
| I was very luck that the B-posts in my car were in great shape. After stripping the seam sealer away and scrubbing the old paint and primer off, the bare metal was treated with phosphoric prep & etch. |
 |
| The driver side rocker sill was pretty nasty, especially along the "wire groove" just underneath where the aluminum sill plates attach. But once the munge was removed, the metal was found to be extremely solid and in fine shape. |
 |
| As fortune would have it, the passenger side rocker sill was also in excellent shape after clean-up and etching. |
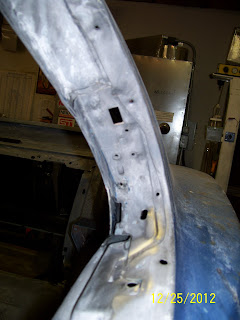 |
| Although a crap picture, the quarter glass surrounds cleaned up well and are completely solid. |
 |
| The underside of the roof drip rails required quite a bit of work to remove the seam sealer and surface rust. However, the end result was good clean metal around both the driver and passenger side openings. Bonus! |
 |
| While I failed to document the "before" shots of the trunk-to-quarter cracking, here you can see the 1/8" "stop hole" I drilled at the outboard end of the crack and the inboard anchor tacks welds at the root of the crack. Also, I have already cut a thing groove along the crack to allow full weld penetration. You will also note that I have hinted at my next modification as evidenced by the short string of weld along the gap between the upper trunk closeout and the quarter panel. |
 |
| As a middle-finger salute to obnoxious "purists" everywhere, I welded the trunk/quarter gaps completely just to watch them point out the "flaw" when the car is complete. Actually that's bullsh*t. I absolutely HATE how this area looks on "restored" cars and didn't want mine to look that way (but I still like my original story better). |
 |
| Though a slight bit of finish work is still left, this shot shows the gaps filled and the crack repaired. |


Tedious work it is, but you still manage to do good work. As for the crack at the trunk/quarter area, I have been thinking about doing the same thing. Never have liked how that looked.
ReplyDeleteThanks Grant and you ain't kiddin! It's hard to slug through the tedious stuff in the winter. Just seems to make time feel extremely slow!
DeleteNice Sven, that's a bunch of tedious work there. Looking forward to seeing it all in one color!
ReplyDeleterj
You and me BOTH R.J.! Unfortunately a long way to go before I'm in "one color"......
DeleteNice work there! I must admit that I had considered closing up those gaps as well as the gaps between the rocker and quarter panels. I think it'll look much cleaner.
ReplyDeleteHowdy Alex and thank you! Those gaps have always been a big peeve of mine and I just couldn't let it go. I think it will add a slight touch of "smooth" to those areas and that's exactly what I'm after.
DeleteYou've turned the corner Sven. The devil is in the details, and the details look great!
ReplyDeleteBoy I sure hope you're right Dennis. I'm definitely trying to be very "detail-oriented" on this build in hopes it will set the car apart from its peers. Even though I know it's progress, it sure doesn't have the visual indicators that so much of my earlier work showed. Part of the phase I suppose!
DeleteHi Sven, tedious but important work nonetheless. I agree on cleaning up those gaps also along with the qtr to rockers mentioned above by Alex.
ReplyDeleteToo right Mike. Too right. I know things will gain momentum before I know it, but MAN could I use some excitement! LOL! Happy New Year!
Delete