Starting from ground zero can be a bit disheartening on so many levels, but for once, I was very happy to be starting from this distinguished point with a clear understanding of what NOT to do.
Recalling the last installment, our first attempt at seam sealing the exterior floor of the car went…..well…..badly. The good news is, we learned a lot in a very short period of time and were able to get ourselves back on plane to start over with new confidence. And that’s exactly what we did!
As before, the exterior seams were carefully taped off to allow nice clean beads of seam sealer to be laid down, smoothed and allowed to tack a bit before the tape is removed and the sealer is left to dry. This technique is fairly exclusive to the “custom” side of the hobby as the purists often get purposefully sloppy with seam sealer to duplicate the rough patterns and textures applied by the factory. However, by taping and smoothing as described here, the seam is very smooth and slick, and when top coated with epoxy primer and later, sprayable bed liner material, the panels take on a very smooth, almost molded appearance that I find very attractive. It’s quite tidy in fact, and that after all, is what we’re after!
In any case, the 3M Urethane seam sealer worked extremely well and by using xylol (xylene) as our solvent, it remained quite happy and dried to a very nice finish. A little trick I learned is to carefully read the ingredients of the sealer for clues on what type of solvent will generally work. In this case, xylol was part of the ingredients of the sealer and worked perfectly.
Urethane sealer is pretty interesting stuff in that straight out of the tube; it dries to a paintable finish in under an hour above about 60 degrees F and 50% humidity. However, when you endeavor to use a solvent to smooth the finish as we did here, it is best to allow a few days before paint to allow all of the extra solvent to flash off completely.
In any case, Ted and I were able to knock out the entire job in a few nights and our focus will not turn to preparing the lower floor for a couple of coats of DP90LF (black) primer and later the U-POL Raptor urethane bed liner material.
In other news, I have struggled with what to do with the rather sketchy condition of the roof panel on the car for several months. I have purposely left this decision until last to give myself adequate “think” time to try to make the best decision possible for the car and ultimately, I have decided the roof needs to go. I really tried to avoid this particular bit of work for many, many reasons, but the old girl deserves the absolute best and that’s what she’s gunna get. Anything less at this point in the project is simply false economy.
With that decision firmly established, I trotted down to the local NPD warehouse to lay down the bones for a brand new roof panel. However, fate would decree differently. The nice gentleman behind the counter rounded in his chair after typing in my rather significant order and informed me that the roof panels were “temporarily discontinued”. I was mortified. After struggling with the decision for so long and avoiding the weighty time penalty it would impose, I was now being told I was too late.
But wait! There’s more. Mr. Counterman allowed that there was one in the California NPD warehouse, and if I wanted it, he could ship it out to the Michigan location at no charge. At this point, I asked him to please call them and ensure that it was indeed there and if so, I would take it and pay for it in advance. They did, I did, and the deal was struck. In “about two weeks”, a new roof panel would be in my possession and the last major panel replacement work could begin.
Fast forward two days. The phone rings and it’s Mr. Counterman looking for yours truly. Apparently, my spendy new roof panel will now take 4 to 6 weeks to arrive and in the process, it will have to make a coast-to-coast tour from California to Florida and THEN make its way to Michigan. Ya……..that makes perfect sense.
Anyway, Mr. Counterman asks if I still want the panel or if I want a refund. After a moment of reflection, I decide to leave the order standing, but have now committed to trying to find another panel somewhere else without having to wait……even if I have to pay the shipping charges to get it. Can’t anything be easy?
And finally, a moment of silence for a trusty old tool that has finally met its end. My nearly indestructible Kodak digital camera has snapped its last images for this project and I feel a bit of personal loss at its demise. To date, this camera has contributed every image shared on this blog and thousands more beyond that. For the price, this camera was a far better tool for taking pictures than most of the similar devices I have experienced and I found myself resorting to it more often than not when I needed something that simply worked. Adios amigo…..
 |
| Taping off the seams once again for round 2 of under body seam sealing fun! |
 |
| Ted is an excellent hand at taping "his" end of the car. He manages to stay just out of arm's reach, forcing me to endure MANY off-handed comments and copious whining. |
 |
| After a few hours, we have one side taped off and we are ready to give the seam sealer another shot. |
 |
| Success! The sealer went on quite smoothly and the xylol solvent worked very well at feathering the edges. |
 |
| After a few solid hours of carefully orchestrated teamwork, Ted and I had caught ourselves up to where we had previously discovered our earlier error. After an overnight cure, the sealer was nice and firmly cured and we could move on to the other side. |
 |
| With each seam taped off, we run about a 12-18 inch bead of sealer and then smooth that section with xylol before moving on. Ted uses a butter bowl to hold a small amount of xylol to make it easier to chase the seams. |
 |
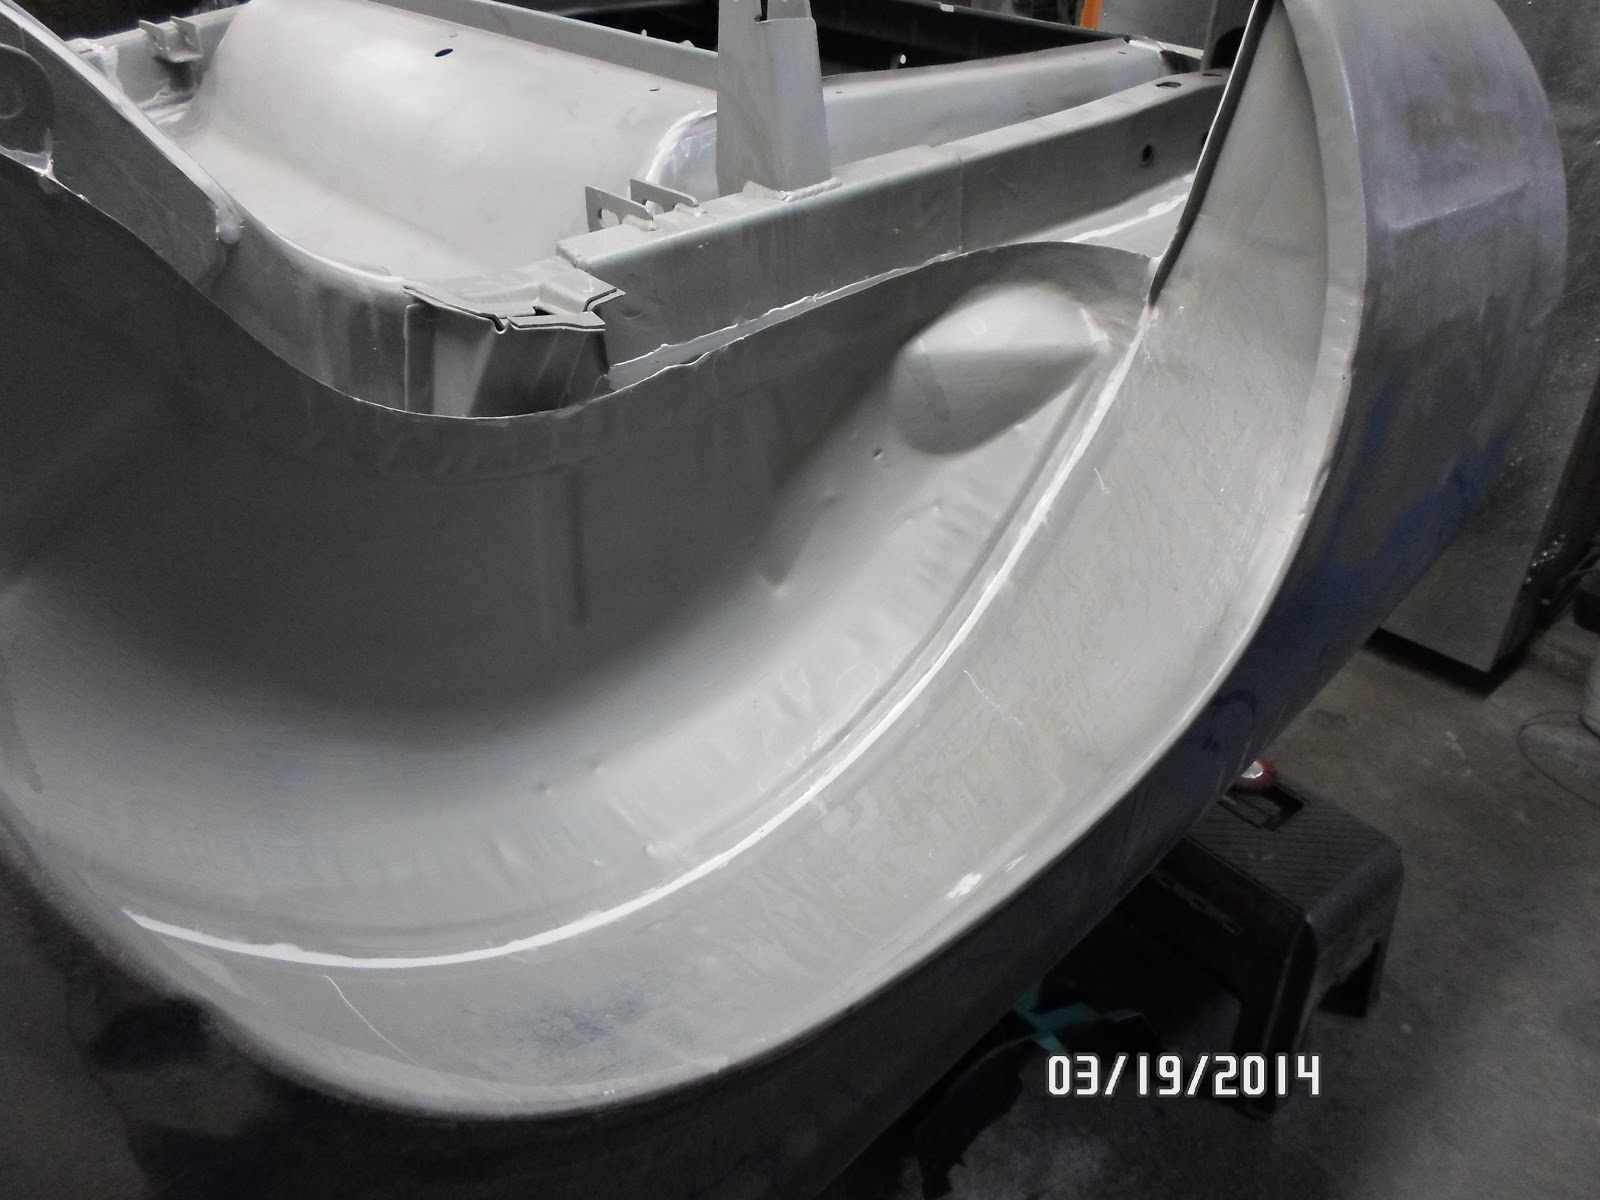
| At long last, the other side is now sealed and we can move on to the harder-to-reach areas at the rear valence to finish things up. |
 |
| Ignore the date on the picture! Camera operator lacked sufficient talent to get that part of the new digital camera set up properly. The good news is the rear wheel tubs are sealed and look very nice and ready for finish. |
 |
| The rear axle tunnel area is one of the more complex areas to seal, but looks very clean when the job is complete. |
 |
| Here, Ted has started scuffing the floor in preparation for the final coat of primer. |
 |
| Synthetic scuff pads are great for scuffing the surface of the primer to get it ready for it's final coat. |
 |
| And there it is. The floor is now completely sealed and scuffed and we can now begin preparations to get the floor in a nice fresh coat of PPG DP90LF (black) primer. |


Great job as always Sven. As for the roof panel, I have seen them on CJP. Don't know what the brand is, haven't paid much attention to it. It would be truck freight though, so it might be better to wait for the tour bus to deliver it's passenger. Here's hoping for a great roof tutorial soon!
ReplyDeleteThanks very much Grant. I was fortunate enough to be able to employ a "Plan B" on the roof skin yesterday afternoon, so I should be good to go in less than a week if all goes well. I really hate to loose the momentum at this point. Especially heading into spring!
DeleteThat looks nice, Sven. I'm glad you were successful this time around. :-) BTW...what camera did you end up getting?
ReplyDeleteThanks Dennis. I was getting pretty peeved at losing so much time, but I am quite happy with where we are now. As for the camera, I ended up buying a tiny little Samsung ST76. So far, so good.
DeleteThat is some precision sealing my friend! Looks perfect.
ReplyDeleteThanks Alex! I'm trying to catch up with ya!
DeleteSmooooooothhhhhhhhhhhhhhhh!!!!!!! I'm glad we all had a chance to see it before the black covers all that beautiful detail work. You know Sven, you'll probably pick up +5mph on the top end just from drag reduction :)
ReplyDeleterj
Smooooooth is the deal RJ! Don't feel bad about the black! Once it's in the Raptor bed liner spray, it wioll look very molded and tidy. It's a really nice, custom look. I'll be interested to see what you think. And who would feel bad about a lil more speed!? Ha!
Delete