Easter
weekend and I have an extra day to spend in the shop and what better excuse
would I need to start the removal of the rusted and damaged original roof skin
on the Boss than that? But first, a
little background…..
Having
committed to replace the roof skin some months ago, I wanted to make sure, in
every practical way, that the original fit and finish of the window openings
and body contours would be as perfect as they could be. As such, I decided to make simple templates
to allow matching the window openings and to have a place where exact
measurements could be made to verify the fit of the new roof during
installation. So, the first order of
business was to make these templates and measure everything before any of the
roof skin removal work began. Ted and I
had a pretty solid plan laid out for the proper templates and we set about
making them in an evening using the scrap cardboard I had left over from the
shipping box the new roof skin arrived in.
With
the templates made, I began marking the exact cut lines I would follow along
the edges of the original roof to allow me to remove the bulk of the damaged
skin in a single piece to allow work on the welded flanges to be much
easier. Using my trusty paint markers, I
traces the entire perimeter of the roof about 1.5” inboard of the seams and
flanges. Then, with a box of fresh
cutoff wheels in the queue, I very carefully cut along my painted cut lines,
making sure to only allow the blade to penetrate the skin just enough to cut
without damaging the under-structure beneath it. This slow progression was particularly taxing
on the cutoff disk life and it took about four fresh cutoff wheels to complete
the job. But, after less than an hour of
work, the major portion of the roof skin was cut away and work would then shift
to the careful removal of the perimeter flanges.
I
wanted to preserve as much of the front and rear window opening flanges as I
could to allow me to compare them to the contours and features of the new roof
skin. Since these were rather straight
forward spot-welded sections, it didn’t take long to cut the spot welds free
using my Blair spot weld cutter tool. As
each window flange was cut free and some small burs removed, I compared each
one to the new roof skin to see how things were shaping up in these areas of
concern. What I discovered was an
absolute stunning fit which quickly offered a welcome measure of comfort that
the rest of the new panel would be workable as well.
With
the front and rear window flanges removed, I could now start evaluating the condition
of the underlying structures of the roof to see what, if any, additional
repairs would be necessary before the new roof could be installed. To my utter amazement, the structures were in
fantastic shape with only the 40-year-old surface rust that is expected on
surfaces that never received any form of protective coating during manufacture. In fact, once the cobwebs and mouse turds
were brushed free, the metal was nearly perfect in all respects. This was good news I really needed and
provided great confirmation that I had made the right decision to replace the
original roof with new metal rather than risk a repair to the original.
At
this point, the drip rails were all that remained to remove and I knew in
advance these would provide a challenge in that there were an extraordinary
number of spot welds along each rail (about 45 on each side), and the welds
were smaller and more closely spaced than what is normal around the rest of the
car. This pretty well eliminated the
possibility of using a conventional spot weld cutter in this area as there just
wasn’t the room necessary to fit the tool in the confined space.
The
solution to this problem was to revert back to my trust cutoff wheel to very
carefully grind through the spot welds just enough to allow them to be popped
loose with gentle prying/peeling on the loose end of the scrap roof skin. On first blush, this sounds like a horribly
barbaric means to address spot welds (Ted thought I was positively off my
perch), but as long as each weld is clearly marked before you start, and a very
careful and light hand is used on the cutoff tool, you will be amazed at how
quick and effective this method of spot weld removal can be with absolutely
minimal impact on the thin, underlying base material. In fact, once I got going, each drip rail
required less than 15 minutes each to remove and that included cleaning up any
burs left behind. Sometimes you have to
see it to believe it, but the technique works and works extremely well.
Now
that the old roof skin was completely out of the way, I spent a few minutes
grinding down the remaining spot weld nubs around each window opening and
across the top of each quarter panel seam.
Then, it was time to test fit the new roof skin to see where we were in
the grand scheme of things.
Much
to our amazement, the new roof skin almost dropped right into place with nearly
every flange settling nicely and cleanly.
We clamped the panel around the flanges and started assessing the fit
more critically and found that only small tweaks would be required to get the
roof to fit almost perfectly. The
critical contours appear to be spot-on and after some small tweaks to get the
roof shifted toward the driver side by about 1/8”, we should be in excellent
shape when the time comes to lock it down for good. To say I am stunned at this stroke of fortune
would be an understatement!
Now
comes the tedious task of addressing the surface rust on the inner roof
structures and getting everything prepared for welding. Every flange will require exceptionally tight
fit to be properly and cleanly welded into place with maximum effect and best appearance
and many hours of prep work will be required to get there. So, the next few weeks work has been defined
and we are off and running in that direction.
Part 2 is on the way!
 |
| To ensure the fit of the new roof skin would match the original as much as possible, patterns were made to match the front and rear window openings and to allow exact measurements to be taken at precise locations around the opening so fit could be verified. |
.JPG) |
| A single pattern was made for the front window opening that could be simply flipped over to verify the other side. Measurements were written directly on the pattern for reference later on. |
 |
| Here is the front window patter flipped to the passenger side for fit. |
 |
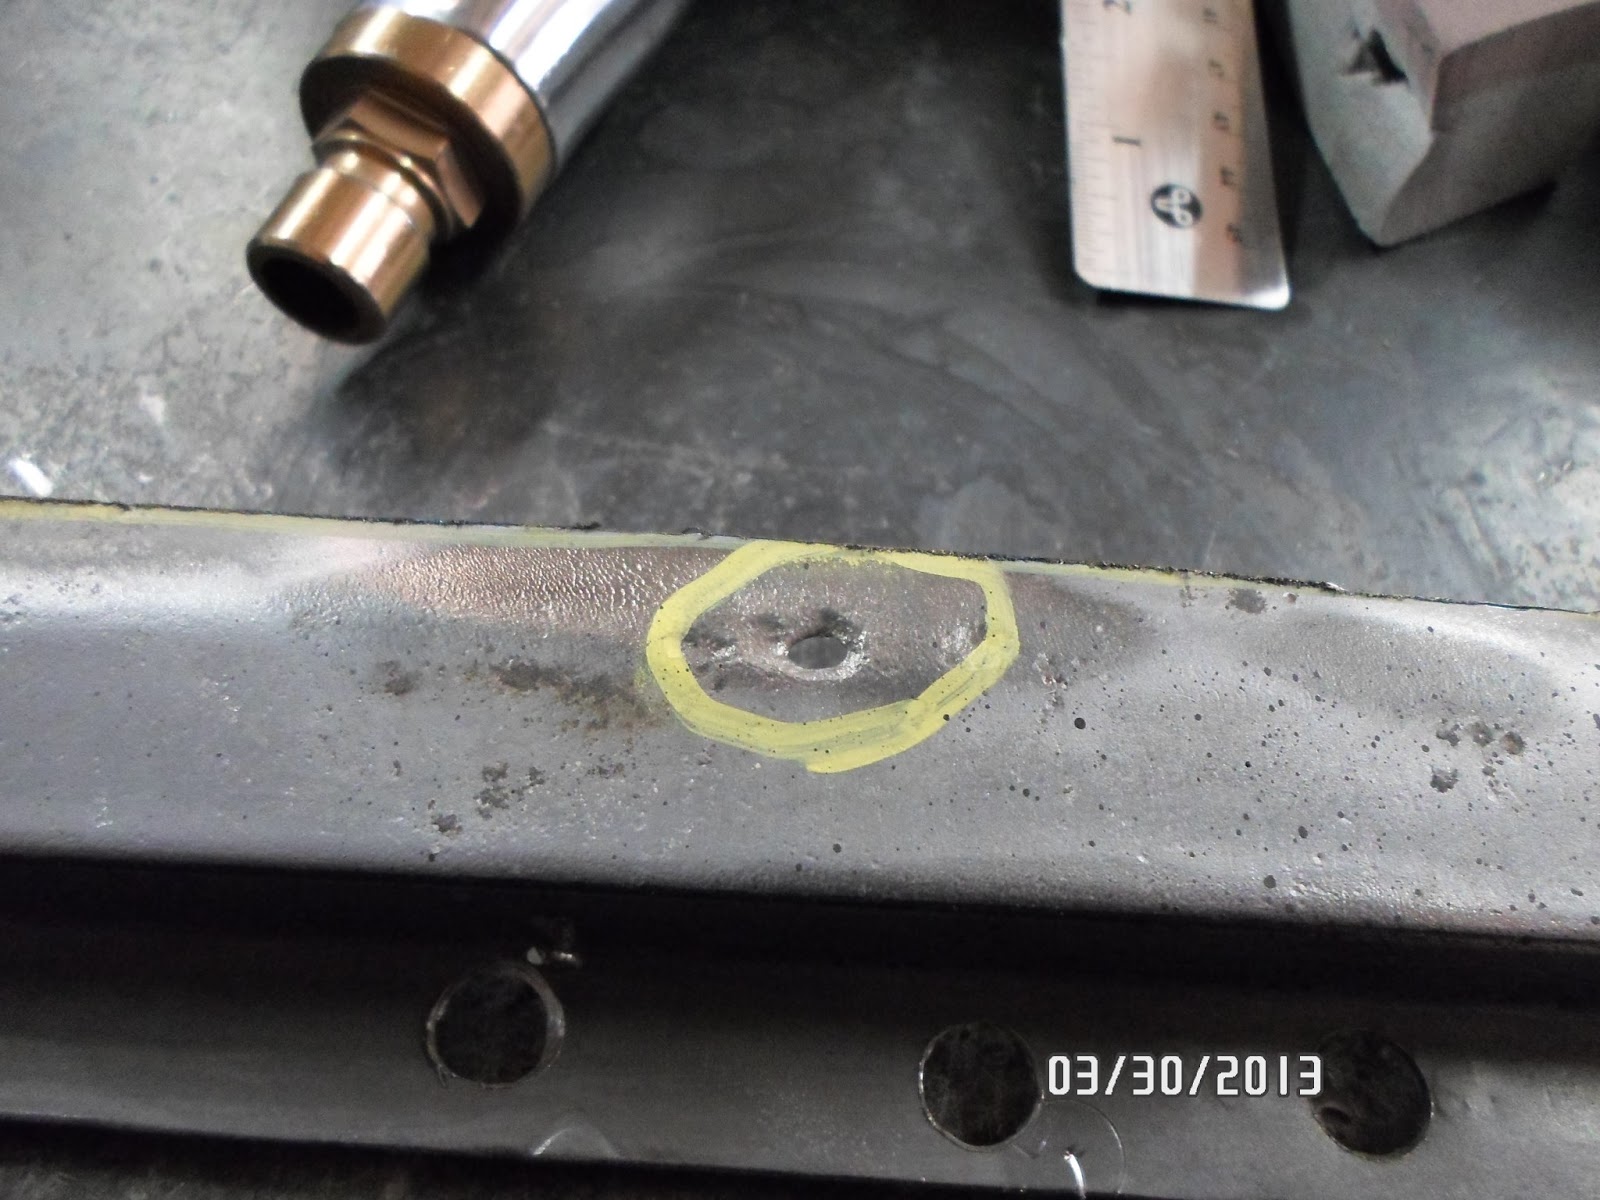
| The hole in the middle of that yellow circle is what started the entire roof replacement discussion (more later). More importantly, you can clearly see the yellow cut line I marked with my paint pen and the clean cut created by the cutoff wheel. |
 |
| This is the cut line around the rear window opening. |
 |
| Here is the cut line around the top of the front window opening. |
 |
| I kept the cutting depth rather shallow to avoid damage to the underlying roof structure. |
 |
| I was expecting a disaster under the roof skin once it was removed, but to my amazement, the roof support structure was in excellent shape with only surface rust to be seen. |
 |
| This is the spot that changed everything. After breezing over this rust spot with a wire brush several months ago and immediately breaking through, I though the world was truly against me. Since it was located above a structural beam and I couldn't see it from behind, I feared the worst was being hidden from view. |
 |
| This is the same spot from underneath. What it shows is the pit was exclusive to the outside surface and not disguising a disaster on the inside. Though this photo makes the interior surface look worse than it is, careful inspection shows a lot of clean metal, a fair amount of red oxide primer over spray and a smattering of surface rust. As odd as it sounds this was a fantastic discovery. |
 |
| Again, worse in pictures than in person, the inner roof structural beams were in excellent shape with only surface rust to contend with. |
 |
| Even in the rear quarter to roof flange area, the condition of the metal was excellent. |
 |
| This little bump in the middle of the rear roof brace is actually an alignment aid used to get the roof skin properly positioned during production. It will serve the same function when the time comes to fit the new roof skin. |
 |
| We were careful to remove the front and rear window flanges intact so they could be used to verify the contours and fit of the new roof skin in this area. They will also function as patterns to position the trim rivets when the time comes. |
 |
| The Blair spot weld cutter does an excellent job cutting spot welds on a job like this. |
 |
| By comparing the original window flanges directly to the new roof skin, we were able to verify the new roof skin would work very well for our needs. Quite a comfort seeing such good fit on panels separated in manufacturing date and tooling by some 43 years! |
 |
| The front upper windshield beam is in excellent shape as well. |
 |
| Upper windshield corner looks great! |
 |
| Diver side quarter panel upper seam doesn't get much better. |
 |
| Using a unique spot weld cutting technique, the drip rail roof sections were removed quite quickly and with virtually no damage to the base material. Cool trick! |
 |
| With all of the spot weld nubs ground smooth, the new roof skin dropped on with amazingly good fit. |
 |
| With only the window flanges clamped, even the quarter panel flange fit is superb. A couple of strategically placed Clecos and we will be in business. |
 |
| Beautiful front driver side window opening fit! |
 |
| Passenger side front window fit is also excellent! |


.JPG)


Sven, I have used that cutoff wheel technique myself. It works quick and surprising accurate. I prefer using a cutoff wheel on my dremel as it is smaller and more accurate. Congrats on good bracing!
ReplyDeleteYou have to admit, the technique kinda scares you on first thought, but once you get the feel for it, it really works very well as you discovered. And you ideas on the dremel are spot-on as well. Much more precise for the really delicate work. I am a big fan!
DeleteWow, that's amazing how nicely the new roof aligns. I like your spot removing technique but I have a feeling it was most useful on the convex surface like your roof supports. Can't wait to see the new roof welded on!
ReplyDeleteI was pretty amazed myself Alex! It's still going to require a bit of massaging to get it exactly right, but for such a large panel, I can't possibly complain for an out-of-the-box fit.
DeleteI have never seen a roof skin replacement and that is amazing. Very nice work indeed.
ReplyDeleteThanks James! Roof skins are kind of intimidating based on their sheer size and the critical nature of them in the overall fit and finish on the car. There ain't no hiding flaws in a Mustang roof!
DeleteSven - you are Fearless!!!!!
Deleterj
RJ, it's more than likely that I'm too dumb to know when to quit!
DeleteObviously, your prior planning and execution is excellent. You make replacing a roof skin like no big deal. I'll be waiting for the next installment.
ReplyDeleteThanks Dennis. I have a pretty hard "think" about these jobs before I ever make smoke and it certainly makes the project direction much more clear. Of course, it sure helps when the panel fits pretty nicely right out of the box as well. Lots more on the way!
Delete