Spring has FINALLY sprung here in Michigan and other than several days of rain (which is needed); we have not let a lot of grass grow under our feet in the past several days. The bottom line, in fact, is that the Boss has a new roof skin installed and it looks absolutely fantastic! The installation went precisely to plan and the finished product fits arguably better than the original roof. Giving credit where it is due, I can thank Tony D. Branda Performance and Dynacorn for a great-fitting roof skin delivered to my door in flawless condition. That helps get things off to a good start no matter what you’re working on!
When we last left off, the interior bracing structures were primed and it was time to start the final fitting of the roof skin in preparation for welding it permanently into place. One area in particular that required a bit of extra grey matter stirring was how best to weld along the drip rails without trashing the solid, original drip rails in the process. These are very thin gage metal and welding to them can be quite a challenge. In addition, the flanges along these rails are very narrow and would only allow a 3/16” plug weld hole to be used. And finally, there are about 45 welds along each rail!
However, the first order of business was to drill and/or punch all of the plug weld holes in the roof skin flanges and then transfer their locations to the main body structure so the weld surfaces could be properly prepared. Then, a set of small c-clamps were modified to help in clamping each drip rail tightly for ease of welding. With all of our clamping devices set to go, we trial fit the roof skin one last time to ensure everything was exactly where it needed to be, and made any necessary adjustments to ensure the fit was a perfect as we could get it.
With the roof skin ready to go, it was time to work out the drip rail welding situation. Since the drip rails present a welding condition not covered by “normal” textbook welder settings and setup, I decided the best thing to do was crate a test panel that precisely duplicated the materials and plug weld configuration that I would encounter on each drip rail. I drilled a series of plug weld holes at the same spacing as those on the drip rails and set the welder up using the recommended settings for the material thickness as a starting point. In addition, I switched to my tapered MIG gun nozzle to allow better access to the narrow rail recess and to allow me better line-of-sight observation of the weld arc area itself.
I began testing various welder settings to determine what gave me the best penetration and flattest weld with the most minimal heat affected zone. What I ended up with was a wire speed close to the recommended setting on the chart, a wire stick-out of about 3/8”, and a heat range quite a bit hotter than you would normally expect. In the case of my Lincoln 180C welder, I set the machine up at 35CFH gas flow, and a wire speed of 3 and heat range of E.5. This allowed the weld to penetrate quite completely and fill the plug weld hole fully without creating a heap of extra metal that would have to be ground away. The heat affected zone was quite compact as the weld required very little “on” time to complete the job. With this confidence in the weld process established, the process of actually welding in the roof skin was just about as textbook as it could have been. We tacked down the corners of the roof and the center of each drip rail and started the methodical skip-tack technique around the perimeter until the entire roof was fully welded into place. And I am happy to report the spot weld settings and technique developed on the test piece worked perfectly to secure each drip rail.
The following few evenings were spent grinding each plug weld smooth and finishing the roof flanges. Next, the location of each trim rivet was sanded clean to make for an optimum surface to weld them in place. Pretty quickly, we encountered another small snag with regard to a welding tool deficiency. In this case, my Motor Guard pin welder could not properly reach over the window flanges to weld the trim rivets in place at the proper location. However, a quick bit of internet investigation revealed the proper extension kit that would remedy this issue (or so I thought). So like any dedicated enthusiast, I order said extension kit and a few days later discovered the gift of UPS had once again graced my door with “stuff”.
Once the extension kit arrived, I quickly discovered the length was going to work, but the “flats” machined in each side of the grounding collar were not going to allow the trim rivets to be welded at the proper 5/16” height above the flanges that were required on the Mustang. So, off to the mill I went to machine the collar flats a bit deeper to allow me to very easily align the trim rivets at exactly the right height to be welded to the roof flanges just like the factory did. Once the modifications to the collar were made, the process of welding on the trim rivets took all of about 15 minutes, with every rivet positioned at exactly 5/16” above the flanges just like the original. After a quick dusting with the nylon cup brush to remove any fuzz from each rivet, the job of attaching the new roof was now complete.
Next up, Ted and I moved directly to preparing the underside areas of the roof and drip rail flanges that were affected by the welding heat and scuffed the entire interior surfaces of the roof and braces in preparation for a fresh coat of DP40LF primer to seal everything up. Fortunately, the largest volume of sanding could be done with careful application of the DA sander with some 120 grit sand paper and the rest of the details were scuffed by hand or with the nylon abrasive cup brush.
After a good swabbing with wax and grease remover and a few thorough applications of the tack rag, we mixed up a batch of primer and cut-in the detail areas. Once the cut-in primer had flashed off for several minutes, we applied two medium-wet coats of primer-sealer and let the works dry overnight before rolling the car back upright to start the next phase of the roof installation which will include preparing and filling the large seams at the A and C pillars and applying a few coats of epoxy primer.
.JPG) |
| With such a narrow flange on the drip rails, we were only able to use 3/16 plug weld holes along the flange. In this shot, we have transferred the locations of each weld to the flange underneath using our trusty paint pen. Once the roof skin is removed, these marks will be scuffed to bare metal for welding. |
 |
| Nice tight flange fit with no clamps is an excellent sign that this new roof skin is as good as they come. |
 |
| I modified these inexpensive mini c-clamps to clamp along the drip rail channels. At $1.84 each, this was money well spent to get good clamping without damage to the drip rail or flange. |
 |
| Ted checks the fit on the rear corners after clamping. Note the number of clamps used along the drip rail. |
 |
| All plug weld surfaces are sanded to bare metal and ready to go. |
 |
| Drip rail channels have been scuffed to bare metal and prepped for welding. |
 |
| With all fitting work complete and the roof skin clamped into place for the final time, the results look excellent. Arguably, the fit of the new roof skin is better than the original that came off. |
 |
| One major issue that needed to be resolved was how to set the welder such that the small plug welds would fully penetrate as well as fill the plug weld hole without burning through or heaving a huge amount of material on top of the weld that we didn't need. The solution was this simple test assembly that allowed each setting to be dialed in perfectly before crunch time. |
 |
| These were the weld trials after a few adjustments. Note the significant differences in heat affected zone and weld bead size that results from very small adjustments to the wire feed and amperage. For reference, the weld at the far left was the final set point. |
 |
| The first weld settings based on the recommended setting chart included with the Lincoln 180C welder created welds a bit too cold with too much material deposited. However, these early tests showed how sensitive this type of plug weld is to small changes in welder setup. |
 |
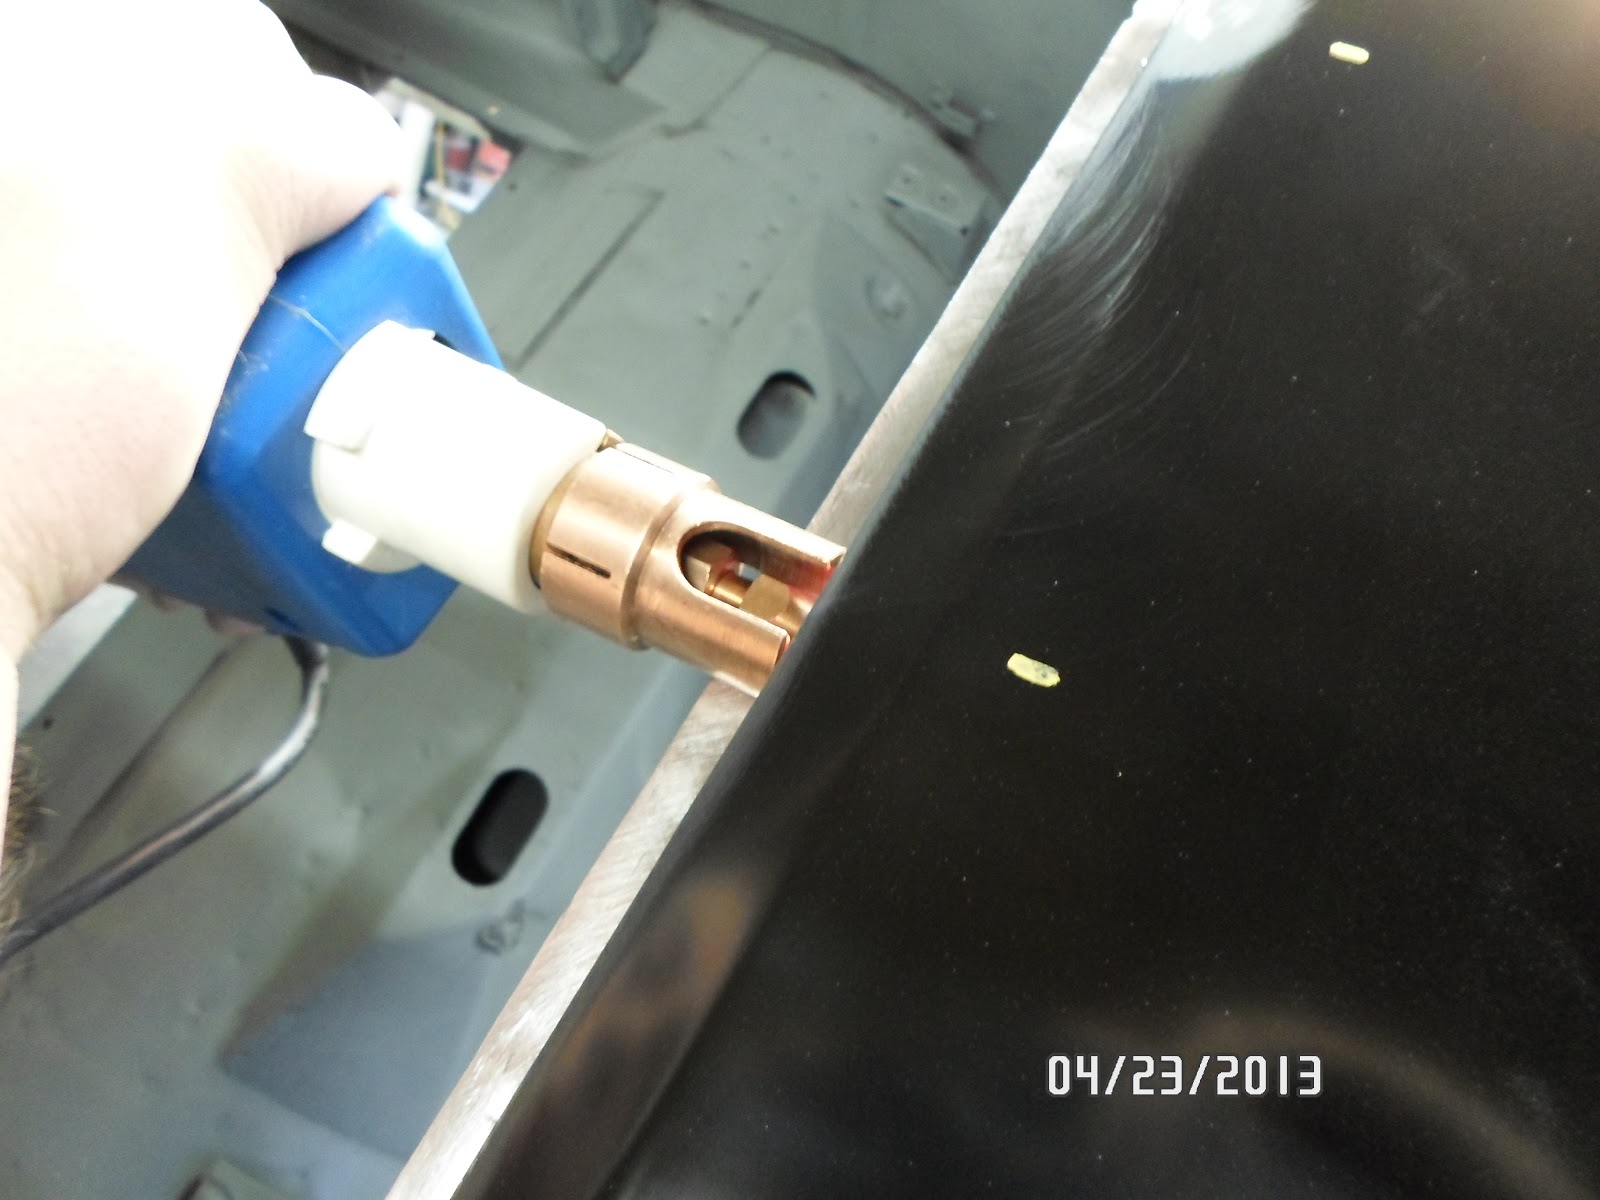
| This tapered nozzle was required to get close enough to the weld surface. Also, the weld wire stick-out was ideal at about 3/8" from the MIG tip. Combined with a wire speed of 3 and an amp setting of E.5, this created the perfect weld in the small 3/16" plug weld holes with excellent penetration. |
 |
| This is a great shot of how nicely the drip rail welds came out. Each weld had 100% penetration with minimal crown and absolutely no porosity. |
 |
| Welds along the rear window opening flange were very conventional 5/16" plug welds. Conveniently, the same settings used on the drip rail plug welds worked well here also. |
 |
| Welds along the front windshield flange were very straight-forward as well. |
 |
| Here is a good look at the weld penetration we achieved along the bottom of the drip rails. 100% penetration everywhere. It doesn't get much better. |
 |
| Welds at the front A-pillar joint include a small seam along the lower edge. |
 |
| Fully welded! With the clamps removed, we get the first look at the profile of the car with its new roof. |
 |
| All of the welds were brushed with a nylon abrasive wheel and the flange edges were trimmed before the welds were ground smooth. |
 |
| After grinding the drip rail welds, the result was quite acceptable. |
 |
| Window flanges were smoothed and the A-pillar corners were cleaned up as well. |
 |
| I had to modify the flats on the Motor Guard extension kit to allow it to properly position the trim rivets at the correct distance above the window flanges |
 |
| This is what a proper trim rivet looks like. In my opinion, this is a far better option than the "repair" screws that are often used. |
 |
| There is a small magnet in the tip of the electrode that holds the trim rivet head securely while it is being positioned on the surface for welding. |
 |
| With the trim rivet in place in the electrode, the stem protrudes above the tip by only a small amount as shown. |
 |
| Here is an idea of what the whole (modified) works looks like at the moment the weld is created. Sorry it's not a better shot....... |
 |
| And there you have it! A nicely welded trim rivet in the proper location. Once the process was started, the entire job of welding trim rivets to the front and back window flanges took less than 1/2 hour. |
 |
| Much of the sanding of the underside of the roof was easily accomplished with a DA sander since there was no cross bracing in the way. |
 |
| The cross brace details were sanded by hand. |
 |
| Two medium-wet coats of PPG DP40LF epoxy primer has the interior roof and bracing looking very nice and protected better than they ever were from the factory. |
 |
| Primer coverage between the braces and the roof skin is very good as a result of cutting in these areas at the beginning of the priming process. |
 |
| Coverage of the primer was good even in the deeper cavities of the B-pillar bracing. |
 |
| The finished interior surfaces of the new roof look beautiful in a fresh coat of PPG epoxy primer. |

.JPG)


Abso-friggen-lutely amazing! I can't get over how perfectly that roof fits and the plug welds are nothing short of perfect as well. This is the best work you've done to date, IMHO. Then to finish it all off with correct trim studs just screams excellence. Gourmet sheet metal work for sure.
ReplyDeleteThanks very much Alex! I admit the outcome of this particular job has been quite good and I attribute the vast majority of that to an excellent panel to start with. Yes, I worked every edge to optimize the fit, but only a little and then it was pretty text book from there. Hopefully, the rest of the sheet metal work will be equally friendly.
DeleteTop notch work and great detail. So when do we see those final colors on the old girl?
ReplyDeleteMuch appreciated Grant. I have to admit, I have been imagining in great detail how she will look in full makeup. Excited!
DeleteAbsolutely jaw-dropping stunning! You and Ted should open your own shop! I'm with Alex. This is top drawer work. Overhaulin' and Muscle Car can't touch what you've done. You're like a friggin barrel of bourbon...you're getting better with age (or experience as the case may be). I'm looking forward to seeing the roof after the filler work at the joints on the A and C pillars. Can't say enough! Excellent work.
ReplyDeleteWow! I don't know what to say Dennis. Humbled. I have considered many times the thought of doing this for a living. I do enjoy this kind of work THAT much. I'm sorry the trim rivet coverage wasn't what I had hoped for, but I can certainly fill you in on any of the details you might be interested in seeing. Until then, thanks very much for your continued support and kind words.
DeleteSven, the trim rivet coverage was pretty good. Looks like a special tip for the stud gun. Did that come with the rivets or did you "Svenify" the tip?
DeleteDennis,the tip is a genuine Motor Guard part designed specifically for installing the trim rivets No mods on my part! The extension kit is also a Motor Guard shelf item, but I did modify the ground extension collar to work properly on the Mustang flanges.
DeleteSven, another great post! I wish you would put a webcam up in the corner of the garage so we could all tune in on Sat night to see what's going on. What should we call it?
ReplyDeletePruett's Corner?
The Automotive Craftsman?
Saturday Night with Sven?
In the Garage with Sven?
The Shop Floor?
Would beat the $100 a month I pay for cable and 157 channels of garbage...
rj
Howdy RJ and thanks! A webcam is an interesting idea and one I hadn't thought of (obviously!). I have been asked to do "videos" regularly, but don't want to invest the time and eneergy into that at this point. I can't stand bad quality videos and know myself too well to get started down that road unless they could be pro-quality bits. But a webcam might be another idea that could work.
DeleteAnd as for a program title, I'd have to leave my name out of it. Sounds too much like Scandinavian porn with "Sven" in it..... How 'bout "Blood on the Boss" of "50 Shades of Gray Primer"?
Oh my! It seems that you have dealt with a lot of work. But I guess all your effort had paid off. It looks really great. It is stunning.
ReplyDeletePMCInd.com