Over
a month between updates is a rather shameful state, but like most of 2013 it
seems, the month of November was less than kind or accommodating to the Night
Mission project and yours truly.
Beginning
with a significant setback on getting customer powder coating work out the door
at the quality level I maintain, I spent a few week getting caught up before
allowing myself the opportunity to dive back into the Boss. In the middle of all this, I took ill for a
rather extended period of time (which I NEVER do) and the end result was a
rather extended recovery that I did not quite expect. Before I knew it, it was December and I
finally realized that the entire month of November had escaped me with
absolutely nothing to show for it.
Fortunately,
the first week of December allowed me to press through the powder work with a
reasonable level of success and work that looked pretty nice and should please
the customer(s) well. Following this, I
was finally able to get refocused on the Boss project and dove into the final
hole-filling work that would see the firewall void of any extraneous holes and
with a much cleaner, smoother final form than anything Ford has ever made in
production.
Earlier
work in this area allowed me to complete the lower half of the firewall while
the car was still on the rotisserie, making this part of the project much
easier. Now that the car was on the body
cart, it allowed relatively easy access to the upper portion of the firewall to
finally complete this phase of the project without killing myself.
Before
I dive into the latest work, I should apologize that I did not photo-document
this particular update as well as I normally try to do, so please feel free to
comment with any questions or clarifications you may have.
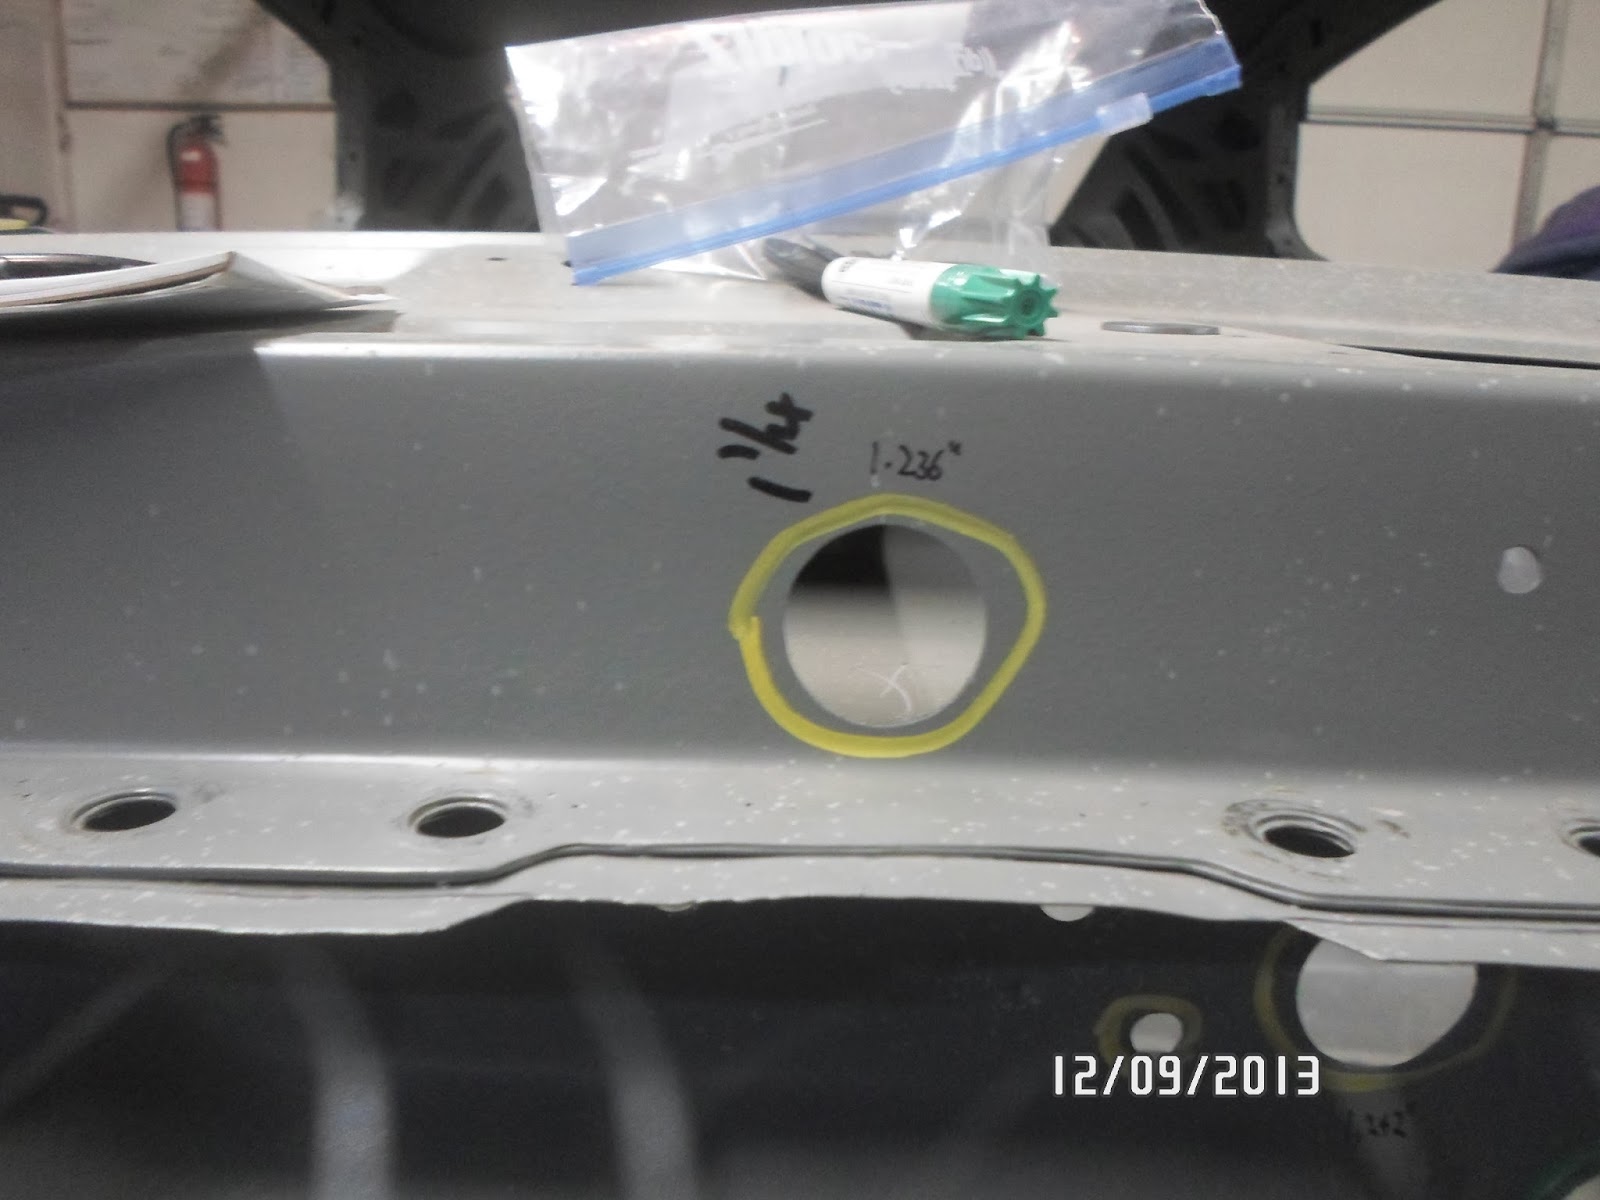
Perhaps
the biggest challenge in this area of the firewall was the number of very large
holes that required filling, some as large as 1.242”! Secondly, since I would be welding these
plugs in using the TIG (GTAW) welding method, the fit of the plugs would have to
be extremely tight and precise.
Therefore, in order to get the final appearance I was after, I would
first have to measure each hole and then machine a sheet metal plug to the exact
spec that each hole required. Sounds
easy, right?
Well,
for anyone who has ever tried machining thin sheet metal without totally
destroying the project or severing an appendage, the idea itself is MUCH easier
than the execution by orders of magnitude.
Complicating the matter even further was that I would not accept a hole
drilled in the middle of the plug that I would just have to weld up later. Yeah……I make this soooooooo easy on myself
sometimes.
Anyway,
though I didn’t document the solution properly here, I machined a “friction
mandrel” that allowed very precise locating of the sheet metal blank in my
lathe chuck, and with gentle cutting passes, allowed me to carefully machine
precise plugs of sheet steel that fit each individual large firewall hole
perfectly and allowed them to be welded into place with a minimum of filler
material required.
A
few nights of tedious and often out-of-position welding exercises and the
entire upper portion of the firewall was filled and smoothed. With only a thin token application of filler
material during the “finish” phase, these modifications will be complete
undetectable and very hard for even the trained Mustang enthusiasts’ eye to
detect. To my observation, the firewall
appearance was far less cluttered up with holes and held the promise that this
subtle modification would look very nice when in final color.
Since
this would be an area that I would revisit at a later date, all that remained
in this phase of work was to treat the bare metal with Prep-and-Etch to ensure
there was no microscopic rust on the surfaces.
Then, a few coats of my ever trusty PPG DP40LF epoxy primer and this phase
of the project was complete.
At
this point, I can hardly wait to get deep into the next project! Once I get the car flipped around in the
shop, I will begin fit and finish work on the rear of the car, starting with
stripping and priming the rear quarters.
Then comes the actual process of fitting the entirety of the components
and panels to the rear of the car, along with all of the custom touches I have
planned. One of the biggest fabrication
projects will be the construction of a tucked and smoothed rear bumper with
hidden mounting bolts. So……..’ol man
Winter may be here for a while, but I have my work plan set and the throttle to
the floor!
 |
| The upper firewall and cowl had some rather large punched holes that needed to be filled with metal. However, the fit of the plug would need to be precise to allow each one to be TIG welded in place. In this shot, you can see that the hole diameter has been marked to allow a plug machined to this exact dimension to be installed and welded using very little filler metal. In the lower end of the frame, you can see some smaller holes that have been marked for size as well. |
 |
| Here is a machined plug fit into place and ready to weld. Note how tight the plug fits the hole. This will allow much easier TIG welding with minimal filler metal and less chance of burning a hole through. |
 |
| Using a weld-cool-weld-cool, etc. method, the plugs are welded into place. In this shot, you can clearly see there were four individual weld paths used, essentially connecting the tack welds that held the plug in place. A few swipes with the sanding disc and this plug will be virtually invisible. |
 |
| With all of the plugs welded into place and finished with the sanding disc, the surrounding areas were feathered with 80 grit paper in preparation for primer. |
 |
| After two coats of trusty PPG DP40LF epoxy primer, the firewall looks remarkably cleaner and simpler. Not a single hole that doesn't have a purpose! |
 |
| Brake booster, steering column and clutch master cylinder mounting holes are all that now populates the driver side corner of the firewall. |
 |
| Heater box, heater hoses, export brace, gas pedal and a single wiring harness access hole make up the middle and passenger side hole population. Nothing more required. |
 |
| The firewall is not ready for action when we return to the engine bay for finish work later on. When this is seam sealed and in body color, it will look fantastic! |


And now I have yet another reason to be envious of your tools. I just wish I had room (and $$) for a good metal lathe. Beautiful and precise work as usual Sven!
ReplyDeleteThanks Alex! I have definitely been very fortunate to have collected some very nice tools over the years (by mostly being in the right place at the right time as opposed to having a stash of disposable cash). Like most, room is always the issue and I am absolutely PACKED in the shop, but we'll manage!
DeleteLooking good as usual, Sven. Small progress is still progress.
ReplyDeleteI appreciate that Grant! And you are so very right about progress. I tend to loose that perspective far too often......
DeleteSven, was wondering what was going on out there. Glad to hear you are on the mend. Firewall looks great! Looking forward to those bumpers!!!
ReplyDeleterj
The mess kinda snuck in on me when I wasn't looking R.J. Sure missed the shop therapy! Thanks as always for the encouragement!
DeleteSmashing bit of craftsmanship there Sven. Absolutely faultless is the only way to describe your work... well done.
ReplyDeleteMany thanks Mike! And very glad to see some new posts on your project as well!
DeleteI feel your pain Sven. I have been waylayed much longer than you. But progress is progress even if there have been gaps in the work.
ReplyDeleteThanks Dennis and I hope all is well or better out your way. Looking forward to your latest work when the time comes!
Delete