The weekend proved to be quite productive after a pretty slow last few weeks. When I left off, I had yet to remove the damaged toe board section from the driver side. I felt a little more thought was required before I cut out the section and the end result was a slight change in how I would cut the inboard side. Once I settled on the method, I marked the general shape on the existing toe board with soapstone and set about making the toe board patch mirror the shape exactly. I have learned it is best to make the patch panel first, and then trace the outline on the original part so you can precisely match the cut to the panel that will be welded in. With this technique applied, I marked the section to be cut, drilled the spot welds that were involved and carefully cut just inside the cut lines with my panel cutter (a.k.a. the wheel of death). The whole process took about 30 minutes and as luck would have it, the panel fit perfectly. Now that both toe board patches are fabricated and the rotted metal cut out, I set them aside until I can sandblast the areas for proper preparation for welding.
Next on the agenda was to remove the remnants of the floor flanges along the rocker boxes and then move on to removing the floor sections that remained at the rear along with the upper torque box covers. Fortunately, the rocker flanges came out without much fuss, leaving the majority of the weekend to be dedicated to removing the rear floor sections.
This rear floor area of a Mustang can be quite tedious to remove because there is a high concentration of spot welds in a relatively small area and the floor flanges that mate to the inner wheel houses actually turn down under the car where the rest of the floor flanges turn up toward the inside of the car. I had my hands full trying to locate each spot weld given so much of the metal was badly rusted making the spot welds almost impossible to see. However, with a little patience and a nice variety of tools at hand, the final section of the old, rusted floor hit the floor with little protest.
I have to admit I was very nervous to uncover the rear subframe and torque box cavities as I was sure they would be destroyed by rust. Well, I WAS WRONG! What I discovered in both locations was clean, solid metal that would require a little massaging to get straight, but no replacement! Luck just doesn’t describe it…….
The joy at this discovery was tempered somewhat by two “downers”. The first I somewhat expected, but was disappointed at the severity. Specifically, the driver side axle tunnel transition area where the floor meets the axle tunnel was much more heavily damaged by rust than I had suspected. The other was relatively minor stress cracks at the rear drive shaft tunnel area. Yet another indication of the abuse this car endured in its earlier life.
I’ll now set off to make a patch panel for the damaged axle tunnel transition and get it ready to weld in and repair the stress cracks at the rear of the tunnel. Somewhere in there I am keeping my finger on the trigger of the sandblast gun with an eye on the weather………COME ON SPRING!
 |
| Removing the rear floor sections is tedious. Lots of spot welds in a small area and some rather difficult to get to with a cutter. Also, I was not confident I would have much to work with under that torque box cover with all of the rust in the floor and the perforations in the cover itself. Was I wrong about that! |
 |
| Other than light surface rust, the underlying metal in the passenger rear floor area was excellent. |
 |
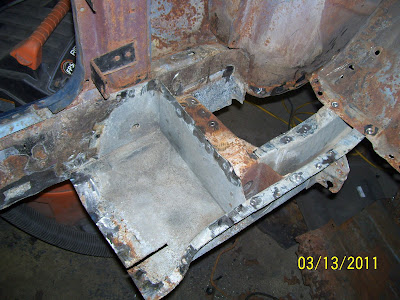
| The driver torque box cover was the better of the two, yet I still wasn't sure what I would find underneath. To my surprise and delight, the torque box was pristine and had almost no rust evident at all! The white powdery surface is actually from the galvanized metal itself and will clean up nicely with a light sand blasting. Both torque boxes will get coated in Zero Rust paint before reassembly. |
 |
| Another surprise was the equally good condition of the driver subframe. |
 |
| Bolstered by the good news on the driver side, I removed the torque box cover on the passenger side with fingers crossed. I was astonished that it too showed to be in equally good shape! |
 |
| And the same for the passenger subframe too! |
 |
| My enthusiasm was tempered a bit by the more extensive damage to the flange just at the transition to the rear axle tunnel. Quite an extensive patch will have to be fabricated to repair this section of the floor pan. |
 |
| My final disappointing discovery was two rather significant stress cracks at the top corners of the driveshaft tunnel where it meets the axle tunnel. I have discovered this is a common stress crack area in cars that were raced heavily or abused. No surprise there...... |


Bummer about your rear transition panel there. Looking forward to seeing how you tackle the transition patch and the toe boards.
ReplyDeleteYeah....not too thrilled with that little detail, but I think I have a solution in mind that you might find interesting. I will definitely be posting the details if I can work it all out in my head.
ReplyDelete