I am happy to report; the left trunk floor is complete! And I would be remiss if I failed to mention that the NPD-supplied trunk floor panel was another excellent piece that required no modification short of trimming the lower edge of the drop-off (which is desirable and expected anyway.
To begin this phase of work, I decided the time was right to install the left rear coilover mounting bracket included in the Heidts 4-link suspension kit I am installing in my car. Under normal circumstances, this mount would be a bit tricky to weld in place with a complete trunk floor. However, since the trunk floor was completely out of the way, I decided to install this mount while the opportunity was ripe.
I started by running the bracket through my blast cabinet to clean off the mill scale and slight surface rust that had developed on the surface. Then, I treated the bracket with a dose of phosphoric acid to clean and etch the metal. After a few hours of dry time, I clamped the bracket into place per the instructions included with the Heidts kit. With all measurements verified, I clamped the bracket solidly into place, saddling the lower frame rail and welded it into place. The lack of a trunk floor panel made welding the inside edges of the bracket quite easy. The job of welding the inner edges of the bracket would have been nearly impossible with the trunk floor in place.
Next came the trial fit of the trunk floor itself. I tend to spend a lot of time getting repair panels to fit as close to perfect as I can. As a pleasant surprise, the trunk floor panel fit amazingly well straight out of the box. I started by dollying the flange that meets the inner wheel house until the fit was just right and the panel would seat firmly against the inner wheel house. Then I aligned the rear of the panel with the frame rail and clamped it into place. After a few small adjustments, I was ready to mark the location of the frame rail flanges on the panel so I could drill spot weld holes where required. At the same time, I clamped and marked the lower quarter flange edge so it could be trimmed for a perfect fit. With the panel marked, I marked each spot weld hole with my trusty paint marker and began punching and drilling the necessary holes.
I treated the bare metal flanges to a thin coat of SEM weld-thru primer (won’t be doing this again) and let it dry. Next time, I will mask the individual spot weld areas to prevent any primer from coating these surfaces. In my experience, the welds are much cleaner and easier to make without any such weld-thru primer in the way. Lesson learned.
Using my painted reference outlines for alignment, I clamped the drilled panel into place and carefully adjusted its position until the fit was perfect. Then, in my usual “clamp-the-hell-out-of-it” fashion, I clamped every flange as much as I could to bring every surface together as tightly as possible. Particular attention was paid to the inner wheel house flange as this proved the most difficult flange to get fitting properly. In the end, every flange fit exceptionally well and I was set to weld.
About an hour later, the left trunk floor panel was fully welded into place and looking like it was made to be there. About another hour and a half of careful grinding, and all the welds were smooth and the repair was complete! This pretty much wraps up the left rear corner repairs on the car and now I will move the whole operation over to the right side for a series of repair operations that will be virtually identical to what I’ve done on the left side. Feels good!
 |
| Heidt's coilover bracket fresh out of the blast cabinet. |
 |
| A good coating of phosphoric acid will be a good prep before installation. |
 |
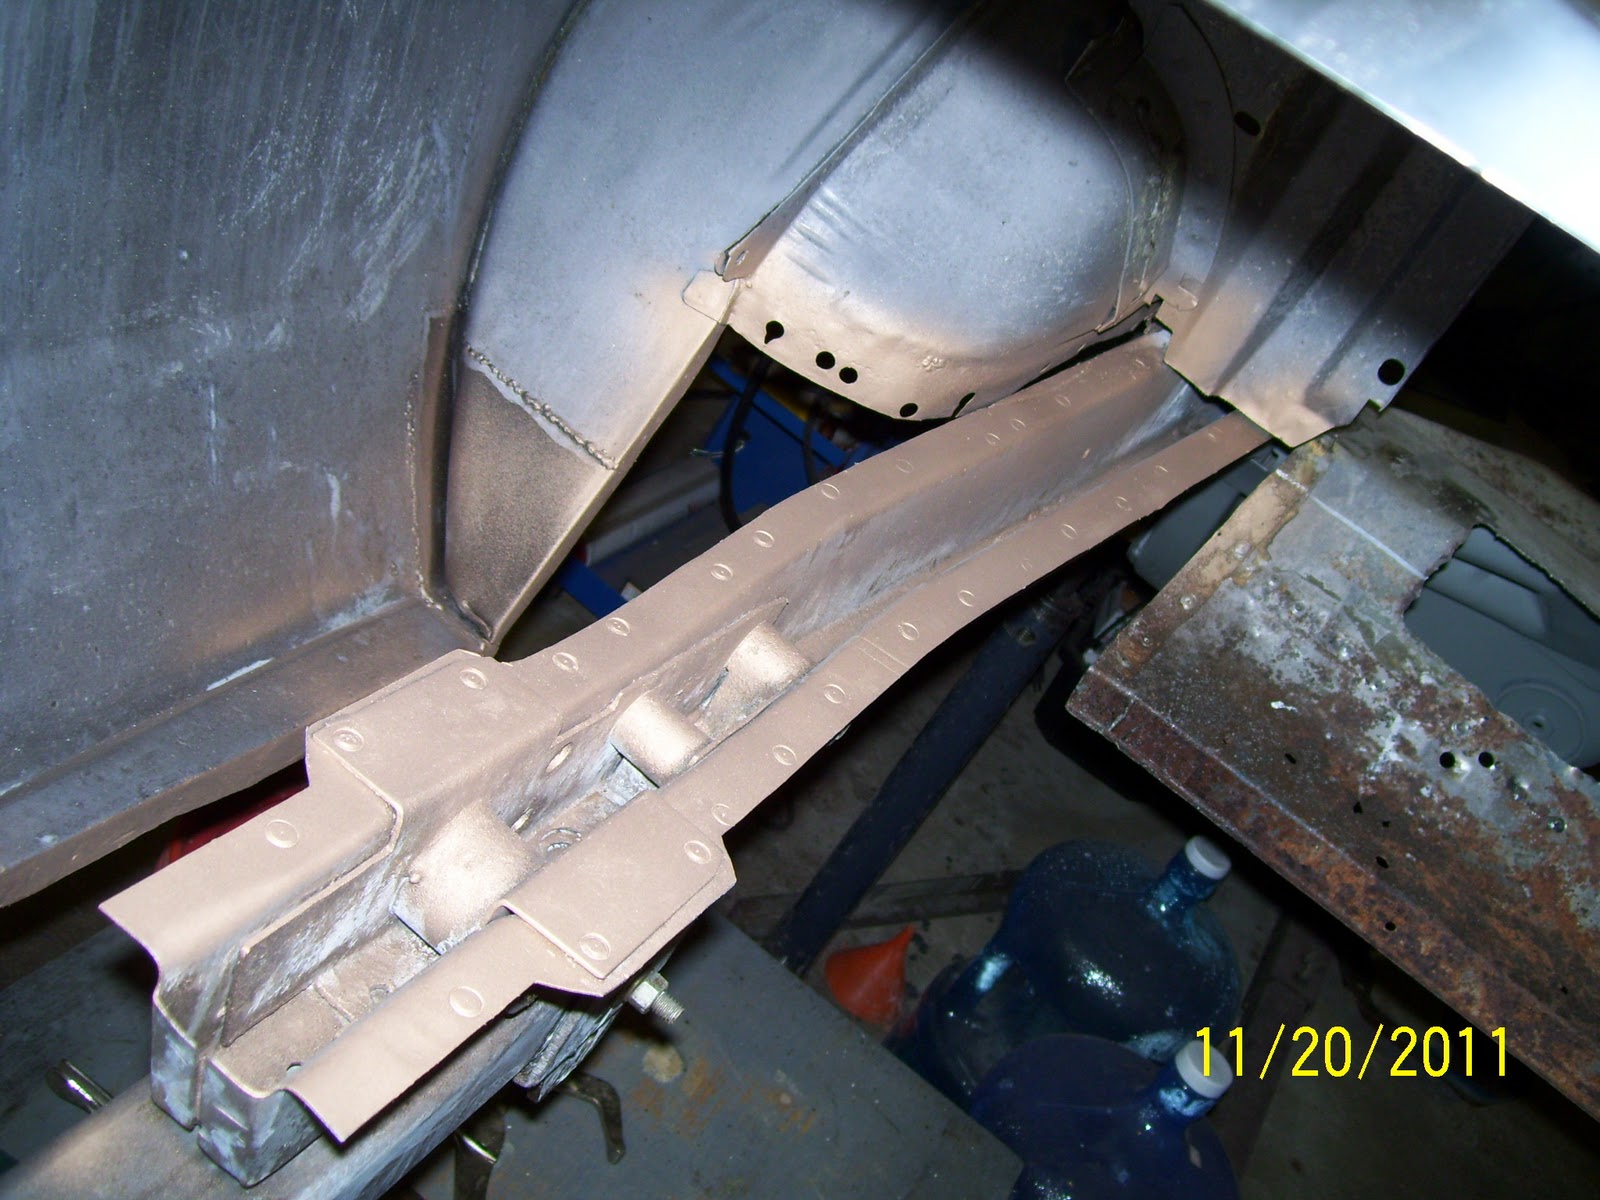
| This gives you an idea how accessible the bracket is without the trunk floor panel in the way. Even these welding clamps would not have been able to be used in this way if the trunk floor was in place. |
 |
| Coilover bracket welded in place on the outboard side. |
 |
| And the inboard welds can be seen here. Note the top weld and the curl around the corner. These welds would simply not have been possible without this kind of access. |
 |
| Fitting the trunk floor panel was remarkably easy. A little flange work at the wheel house and some small adjustments at the rear and the panel fit was excellent. |
 |
| Here, you can see that I traced around every flange to give me reference marks for drilling spot weld holes and to help me realign the panel when it comes time to clamp it in place for final welding. |
 |
| The NPD trunk floors have extra material on the lower drop-off flanges to allow you to fit the panel perfectly to the lower quarter flange shape. If you look closely, you can see this flange has been marked for trimming. |
 |
| I coated the flanges with a light coat of SEM weld-thru primer. I believe it would have been better to mask each spot weld location to leave it in bare metal. |
 |
| With all of the spot weld holes drilled, it was time to fit the panel in place and clamp it securely for welding. |
 |
| I was more than pleased with the fit of the lower drop-off flange to the original quarter panel. This fit is arguably much better than the factory had done originally. |
 |
| The fit around the inner wheel house is critical for good overall panel alignment. Here, the fit is almost perfect. |
 |
| Clamps? You betcha! The use of lots of clamps is key to getting the fit as good as it can be. |
 |
| Here is my collection of clamps located along the lower flange edge. |
 |
| And here is the front flange edge clamped up as well. |
 |
| Plug welds along the top are nice and symmetrical. |
 |
| Lower drop-off flange welded up! |
 |
| Here are the welds securing the inner wheel house to the trunk floor flange. |
 |
| Trunk floor welded and ready for finish grinding. |
 |
| Top frame rail welds ground smooth. |
 |
| Inner fender and coilover bracket welds ground. |
 |
| And finally, the lower drop-off flange welds smoothed up as well. |


Coming along nicely Sven - I see the turkey dinner didn't slow you down much. Left side down - only 1 to go then.
ReplyDeleterj
Thanks RJ! I sure will be glad when all this structural work is complete and "regular" restoration work can begin!
ReplyDeleteNice! That is a good tight fit. You can give a lions-share of the credit to the repro part if you want but your repairs to the car to this point have a lot to do with your success. It's a cascading thing; If you do good work from the beginning, you're rewarded near the end and vice-versa.
ReplyDeleteI really appreciate your kind words Alex. I guess I've been with this 'ol girl so long, I can't help but try to treat her the best I can. LOL!
ReplyDeleteGreat auto restoration skills! You did it well, good job.
ReplyDelete